SQ: Crucible Quests
The Elder Scrolls IV: Oblivion Walkthrough and Guide
The Elder Scrolls IV: Oblivion Guide - Shivering Isles: Side Quests
Crucible Quests
This set of quests is broken down into the following sections. You can use the links below to jump to the part of the page you are interested in.
A Liquid Solution
Brithaur
Final Resting
The Coming Storm
The Museum of Oddities
Ushnar's Terror
The Antipodean Hammer
A Liquid Solution
Enter Sickly Bernice's Taphouse in Crucible and speak to the proprietor, Sickly Bernice. Sickly Bernice really lives up to her name; she is very sick and is apparently going to die. Fortunately, she knows of a cure. She has offered a reward, though so far none have taken up the offer. Ask her about the 'Cure' and agree to help. You are given Bernice's Empty Flask, and Knotty Bramble, where the cure can be found, will be marked on your map.
After speaking to Sickly Bernice, make your way to Knotty Bramble and enter. The place is full of Grummites, so be careful. You're here for a sample of Aquanostrum. Bernice mentioned that it could only be found near a statue that sits in a pool on the lower level of Knotty Bramble. The direct route (the one that your compass initially tries to lead you through) is blocked by a Twisted Root barrier, so you'll have to go all the way around and then enter the 'Knotty Bramble, Hatchery' area.
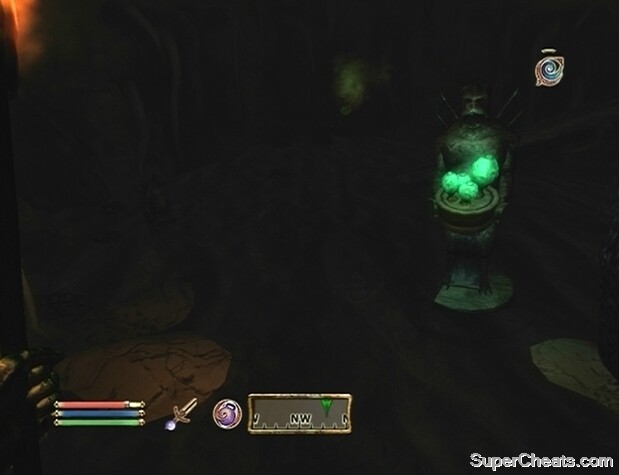 Stand next to the Grummite statue in the pool in the Knotty Bramble Hatchery to fill Sickly Bernice's Flask with Aquanostrum. |
Once in the Hatchery, hop down next into the pool, stand next to the Grummite statue, and the Aquanostrum will be automatically collected. There's no need to go all the way around again on your way out; just exit the Hatchery through the north passage. This passage leads to the Twisted Root door that was blocking your way. On this side, a Pull Pod can be activated to part the roots.
With the Aquanostrum in your inventory, travel back to Sickly Bernice's Taphouse in Crucible and speak to Bernice. Hand over the sample of Aquanostrum by selecting the 'Cure' dialogue option. As a reward, you are given the Circlet of Verdure. This ring adds the Resist Poison and Resist Disease effects, as well as fortifies the health and Endurance attributes.
Brithaur
Locate Earil's Mysteries in Crucible and head inside. Speak to Earil and after turning down his tempting offer, select the 'Brithaur' dialogue option. Earil has a problem with Brithaur, mainly his constantly botched thievery attempts. He wishes for Brithaur to disappear. Don't do anything rash now; locate and speak to Brithaur first.
If Brithaur won't tell you anything, use persuasion or bribery to raise his disposition to at least 70. He'll tell you that the only reason he steals is because he must complete his collection of jewels. He only needs five Flawless Pearls to complete his collection, and then he can stop stealing.
 Bring Brithaur five Flawless Pearls or kill him to put a stop to his thievery. |
You may have already collected five Flawless Pearls during your travels in Cyrodiil. They can also be found all over the Shivering Isles in dungeons, treasure chests, or on dead creatures. You could give Brithaur the five Flawless Pearls, or you can kill him and bring his heart back to Earil as proof of his demise. That, or if your character is the Duke/Duchess of Dementia, you can speak to Kithlan in the House of Dementia about the thievery, and Brithaur will be thrown into the dungeon. Whatever your decision, once Brithaur has been dealt with, return to Earil for a levelled monetary reward.
Final Resting
Look for Hirrus Clutumnus, who can be found wandering the streets of Crucible. Speak to him, and he'll ask you to meet him at sewer grate northeast of the Sheogorath statue after dark. Go to this location a little after 11:00PM and Hirrus should be waiting there for you. Hirrus wants to die, and you'll need to help him with that.
If Hirrus were to kill himself, he would end up as one of the souls on the Hill of Suicides. Your reward for killing Hirrus is the key to his house. He mentions a jewellery box, which is sure to contain something of value. Though Hirrus wants to die, he doesn't want to know that it's coming. He will live his life like he normally would, and you will have to find an opportunity to do the deed so it looks like an accident. Of course, you can cut him down where he stands, but you'll likely get a bounty on your head by doing so.
 Push Hirrus Clutumnus while he stands at the top of the stairs to the door into the Palace Grounds to make the killing look like an accident. |
There is one good opportunity to surprise Hirrus while making the killing look like an accident. While in Crucible, take a look at the local area map and locate the door to the Palace Grounds, which is at the top of a large set of steps in the northeast corner of Crucible. Position yourself at the very top of the stairs in front of the door to the Palace Grounds, and use the wait menu to pass the time to around 10:00AM. Hirrus should be standing right before a very long drop at this time. If he is not there, pass another hour. If he still isn't there, continue to wait in one hour increments until he is.
When Hirrus is standing at the top of the steps, speak to him, and you will be given the option of pushing him. Do so, and then climb down the steps and remove Hirrus Clutumnus' Key from his corpse. Enter his house and take your reward from the jewellery box in the bedroom. You'll find the Ring of Happiness inside, which adds the Feather, Light, Water Walking, and Fortify Personality effects.
Killing Hirrus Clutumnus and making it look like an accident.
The Coming Storm
Locate and enter the Things Found shop in Crucible and speak to Ahjazda inside. She may also be wandering the streets of Bliss or Crucible. She asks that you help her prepare for the coming storm by gathering the last few supplies she needs. She wants you to bring her the Amulet of Disintegration, the Ring of Desiccation, and Calming Pants.
Start with the Ring of Desiccation, which can be found in the Museum of Oddities in Crucible. The Ring of Desiccation is in a Glass Display on the second level of the Museum. You are free to open the Glass Display, but taking the ring is considered stealing. Ensure that Sneak Mode is toggled, and that the sneak icon is faded, before taking the Ring of Desiccation into your inventory.
Next, you'll need to acquire the Calming Pants. Locate and speak to Fimmion, who can be found wandering the streets of Bliss. Ask him about the Calming Pants, and he'll reply with unintelligible babble. Basically, Fimmion loves Sweetrolls. If he's given a Sweetroll, he'll give you the Calming Pants. There is one location that Sweetrolls can for sure be found, but you'll have to travel back to Cyrodiil for that. Once back in Cyrodiil, fast travel to Skingrad and locate and enter Salmo the Baker's House. Upon entering, look to your left to spot many Sweetrolls on the shelves there. Take a Sweetroll from Salmo's house, and then return to the streets of Bliss and trade the Sweetroll for Fimmion's Calming Pants.
 Trade a Sweetroll to Fimmion for the Calming Pants. |
The Amulet of Disintegration is in Milchar. Travel to Milchar and enter. Follow the arrow on your compass into the 'Milchar, Tieras' area. Continue following the arrow to reach the 'Milchar, Chatterhall' area. The Diligence Crux in the middle of this room is frozen shut. The Amulet of Disintegration is within, so you'll have to find a way to open it.
Up the stairs behind the Diligence Crux is a podium burning with a blue flame. Sitting near the flames is the Ritual Torch. You cannot take this torch into your inventory, but you can manipulate it with the LB/L1 button. With the cursor hovering over the Ritual Torch, press and hold LB/L1 to carry it. Use the Ritual Torch to light the three podiums in this room. The lit podiums will extinguish quickly, so you'll have to be quick. With all three podiums lit, run to the Diligence Crux and remove the Amulet of Disintegration.
Using the Ritual Torch to open the Diligence Crux in the Milchar Chatterhall.
With the three requested items in your inventory, return to Ahjazda and speak to her. Give her the three items, and she will teach you the Ahjazda's Paranoia spell. This spell inflicts Frenzy on those in the effect radius.
The Museum of Oddities
Visit the Museum of Oddities in Crucible and speak to the curator, Una Armina. Select the 'Oddities' dialogue option, and she'll tell you that she is always looking for new exhibits for her museum. If you come across any oddities during your time in the Shivering Isles, Una will be willing to purchase them to display in the museum.
The oddities can be found randomly in chests, containers, and on dead monsters are: the Dagger of Friendship, Hound's Tooth Key, Mixing Bowl, Ring of Disrobing, Soul Tomato, and Two-Headed Septim.
Una Armina in the Museum of Oddities in Crucible will purchase anomalies. |
There are also some static oddities; their locations are described below.
Blind Watcher's Eye - Travel to Milchar (a location visited during the main quest) and enter. Proceed down the tunnel, and turn left as soon as you enter the large area. Look for the cluster of Flame Stalks in the distance. A Watcher's Eye is among the Flame Stalks and Screaming Maws.
Deformed Swamp Tentacle - Make your way to the Lost Time Camp in Dementia. The camp is along the side of the road that runs along the Madgod's Boot. Travel down the road south from here. When you come to two boulders, harvest the Swamp Tentacle on the boulder to your right to receive this oddity.
Din's Ashes - Head to the ruins of Ebrocca, north of New Sheoth; it's just above the second 'e' in the 'Jester' text on the world map. Locate the entrance and step inside. Upon entering, move straight, turn right, and continue heading straight until you reach a locked metal door. Unlock the door and enter the room. Move the two leather shields straight ahead and press the small Press Block underneath them. While facing the Press Block, turn left. Proceed through the door to the 'Ebrocca, Crematorium' area. A shelf in this area contains a Gilded Urn that holds Din's Ashes.
Mute Screaming Maw - Travel to Cann, which can be found by traveling west from the 'T' in the 'The Jester's Spine Mountains' text on the world map. Make your way to the 'Cann, The Great Hall' area. Move through this area and enter the 'Cann, Halls of Tranquility.' This area is a bit more complex, so use the local area map to help you find your way around. Locate the door into the 'Cann, Arena' area and go through.
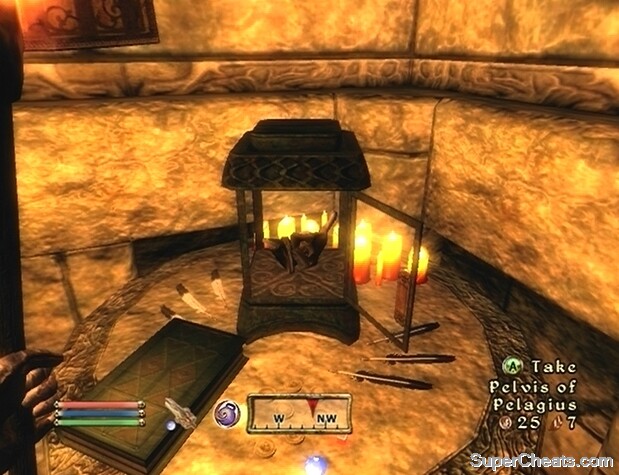 The Pelvis of Pelagius in the Howling Halls Antechamber is one of the static oddities. |
Upon entering the Arena, turn right and follow this tunnel. Keep an eye on your left, and continue traveling down this tunnel until you reach a group of Screaming Maws. The Mute Screaming Maw is behind the root and between the two larger Screaming Maws. No need to backtrack to the entrance; continue down the tunnel and into the 'Cann, Amphitheater' area. In the Amphitheater, move straight and travel down this path until you reach a door back to the Great Hall sector.
Pelvis of Pelagius - In the Howling Halls (a location visited during the main quest), find the door into the 'Howling Halls, Antechamber' area. Look on the table to the right of this door in the corner of the room. There's a display case on this table that holds the Pelvis of Pelagius.
Ushnar's Terror
Note: If you are playing as a Khajiit, you cannot undertake this particular quest.
Ushnar gro-Shadborgob can be found either wandering the streets of Crucible or in the Museum of Oddities. Where Ushnar is, Bhisha the beggar will not be too far behind. Speak to Ushnar. He really, really hates cats, and therefore walks the streets of Crucible with a dog by his side. Unfortunately for him, Bhisha the Khajiit loves dogs, and has decided to follow Ushnar's dog around. Ushnar would like Bhisha to leave Crucible—permanently. He asks you to make it happen.
 Find a way to rid Ushnar gro-Shadborgob of Bhisha. |
Permanently ridding Crucible of Bhisha does not necessarily mean killing him. Find and speak to Bhisha, and select the 'Ushnar gro-Shadborgob' dialogue option. Give him 100 gold and he will move to Bliss. It's as simple as that; there's no need to get your hands dirty.
Once Bhisha has agreed to leave Crucible, inform Ushnar that Bhisha is gone. As thanks, Ushnar will give you one of his old dogs. The Skinned Hound that Ushnar sends will follow you around until you lose it or until it is killed.
The Antipodean Hammer
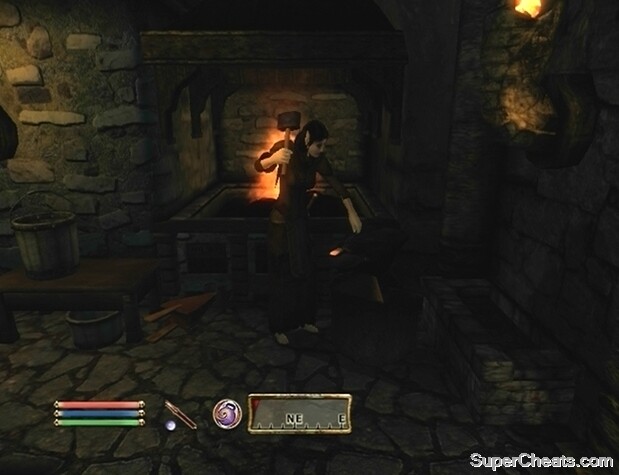
There are two blacksmiths in New Sheoth: one in Crucible, and the other in Bliss. During your travels in the Shivering Isles, you'll undoubtedly encounter Amber Ore and Madness Ore. These two types of ore can be brought to the blacksmiths in New Sheoth who will fashion armour and weapons out of them. Also, items called Matrices can be used to add a magic property to the weapons and armour that are forged. A Matrix is specific to a weapon or piece of armour (ex., a 'Madness Gauntlets Matrix').
Cutter of Cutter's Weapons can forge Madness Armor and weapons using Madness Ore. |
The blacksmith of Crucible, Cutter, can be found in Cutter's Weapons. Cutter requires Madness Ore to forge weapons and armour. Madness Ore can be found in Madness Ore Deposits in certain dungeons (usually on the Crucible side), and is often found on Grummites as well. The Madness armour that Cutter forges is a Heavy Armor type. The quality of the forged armour and weapons will depend on your character's level.
How i'll pick up ritual torch ....by presing L1 starts punching