Machine List 01-13
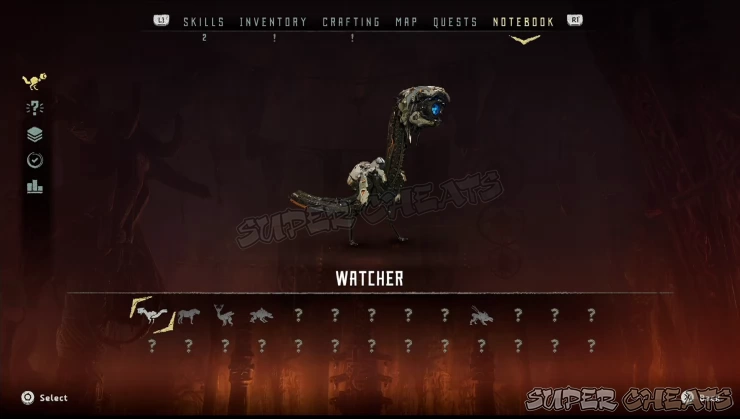
As you encounter new machines, they'll be automatically added to your Notebook > Machine Catalogue after using your Focus to scan them. You can consult this list later on if you need to review their weak spots, Overrides, and drops.
Click on the images to enlarge them.
01. Watcher
One of the very common machines and what you’ll encounter most of the time. They’re mainly scouts for machine herds and should taken out first if they’re part of a greater group of machines. They’re quite easy to kill and lure so make sure not to waste your valuable tripwires and traps on them.
02. Strider
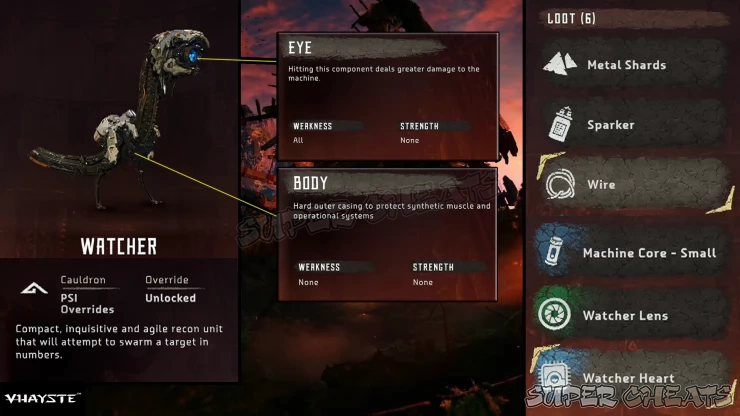
One of the earliest machines that you can mount and use as a means of transportation. They’re quite oblivious of their surroundings which makes it easy to approach them from behind to either override them or destroy them instantly using a Silent Strike.
03. Grazer
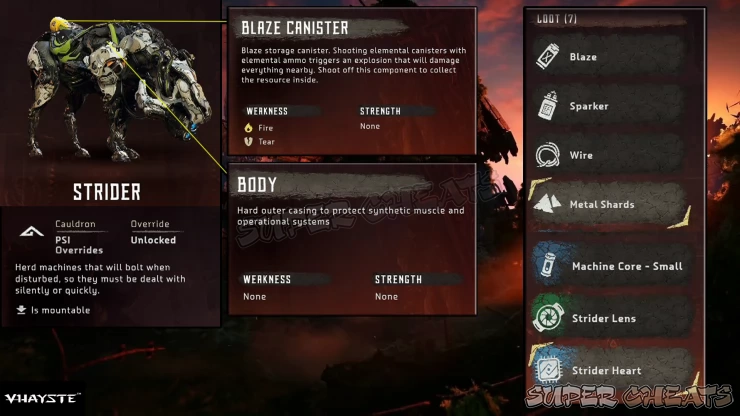
Grazers are normally part of a large herd with usually a couple of watchers nearby. While normally docile and gets easily spooked, they can be hard to deal with early one because of their immediate numbers. Try to deal with them individually first using stealth or better yet, lay down traps since they’re fond of running away and/or charging.
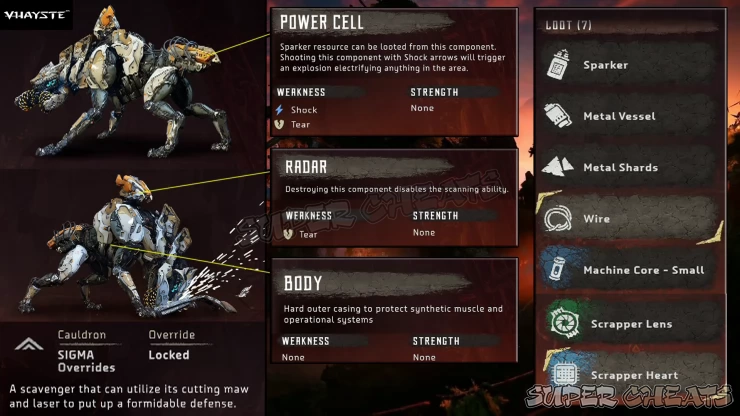
04. Scrapper
These scavengers will often appear in groups of three when there are fallen machines nearby, especially those unlooted machines you just defeated. The power cells of this machine is very vulnerable to shock arrows which can severely damage them or even destroy them instantly in some instances. It's one of the lower level machines that have the Scan ability, which will reveal your location near them even when you're hiding in the bushes. They're quite a handful when in groups but if you have upgraded your Spear skills, they’re quite easy to knock down and get finished off by critical hits.
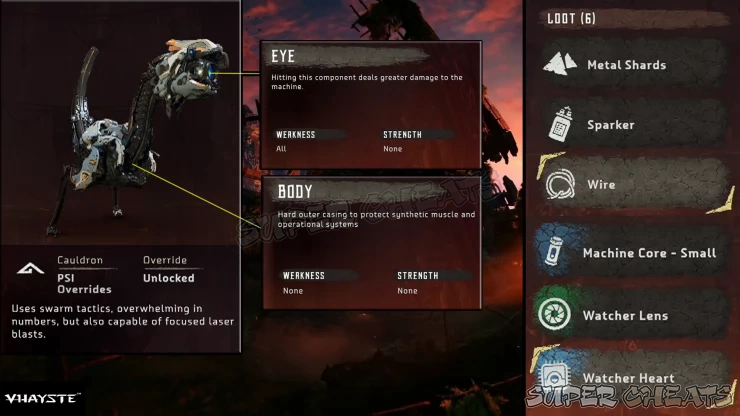
05. Red Eye Watcher
Similar to an ordinary watcher in build but more aggressive and capable using focused laser blasts. They often appear in swarms in an attempt to outnumber and flank their targets. Their eyes are still their main weakness and their low HP pool makes it easier to destroy them using well-placed arrow shots or heavy spear attacks.
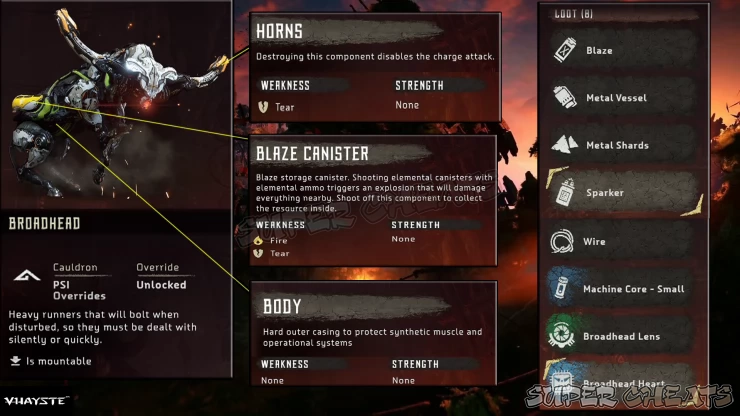
06. Broadhead
A bull-looking machine that aggressively charges to its target when disturbed. Similar to striders and other grazing machines, you can easily sneak behind them when they’re grazing to deliver a Silent Strike and destroy them quickly. When spooked, they’ll usually run away but when enraged, they’ll often attack in groups. Aside from their horns, they can also do powerful kicks that can send you flying and deal considerable damage.
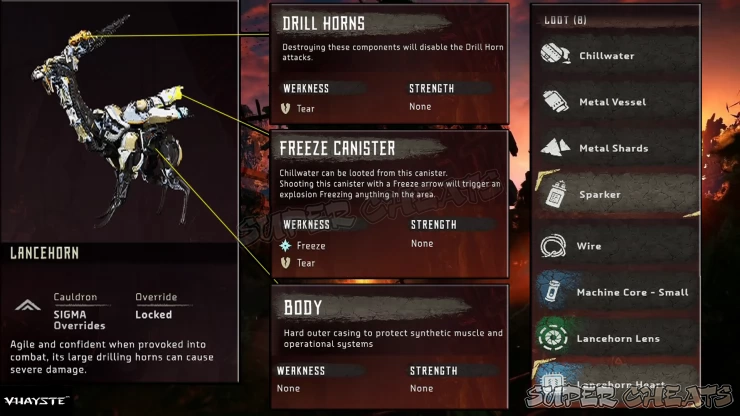
07. Lancehorn
This deer-looking machine is also a “grazer” and can be easily backstabbed when it’s busy grazing on the ground. However, similar to the Broadhead, this machine can be aggressive and will charge towards its targets using its very damaging horns.
08. Longleg
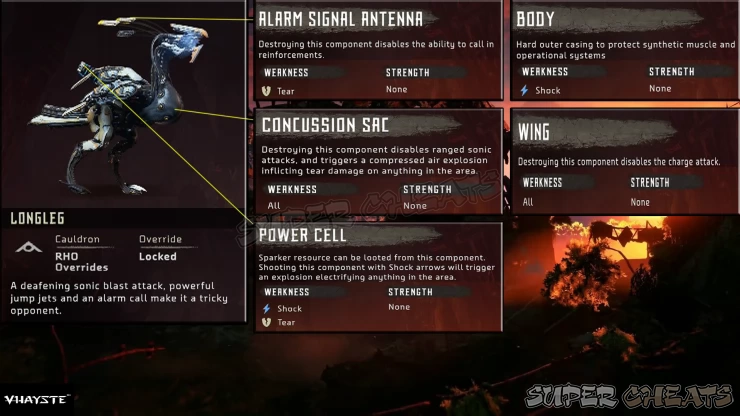
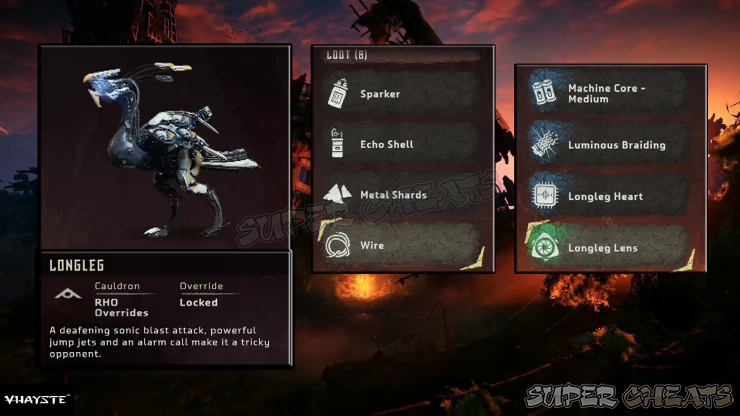
This aggressive ostrich-like machine is like a more dangerous watcher with the capability to call in reinforcements. That said, prioritize taking out its antenna on its head to stop it from calling for help. If you can’t, then concentrate on taking out the Concussion Sac on its belly to disable its Sonic Attacks and cause a compressed air explosion that can take tear damage in an area and take off several components of nearby machines at once. You should also note that this is an aggressive charger, which makes it quite an easy prey to tripwires and traps.
09. Trampler
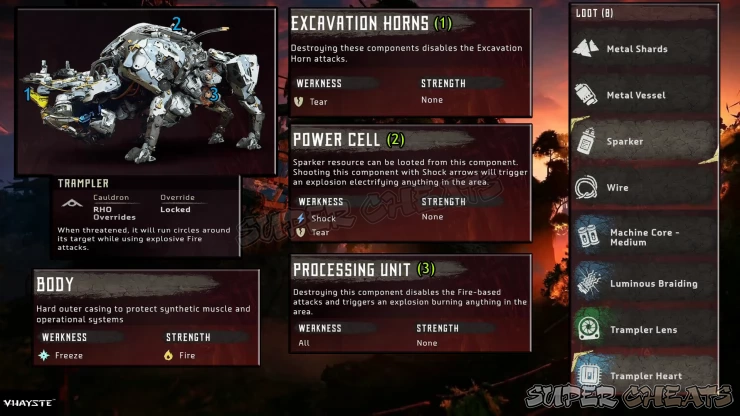
These bison-like machines are often seen in herds of 4 or 5 machines and will mostly mind their own business digging on the ground. However, unlike other “herbivore” machines that usually run away after getting spooked, Tramplers are territorial and quite aggressive. Alerting one will usually result dragging the other members of the herd to you. When attacking, they’ll usually do a combination of charging attacks with their horns and ranged fire attacks. There’s also an AoE (area of effect) version of their fire attacks, making them more dangerous especially when they’re circling around you. Tripwires and traps are very effective against them, since their Processing Unit is a large component under their bellies. When fighting them in groups, always keep on the move, leave traps/tripwires and lure them towards it.
10. Sawtooth
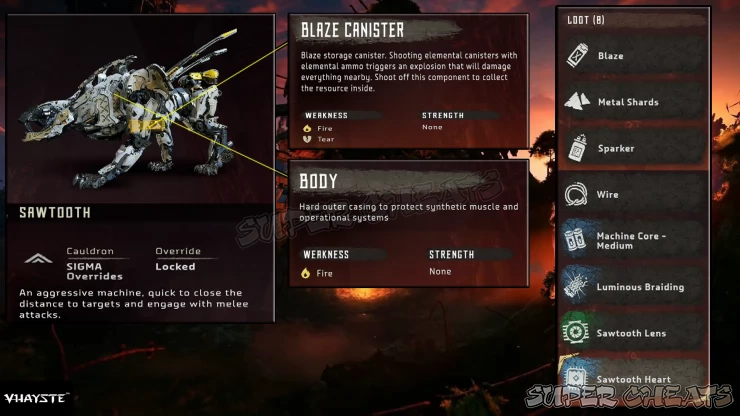
This is the first combat machine you’ll encounter. Fast, agile, and deadly, it will be tricky to fight this machine in melee combat. However, it’s quite vulnerable to fire. It’s body and blaze canister under it are quite susceptible to blast and explosives, and will even make the sawtooth panic. You can use this chance to get some free shots and when the fire has died, you can repeat the process again until you can finish them beast machine off.
11. Shell-Walker
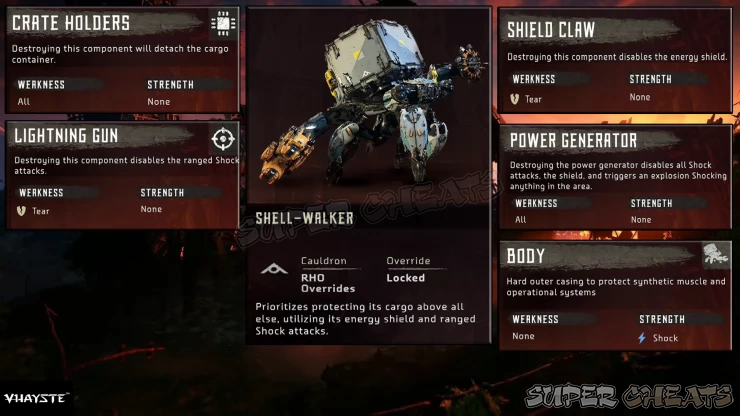
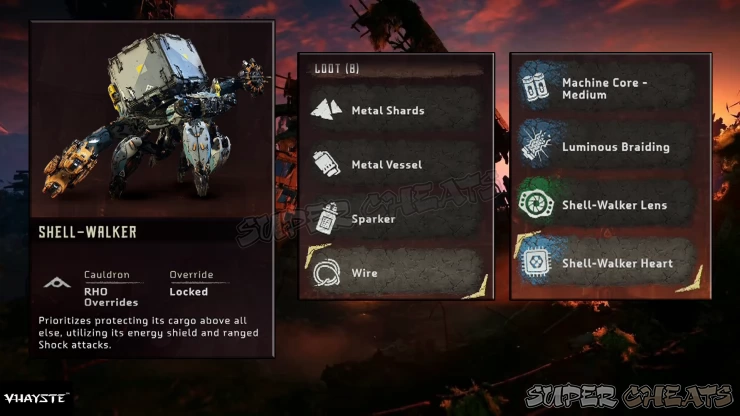
Bulky and slow, these guys tend to fight more defensively using its shield and shoot electric projectiles at a distance. It’s also quite hard to hit its weak spot, the power generator, since it is placed conveniently under its body. Traps and tripwires are perfect against them. Other than that, this machine can’t keep its shield up all the time so use those chances to shoot its weak spots.
12. Fire Bellowback
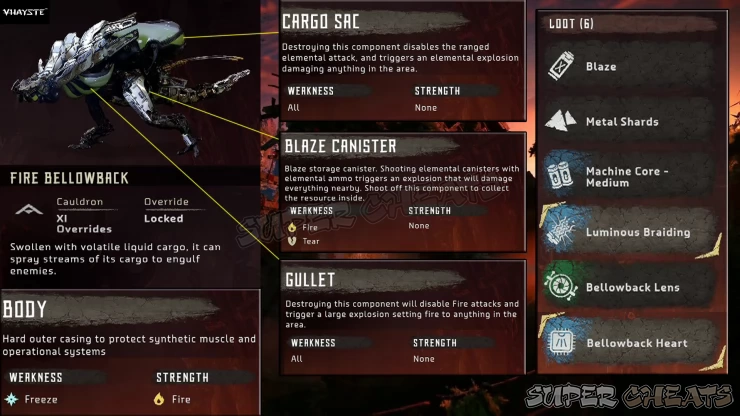
This variant of the lumbering Bellowback can use ranged fire attacks or a short-ranged area-of-effect attack around it. It’s annoying that the spot where its projectiles landed tend to burn for a few seconds before dying which can cause extra burn damage to you if you’re not careful. It’s also tricky since while its blaze canister is its main weakness and susceptible to fire, its main body is the other way around; it’s weak to ice and strong against fire. Blast tripwires, traps, and slingshots that can lob freeze bombs is effective against it. Otherwise, you’ll have to your Sharpshot Bow’s Tearblast Arrows and hope that its components get shredded for extra damage. Also, its gullet are weak against all types of ammo so you can keep targeting that just in case.
13. Freeze Bellowback
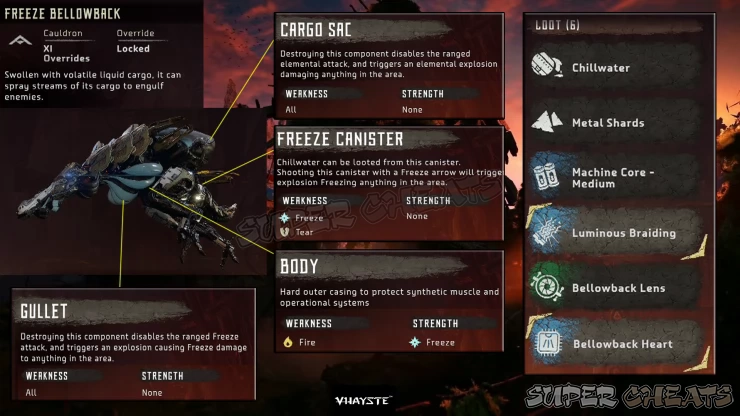
This variant has the same exact body type and parts as its Fire counterpart but obviously utilizing Freeze attacks instead of fire. The same tactic applies; just make sure to use the appropriate elemental ammo against it.
Anything missing from this guide?
ASK A QUESTION for Horizon Zero Dawn
Comments for Machine List 01-13
Add a comment
Please log in above or sign up for free to post comments- Basics
- Main Quests
- Side Quests
- Errands
- Skills
- Collectibles - Ancient Vessels
- Collectibles - Banuk Figures
- Collectibles - Metal Flowers
- Collectibles - Vantage Points
- Tallnecks
- Bandit Camps
- Hunting Grounds
- Cauldrons
- Inventory and Crafting
- Machine Catalogue
- Extras
 Join us on Discord
