Chapter 5: Inside the Mountain 1
Thank you for printing this page from www.SuperCheats.com.
Remember to come back to check for updates to this guide and much more content for God of War (PS4 - 2018)
Follow this guide to hear about updates
Last Updated:
After dispelling the Black Breath, proceed in climbing up the steep rocky cliff of the mountain. After reaching the mountain entrance, you’ll find remnants of the black breath. Use the light to dispel it and continue pushing forth to reveal the entrance. The other path connected to the zipline has a coffin covered by that red sap so it’s safe to ignore it for now and just enter through the door.

Once inside, you’ll see a giant with a deer statue. Have Atreus examine the sand bowl to get a clue. There’s also a missing light crystal to the left. To find the crystal, enter the tunnel to the left. As soon as you enter, two speed draugrs will ambush you so defeat them.

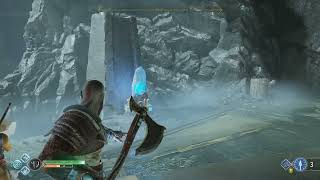
The tunnel is blocked by a shock crystal. This tunnel is actually a shortcut for your return trip later on as part of the story, and with the capability to destroy them. Ignore them for now then find the second light crystal sitting on top of a wooden beam. Throw your axe at the beam to destroy it and bring the crystal down.

Pick up the crystal and insert it to the empty slot. Then, have Atreus light it up to activate the unlit runes on the floor. Next, grab the handle and pull it all the way to the back to complete the arrangement of the runes on the floor. Have Atreus read it to get the answer to the sandbowl riddle and solve it.

Next, enter the newly opened doorway. This portion of the cave is too dark so you’ll have to order Atreus to light up the light crystal torches. Light the first one then drop off the ledge. Vault over the obstacle and continue inside the tunnel. Light the next torch to illuminate the way then crawl under the hole to reach the next part of the tunnel. Before continuing, turn to the left and light up the crystal there. Go upstairs and light up another crystal beside the coffin. Open it to loot the Scaled Bracers of Focus (rare wrist armor).

Backtrack to the main path and lift the fallen stone pillar along the way to pass through. Defeat the revenant and the nightmares that will appear along the way. Take note of the spinners’ location since they’ll be need to unlock the nornir chest nearby. For the meantime, climb up the ledge and defeat the enemies ahead. Activating the chunk of light crystals on the ground will instantly fill the stun gauge of nearby enemies, allowing you to instantly execute them.

After clearing the area, there are points of interest that you can check out before moving forward. First, destroy the wooden boards covering the large light crystal. Activate it to create a light bridge leading to the nornir chest. Cross the bridge and light up the torch beside the nornir chest. The runes needed to unlock the chest is written in blood on the wall.


To unlock it, you have to throw your axe to the rune spinners to match the symbols as shown below. Loot the Horn of Blood Mead from it.


After looting the chest, find the light crystal you can carry beside the light bridge. Pick it up and carry it across the stone bridge, leading to the dark room with an inactive lore marker. Be careful of the draugrs that will appear on your way to and back there. Place the crystal on the slot then activate it with a light arrow to activate the lore marker. Have Atreus read it to add it to the journal.


Backtrack to the main path and peer over the edge of the ledge near the waterfalls to find a coffin in a separate stone platform. There’s another light crystal under the wooden boards across it. Activate it to create another light bridge. Loot the Symbol of Menace and Solid Svartalheim Steel from the coffin then return to the main path.

Next before following the journey marker, enter the room with a broken door and destroy the objects by the wall facing the door. This will reveal a knight corpse inside with this artifact. (Which starts the new artifact set “Bottoms Up”


Continue along the main path and crawl under the tunnel with a lot of bodies. Destroy the wooden barricade at the end to get out. Next, have Atreus read the lore marker behind the deer-head statue. Loot the wooden chest in front of it as well. Next, destroy the damaged wooden door and have Atreus examine the lore scroll on the floor. Light up the torch inside as well. Get out of the room then light the other torch by the door if you want then go through it.

Defeat the draugrs in the next path. There’s also another lore marker beside the blocked tunnel you saw earlier but you’ll need a light crystal to activate it so take note of its location for now and continue onward.

At the end of the path, you’ll reach a steep wooden ledge. Before climbing it, you should see a coffin behind the wooden boards. Go through the narrow tunnel beside it to reach the coffin in the other side. Loot the Solid Svartalheim Steel from it then backtrack to the main path.

Light up the torch then scale the rock wall and have Atreus read the lore marker along the way. Continue forth until you can jump to the other ledge. Before moving forward, make sure to kick the chains from the chain holder behind you for a quicker way down (and up when you return).

Continue along the path and you’ll find another chain holder. Clear the objects and kick the chain down so you can reach the wooden chest below. Climb back up and continue to the large wooden door. Interact with the gate handle to open the gate and reach an enormous cavern leading up to the summit.


Anything missing from this guide?
ASK A QUESTION for God of War (PS4 - 2018)
Comments for Chapter 5: Inside the Mountain 1
Add a comment
Please log in above or sign up for free to post commentsNo comments yet. Tell us what you think to be the first.
Table of ContentsClose
- Basics
- The Journey
- Favors - Dwarves
- Favors - Wayward Spirits
- Favors - Free Dragons
- Favors - Valkyries
- Labors
- Artifacts
- Nornir Chests
- Jotnar Shrines
- Treasure Maps
- Alfheim Locations
- Lake of Nine Locations
- Bosses
- Valkyries
- Muspelheim Trials
Guide Updates
Get notified of updates to this guide
Many of our guides get updated with additional information. To get an email when this guide is updated click below.
 Join us on Discord
Click to close