Trading Cards Locations
Thank you for printing this page from www.SuperCheats.com.Remember to come back to check for updates to this guide and much more content for The Last of Us 2
Last Updated:

In the original Last of Us, there are collectibles in the form of a fictional comic book series, Savage Starlight. With the sequel, there’s no surprise that the developers will include a ton of collectibles for players to hunt and find. One of the many collectibles are Trading Cards. These small pieces of illustrated cardboard can hide in plain sight and you normally won’t be able to spot them from a distance without using High Contrast mode or getting near enough to see the pick-up prompt. You can also consider turning on the Enhanced Listening Mode (in the Navigation and Traversal section in the Options menu) which will enable you to use mapped buttons to send a ping to find nearby collectibles in your immediate location.
In this page, we will list all Trading Card locations divided per chapter. You can also check out our other dedicated pages for the other collectibles in the game. Finding all trading cards in the game will unlock the "Master Set" Trophy.
New to the game? Don’t forget to check out our Beginner’s Guide for a quickstart!
Jackson
In Waking Up, shortly after starting the game continue following Jesse until you reach the street. Keep hugging the left walkway and once you’ve reached the corner (where the cart with the logs left off), turn left and pick up the Seismicayla trading card.

After the cutscene in the bar and receiving your “bigot sandwich”, Jesse and Maria will leave the bar. Don’t follow them yet; turn to the left and find the Keene Twins trading card on top of the barrel by the dartboard.


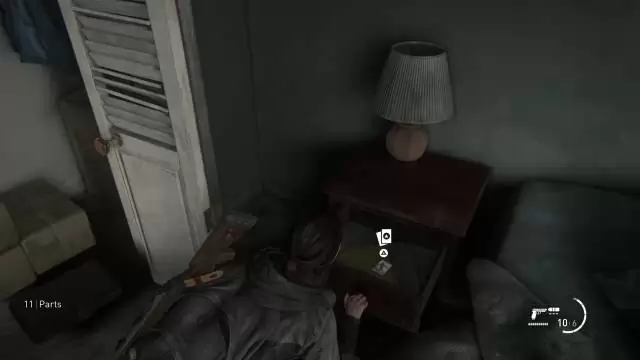
After leaving the first lookout with Dina, you'll come across a small suburban neighborhood. Find a blue-painted house with a pickup truck in front. You can climb on that truck and use it to reach the second floor of the house. If Dina climbed first, she’ll pick up the trading card from the shelf and hand it over to you. Obtain the Tesseracter trading card. Check the desk for some rifle ammo then pick up the supplements on the drawer.


Once inside The Library and breaking the glass window to get further in. Find a small utility room in the corner of the room with the stuffed giraffe (Journal Entry). There you’ll find the Laurent Foucault, CEO Spark trading card on the table.

Seattle: Day 1
At the start of the chapter, continue riding with Dina until you reach some abandoned cars and a waiting shed. Dismount in front of the shed to get the Motivator trading card from the billboard.
Continue riding along the straightforward path until you reach the road with lots of abandoned vehicles. The path to the right has nothing but a broken bridge/dead end so head west instead. Continue along the road until you reach a construction office to the left. Enter the office and loot the alcohol from the drawer near the entrance. Get the The Starfire Kids trading card from the bulletin board.

After climbing up the broken wall in The Gate, continue to the watchtower. Go up the ladder to reach watchtower itself then pick up the Chessmaster trading card on the table. You can also find the Artifact Isaac's Orders on the crate to the right.

After successfully climbing over the wall and going down, you'll have to circle around the FEDRA office to turn on the generator. After powering up the generator, carry the cable then throw it over the roof of the office. Circle around and use the cable as a rope to climb up to the roof. On the roof, you’ll find a lot of supplies, the Oozer Trading Card and the Rooftop Note Artifact.


Downtown, Seattle
Referring to your map, this location is two squares north of Westlake Bank. Head to the building ruins with some upper floors intact, as shown below. Go upstairs and smash the glass. Go to the ledge and jump across the gap to circle around to reach the other set of stairs.

You'll find some supply crates there. Loot the parts on the desk. Open the crate to the left to get more parts and the Doctor Uckmann trading card. Loot the other crate to get some supplements. That's all loot you need to get in this area and Ellie will mark this location complete.

The next card is located inside the Valiant Music Shop, located in the corner of 5th and Marion as shown on the map below. Once inside, open the drawer behind the counter in the first floor to get the Das Wort trading card.


This card is located in Ruston Coffee, located in the corner of 5th ave and Spring St (see the map below). Smash the window then grab the various supplies inside. The card is located inside the drawer in front of the small oven further back in the shop to get the Big Blue Trading Card.


This card is located inside Gate West 2. In the corner of Madison St and 5th avenue, just a few steps away from the Courthouse, you'll find a gate with the sign, "Gate West 2". Head towards it and you'll find a slightly opened gate where you can squeeze through.


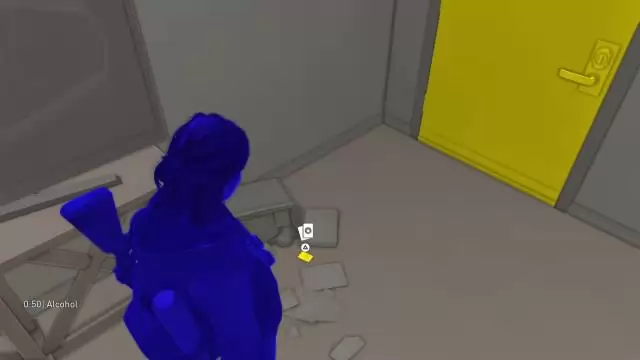
Once inside, turn to the right to find a safe. Use the code 0451 to open the safe. Inside, you'll find a good amount of supplements, parts, health kit, shotgun ammo, and the Flo Trading Card.

Severena Hotel
Continue to the second floor of the hotel where you'll find a body by the door. Enter that room and continue to the adjacent room. Pull the drawer between the two beds to find the Know It All Trading Card.
Eastbrook Elementary
After escaping the school and jumping over to the adjacent apartment building, vault over the toppled bed by the kitchen and enter the bedroom to the right where you can find more supplies and parts in the closet. Pull the drawer beside the bed to get the Cardio Trading Card.
Capitol Hill
After jumping down to the street level, continue to the two apartment buildings. Your landmark is the drained pool on the leftmost side. Each of the buildings has a collectible so you can check them in any order. First, let’s enter Apartment 3. Head inside and open the drawer by the sofa to get the Kinnard, Esq. Trading Card. Loot the parts and supplies in the kitchen. The stairs are blocked so you’re done in this location for now.
In the actual Capitol Inn motel, enter the next open room then pick up the supplements in the bathroom. Climb out of the bathroom window then look for another open bathroom window. Vault inside then pick up the materials and the Rockafella Trading Card on the floor near the door. You’re done now in this area so head to the second floor and vault over the balcony to reach the streets below.
From the gas station, enter the bookstore just across the street then head to the coffee house section of the same building. Open the door that leads you back to the corridor with the restrooms and check the corner to find the Doctor Stem Trading Card on top of a chest with the gramophone. Leave the bookstore afterward.
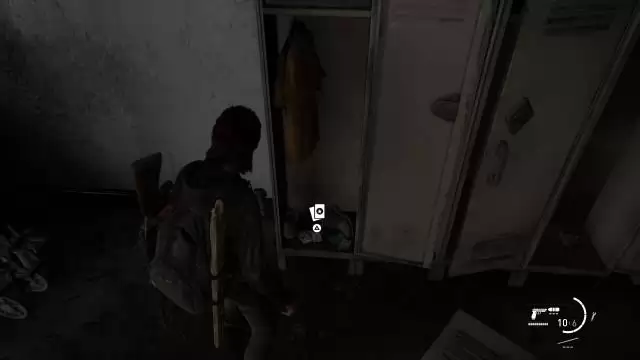
From the Bagel Bros building, turn around and walk a bit to find the supermarket. There’s a lot of supplies inside but there are infected as well so take them out silently, including the clicker that’s patrolling the back room. Head to the back room, pick up the parts on the shelf, then open the lockers to find a health kit, and grab the Sergeant Frost Trading Card. Enter the storage room nearby to get a Lead Pipe and more materials.
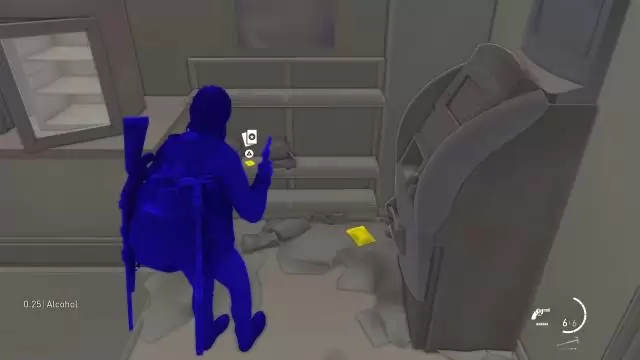
After passing through the Bagel Bros building and jumping over to the next gate, continue until you see a clicker getting blown apart by a trip mine. Enter the liquor store to the left then loot the supplies inside, including the Candelabra Trading Card on a shelf beside the ATM.
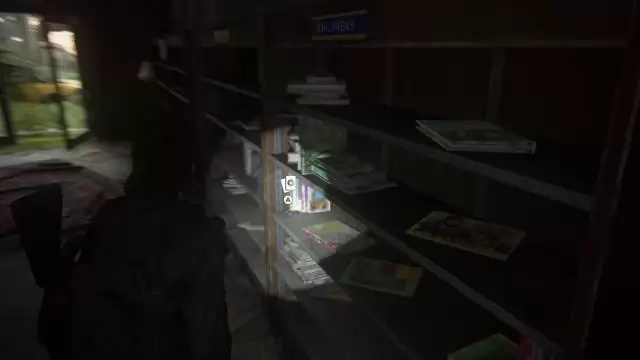
From the stream, continue until you reach a grassy road full of tripmines. There's a gym to the right with a Workbench and an Artifact. Enter the thrift store just across the gym. Watch out for the trip mines then check the Children’s books in the corner to find a Bizarrebra Trading Card.
Channel 13
After reaching the news studio where there are several hanging bodies, go to the second floor and find the balcony where you have to shimmy along the curved metal beam.
Enter through the broken window then head to the hallway and enter the small office near the elevator to find the Kimimela Trading Card on the desk.

The Tunnels
Pass through the train cars in the first area then continue forth until you see an open doorway with red light. Go past that door and find the The Imp Trading Card lodged between the rocks under the derailed train car, as shown below.
After encountering the first set of shamblers and clearing that room, you'll find yourself in a long corridor. Follow the long corridor then enter the door that you can open on the right side. Inside, you’ll find a smaller office inside a cage. The cage’s gate is locked on the other side so loot the drawers to the right then find the opening hidden behind some tables in the corner. Crawl inside the cage and loot more materials, including the Dr. Daniela Star Trading Card on the desk beside the PC. Open The Gate then open the other door to reach the break room.


After leaving the maintenance tunnel, you'll reach another section of the subway where there's a pile-up of train cars. Go through the first one then squeeze through the narrow gap. Turn to the left and look for a train car that’s turned on its side. There should be a small gap by the water.

Crawl inside the train car to find a health kit, ammo, and the Bastet Trading Card by the open luggage. Crawl out of the train car afterward.

The Theater
After arriving at the theater, head towards the round counter in the middle of the room with several glass displays. Shatter the rightmost glass cabinet to find the Mortem Trading Card at the bottom.
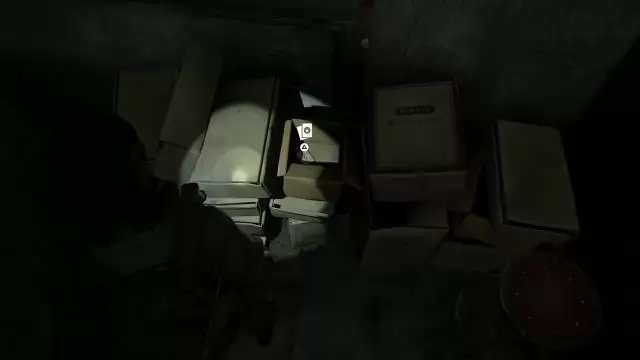
In the second floor, continue past the bar until you reach a dead end. Find the Beyond Trading Card under an overturned sofa, beside the pile of cardboard boxes.

The Birthday Gift
While in the main dinosaur exhibit, head to the bathroom to the right then pick up the Nighthawk Trading Card on the bench, as shown below.
After swimming across a pool, you’ll be inside another section of the museum. Continue until you reach the statue of a moose surrounded by wolves. From there, look to the right to find the Saura Trading Card under the bench as shown below.

Seattle: Day 2
Hillcrest
As soon as you arrive in the area, turn around and drop down to the sinkhole. Break the rear window of the pickup truck then grab the Wachumero Trading Card.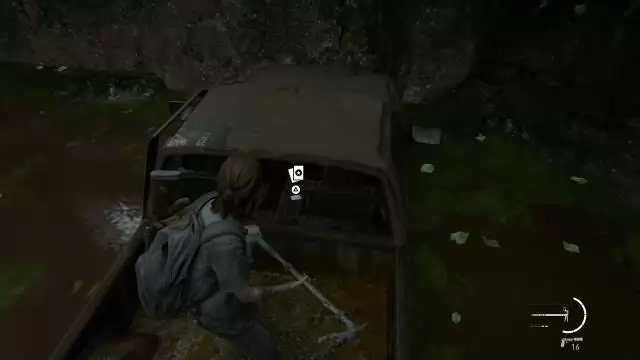
After exploring and looting the establishments in the first area, climb over the toppled truck on the other end of the street to reach the next area. After climbing the truck, head to the left through a narrow path by the bushes. You should find a small store here that you can reach by climbing over the dumpster. Break the glass and enter the store. Find the Sahir the Sorcerer Trading Card inside one of the cardboard boxes there.
After your first encounter with the WLF Patrol with dogs, you'll come across a back alley where you'll have to push a dumpster to reach the rooftop and drop inside a bicycle shop. Search for a bike parked in the corner and pick up the Naledi the Youthful Trading Card stuck in its rear wheel.

After taking the long concrete stairs, you'll hear a muffled explosion and smoke emanating from a short distance. Continue forth until you climb over a fence that will take you to a house's backyard with a playhouse. Look at the playhouse's window and pick up the Brainstorm Trading Card by the toy’s window.


Shortly after getting the Bow weapon from Boris' house, head to the last house in the street, where the sharpshooter is located. Head to the second floor and check the bathroom to get some supplements. Check under the bed in the bedroom close to the balcony to find the Reverb Trading Card.

Finding Strings
While on horseback, continue following the trail until you reach the hotel. Turn to the left to see the sign of the music store then climb over the small trailer to find a collapsed section of the road with a small car in the hole. Approach the other side of the car to find the Austringer Trading Card on the back seat.
The Seraphites
Once you've reached the convenience store at the start of the mission, you’ll find the Randy Styles Trading Card on the shelf near the cashier in the corner, as shown below.
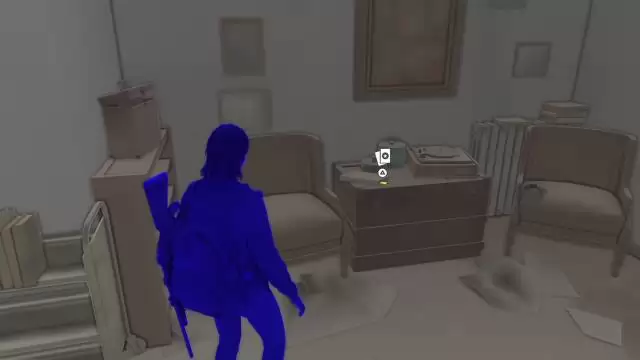
Enter the conference center then head to the elevator shaft and climb up the ladder and slip through the stalled elevator to reach the upper floor. The door is locked so break the glass window and the glass roof above it. Next, grab the rope and throw it over the metal support to the left. Jump down to the ground and grab the rope. Climb up then swing to the other room. In this room, loot the various parts, ammo, and supplies. You can find the Shift Trading Card on the couch.


Continue following the main road and you’ll find an apartment to the left and a locked gate to the right. You have to find a way to vault over The Gate to proceed but it’s recommended to explore the apartment building to the left first since it has a lot of valuable loot inside. The main door is locked so head to the side where you can use a delivery truck to climb up and reach the second floor window. Smash the window and climb inside. Open the door beside the fridge and open the nightstand drawer to find the Star Sign Trading Card inside.


After entering the Seattle Convention Center, make your way to the bottom floor and circle around the locked door to find a couple of glass windows. Break one of them then climb inside the room to find a good amount of loot like a molotov, parts, ammo, and the Arch-Enemy Trading Card from one of the desk drawers.


After clearing the grassy area where you first encounter the Scars, find the Garden Suites building near The Gate and enter it. Once inside, scavenge the first floor of materials then go upstairs. Don’t enter the room yet; instead, circle around the other corner of the corridor and pick up the Doppelganger Trading Card under the table, near a pile of toys. Enter the room 201 next. Scour the room for ammo, parts, and crafting materials. Open the door to the fire exit but don’t drop down to the alley yet. Instead, go upstairs to reach the room above.

Once you've reached Weston's Pharmacy, pick up the Bhat M'Andarr Trading Card from the shelf near the door, by the counter.

Seattle: Day 2
Road to the Aquarium
Continue along the road until you reach the dead end. You’ll have to enter the WPL building to the right. After entering, loot the ammo and materials on the shop to the right, then follow Jesse up to the next hallway. Loot the cupboards in the break area to get some supplements from the cupboard. Enter the bathroom nearby to find more materials and parts. Return to the hallway but don’t open the double doors yet; check the open door in front of it that you can crawl into. Look to the left to find a workbench. On the table, you’ll find more supplements and the Tormentra Trading Card. Use the workbench; when ready, open the double door to reach the next room.

After swimming past the heavily flooded and mostly destroyed street, you'll eventually enter a bookstore. Drop down to the lower floor and crawl under the portion of the collapsed roof where you landed. You’ll find alcohol and the Tanager Trading Card from the shelves underneath it.

After reaching the vantage point on top of the collapsed mall and seeing WLF trucks crossing an overpass from a distance, drop down to the covered bridge and enter the next building. Grab the crafting materials inside the coffee shop then drop down to the lower floor. You’ll have to push a pile of debris along the way but before doing that, grab the Tatuaje Trading Card from the shelf in the corner as shown below.

The Flooded City
Continue riding the boat until you encounter a grate that will block your path. Don’t open the grate yet; continue towards the rapids to find a door to the left leading to a small office. Get the Seff-L'ho'pahd Trading Card from one of the desk drawers there.

After defeating the bloater in the arcade bar, check the immediate area for more ammo and crafting materials. Head towards the gift shop and open the rolling gate. Vault inside and find the Khazakh Bright Trading Card on the shelf to the right.

Santa Barbara
Pushing Inland
After climbing over the broken wall of a large house, a clicker will appear from the rooftop. Reach the roof by climbing over the parked car then stealth-kill the clicker then enter through the second floor floor of the house. Don’t fall down yet; instead, check the kid’s bedroom to the right to find the CBB-73 Trading Card on the desk. img=https://resource.supercheats.com/library/2020/1596358935tlou2ch22pushinginland4.jpg title=]The Resort
After entering the Rattler compound through a chain-link fence and killing all enemies inside, enter the tunnel-like hallway with the lights on and look to the right to find the Sparkthug Trading Card beside the stereo. If you found all trading cards up to this point, the trophy “Master Set” will be unlocked by finding this trading card. Continue to the gap on the next door and squeeze through. Collect more supplies in this room then climb over the barricade on the doorway to reach the next area.
We have questions and answers related to this topic which may also help you:
Anything missing from this guide?
ASK A QUESTION for The Last of Us 2Comments for Trading Cards Locations
No comments yet. Tell us what you think to be the first.
Table of ContentsClose
 Join us on Discord
Click to close