Downtown, Seattle
Thank you for printing this page from www.SuperCheats.com.Remember to come back to check for updates to this guide and much more content for The Last of Us 2
Last Updated:
Downtown Seattle is a large area that you can explore at your own pace. You'll need to visit the dome building and the courthouse to continue with the story and everything else that you do here is optional. However, we strongly suggest starting taking this time now and exploring since there’s a lot of collectibles and valuable stashes that you can find in this area. Some items may be dynamic so it’s possible that you’ll find different items than what we have listed here. Nevertheless, consider these spots as “spawn” points for other valuable items or objects of interest so you’ll still find something as you check out these spots. Take note however, that after your business with the Synagogue and Courthouse, you’ll have to leave this area and head to the next part of the city.
Westlake Bank
From the entrance west of the Fuck FEDRA gate, look to the left and you should find a skyscraper with the large sign so it’s quite easy to find. (It will be highlighted if you toggled High Contrast Mode) Approach the building and you should be able to find the opening where you can enter.

Continue following the path until you reach the hole in the wall. Drop down and you’ll be in the bank itself, with several runners and clickers. Kill them all then loot the cabinets behind the counter for other materials.

Continue to the vault then examine the bag on the floor to get the Bank Heist Plans Artifact. Next, interact with the vault door and input the code 60-23-06 to open it.

After opening the vault, you’ll find a skeleton in front with a shotgun in front of it. Pick up the Pump Shotgun to permanently add it to your inventory. Next, check the corner of the counter then pick up the Bank Robber Letter Artifact.


Next, pull one of the trays in the corner (enable High Contrast Mode to see which trays you can interact) to find an Antique Ring Artifact. This will also unlock the So Great And Small Trophy. These are all the items you can loot here but be careful since more infected will appear on your way out. Dispatch them and leave the bank to mark it off on your mark.

Columbia St cor 6th Ave
Referring to your map, go to the square north of Westlake Bank as shown in the screenshot below. Beside the sloping building ruins, you'll find remains of another building. Beside the desk, you'll find a skeleton with a bag. Open the bag to get the Cache Hunter's Note artifact.

Columbia Cor 4th/5th
Referring to your map, go to the square northwest of Westlake Bank. This plaza is hard to miss since it has a tank in it. To the left of the tank, you'll find a skeleton crushed by rubble. Examine the bag to get the Letter from Isaac artifact. Next, open the hatch of the tank to get 2 shotgun ammo.

Marion St cor 6th
Referring to your map, this location is two squares north of Westlake Bank. Head to the building ruins with some upper floors intact, as shown below. Go upstairs and smash the glass. Go to the ledge and jump across the gap to circle around to reach the other set of stairs.

You'll find some supply crates there. Loot the parts on the desk. Open the crate to the left to get more parts and the Doctor Uckmann trading card. Loot the other crate to get some supplements. That's all loot you need to get in this area and Ellie will mark this location complete.

Overpass, corner of 6th and Marion
Find the destroyed overpass roads near the corner of 6th and Marion. You should find a lone firetruck in the middle of the destroyed overpass. Find a nearby deliver truck where you can climb and use as a platform to sprint-jump to the next overpass where you can reach the firetruck. Open the side of the firetruck to get a Hatchet.

Next, pick up the rope nearby and drop it from the ledge. Use it to carefully rappel down but don't drop all the way. While hanging on the rope, press and hold R1 then start swinging Ellie so you can jump to the tumbled cargo truck with some goods inside. You'll find the Crafting manual inside, a lot of parts, and a health snack.

The Crafting Manual and its corresponding skill tree is automatically unlocked as a pre-order bonus. so if you pre-ordered the game, you’ll only find the supplies inside the truck, sans the manual.
Valiant Music, corner of 5th and Marion
Open the drawer behind the counter in the first floor to get the Das Wort trading card. Continue upstairs to find a pristine guitar in one of the rooms there. Interact with the guitar to play it and trigger a short cutscene.
After the scene, there’s a few more loot to grab on this floor. Break the glass cabinet to the left by the collapsed walkway to get some parts. Jump across the gap to pick up more parts. That’s all the goods inside this location; leave the building and Ellie will cross out this location on the tourist map.


Workbench, corner of Marion and 4th Ave
Head to the marked location below to find a large military tent. Examine the wanted posters along the stairs for a short conversation with Dina. Continue upstairs then slip through the barely-opened gate to access the tent. Loot the parts on the shelves and the shotgun ammo beside the corpse. You can also examine the FEDRA scanner inside the open crate. Use the workbench afterward to upgrade your weapons.

After using the Workbench, don’t leave through The Gate again. Circle around to find a footbridge with some guardhouses. Enter the first one then open the drawer to find the Street Drawing Artifact. After getting the artifact, a prompt will appear immediately for a Journal Entry.


Ruston Coffee (corner of 5th ave and Spring St)
Head to the marked location below to find a coffee shop. Smash the window then grab the various supplies inside. You’ll also find the WLF Safe House Supply Note artifact on the counter.

Open the drawer in front of the small oven further back in the shop to get the Big Blue Trading Card.

Head to the backroom to find some supplements on the shelf. Continue further inside to find the bathroom door. There’s an infected inside so be prepared to kill it. After killing it, head inside the bathroom and pick up the Barkos Key on the diaper-changing tray by the wall.

Barko's Pet Shop
This is an unmarked location in the corner of 6th and Marion, a few steps away from the destroyed overpasses. After finding the pet shop, check the alley around the building to find a door that you can open using the Barko's Key you found inside the bathroom of Ruston Coffee (see above) There are no enemies inside so just enter and grab the valuable loot inside.
Once inside, grab the Join WLF Note Artifact leaflet on the copier. Grab the supplements by the shelves, then head to the shop’s counter by the entrance. Pick up the Long Gun Holster and equip it, which will allow you to quickly swap between two long-arm weapons like your rifle and shotgun.


Head back inside then check the tables near the whiteboard. Here, you’ll find a Stun Bomb. Its recipe will be unlocked in your Crafting menu as well. Interact with the whiteboard if you want then leave the building after getting all the valuable loot. Ellie will then cross off this location on the map.

WLF Supply Note
In the building beside the Courthouse, along Madison St, you’ll find a set of stairs in the alley, with the WLF sign. Continue upstairs to find a bag and a crate. Pick up the WLF Community Supply Chest Note artifact from the bag on the floor, then open the nearby crate to get the supplies inside.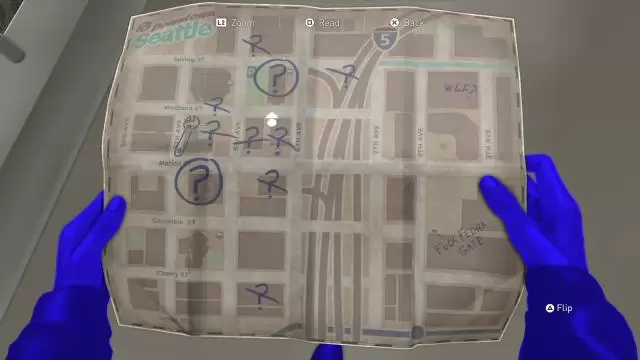
Gate West 2
In the corner of Madison St and 5th avenue, just a few steps away from the Courthouse, you'll find a gate with the sign, "Gate West 2". Head towards it and you'll find a slightly opened gate where you can squeeze through.

Once inside, turn to the right to find a safe. Use the code 0451 to open the safe. Inside, you'll find a good amount of supplements, parts, health kit, shotgun ammo, and the Flo Trading Card.

FEDRA Truck
In the corner of Spring St and 6th Ave, look for a convoy of trucks under the collapsed overpass. Head to the frontmost truck that’s partially submerged on the stream then open its cargo door. Loot the parts inside and pick up the Note to Informant artifact on the floor.

Toppled Supply Truck
Find the destroyed overpass roads near the corner of 6th and Marion. You should find a lone firetruck in the middle of the destroyed overpass. Find a nearby delivery truck where you can climb and use as a platform to sprint-jump to the next overpass where you can reach the firetruck. Open the side of the firetruck to get a Hatchet.Next, pick up the rope nearby and drop it from the ledge. Use it to carefully rappel down but don't drop all the way. While hanging on the rope, press and hold R1 then start swinging Ellie so you can jump to the tumbled cargo truck with some goods inside. You'll find the Crafting Manual inside, a lot of parts, and a health snack.
This manual and its corresponding skill tree is automatically unlocked as a pre-order bonus. Thus, you won’t find the manual inside the truck if you pre-ordered the game.
Synagogue
This is one of the two story-related locations where you have to find fuel. From the front facade of the building, enter the gate to the left with a ladder that will take you to the lookout tower. Open the drawer there to get the Emergency Protocols Memo artifact.
Go down the ladder and continue to the back yard where you’ll find a locked gate. Interact with The Gate to pass through then kill the two infected that will arrive. Once done, continue moving forward to reach the other part of the courtyard where more infected are waiting. You don’t have to fight all of them; in fact, you can go prone in the short grass and crawl around to reach the scaffolding at the back which will give you access inside the building.


There are no enemies inside the building so just drop down and pick up the parts and other items from the shelves to the right. Next, head to the entrance and collect more parts by the table and the counter. Continue to the broken iron fence and squeeze through the shelves to access a pushcart. Grab the revolver ammo by the shelf then push the cart forward all the way to the iron bars enclosing the fuel tank. Climb up the boxes and vault over the fence. Pick up the fuel container and discover that there’s no fuel in the tank.

You’re done in this location for now climb out then wait for Dina to open the large gate. Get the pushcart again and push it towards the platform near the entrance. Climb up then grab the parts on the table.

You can open the cabinet inside the room to the left to find a Torah for a short conversation with Dina. Either way, find the dangling cable on the other end of the balcony then swing and jump to reach the other balcony.

In the next balcony, enter the room on the end of that balcony then pick up the supplements on the table and the Rabbi Saunders' Letter Artifact from the desk drawer. Examine the calendar on the wall and speak with Dina to get a Journal Entry logged.

You’re done with this location so you have to find a way out of the building next. Leave the room and exit through the window and climb down the scaffolding. Go down the ladder then jump off the scaffolding to go back to the ground. Ellie will then mark off this location from the map.
Courthouse
The Courthouse is a large building where you can get the fuel to start the generator in the F*ck FEDRA gate. The front yard is located along 5th avenue but you can only get in through a window in the southeast corner of the building, in the corner of Madison St and 6th Ave. Open the door with Dina and drop inside.

The floor has a lot of runners and clickers so use stealth to take them out. Once done, open the double door at the end of the corridor then continue downstairs to the lower-ground offices.

Pick up the rag from the desk at the bottom of the stairs and revolver ammo on the desk in front of the doorway. Continue past the open elevator shaft and head towards the end of the corridor to find two bodies. Pick up the Plea to a Friend Letter Artifact from the body near the corner.

The nearby office is locked so break the glass window and climb inside. Pick up the alcohol from the shelf then pull the machete from the corpse. After pulling it, a paper will fall on the floor. Pick it up to get the Lt. Torres' Final Memorandum Artifact. Take note of the safe code on the whiteboard, then open the file cabinet to the left of the corpse to get the List of Known WLF Agitators artifact inside.

Finally, turn around and find the safe under the glass window you broke earlier. Enter the code 86-07-22 to open the safe. Loot the good number of parts, supplements, and alcohol inside.

Leave the office after looting then head to the open elevator shaft. Climb down using the cable then enter the elevator to reach the basement parking level. There’s a lot of infected waiting here so be prepared to fight as soon as you open the door.

After killing all the infected, head towards the garage door exit where you can find the fuel tank nearby. Fill up your container then pull the garage door chain to open it and leave the area. Your mission here is now complete so you just need to head back to the F*ck FEDRA gate or continue exploring the other spots we listed here if you’re not done yet.

Anything missing from this guide?
ASK A QUESTION for The Last of Us 2Comments for Downtown, Seattle
No comments yet. Tell us what you think to be the first.
Table of ContentsClose
 Join us on Discord
Click to close