1 - Midair Stadium
Super Smash Bros Brawl Walkthrough and Guide
by SPV999
Super Smash Bros Walkthrough
Level 1: Midair Stadium
Enemies: Kirby/Mario, Primid, Boom Primid, Spaak, Sword Primid
Boss: Petey Piranha
Boxes: 0
After the cut scene, choose whoever you want. You begin a 1vs1 stock match with the person you DIDN'T choose. You have two lives, but your opponent only one.
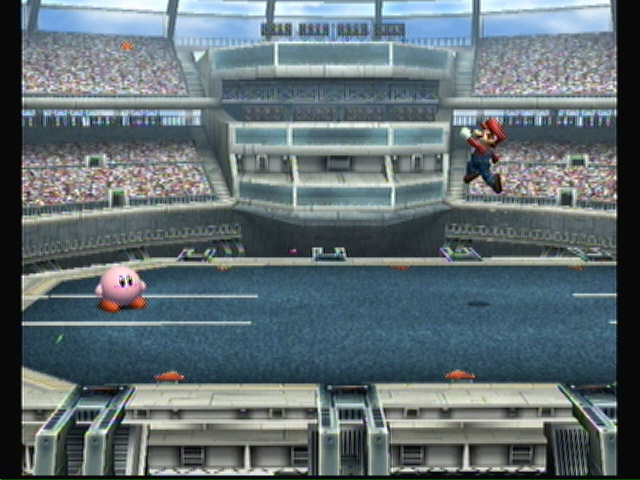 What a wonderful day in the neighborhood |
Story Note
After the match and the cut scene, you see that Pit was watching the match, and rather enjoying it. Also note that when a person is defeated, they get turned into a trophy, which can be turned back to normal by touching the stand. After, Kirby and Mario shake, signifying that the match was just for fun, a boxing match if you will. At this point the Halberd shows up and releases spores that turn into Pirmids.
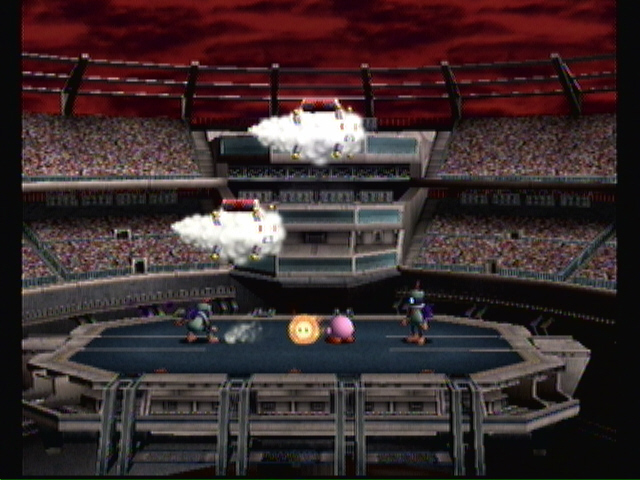 Oh noes! Our beautiful day! |
Now you get to choose your characters again. Zelda is a good choice for what's up next. After that it doesn't really matter, the odds of you dying are slim.
Here you'll face an army of Primid and Spaaks. Since the order of the enemy emergence is random based on the order you defeat them, and the fact that they are very low-level, I wont list the order of the waves.
Just use regular crowd clearers on the Primid, paying special attention to the Boom Primid, and aerial up moves on the Spaak (Zelda makes that nice explosion).
Story Note
The Ancient Minister makes his first appearance. He carries a strange bomb device on the undercarriage of his pedestal. The R.O.Bs are given the task of arming the bomb with no hope of escape. Bomb timers are set to three minutes. That remains a constant throughout the game, though I'm not sure why three minutes exactly. Mario is also given the boot with a as-of-now unknown projectile (likely from the Halberd.
Time for the fight with Petey Parana. You only have one choice of characters: Kirby. Though Zelda would have been better, IMO, Kirby has a nice, cheap move that will work well for this battle.
Petey Piranha
--== Petey's attacks ==--
1) Swings a cage horizontally in front of him.
2) Jumps into the air and lands, creating a small tremor.
3) (near the end of his life) jumps a few times in a row.
--== How to predict ==--
1) He'll take the cage and kind of hold it back a bit.
2) Ducks his head down.
3) Ducks his head down longer and roars.
--== How to dodge ==--
1) Jump into the air.
2) Either shield or be in the air above him.
3) Be in the air for the first, then stay in your down B form till
he is finished.
--== Strategy ==--
The goal here is the free both Princesses. Sadly, try as you might, you only get to free one. Choose with one you want and focus on only on that cage. Zelda on the left and Peach on the right. Bear in mind that the one you don't free you wont get to see until much later in the game, and the one you do you'll have to put up with for the next few levels. I'd choose Zelda. She's more well equip, especially with Sheik to help.
Either way, start pounding on the cages. Your best bet (and the cheap move) is to jump up above Petey's head, then use Kirby's down B attack to drop on the cage. It does a fair amount of damage, and will protect you from Petey's attacks.
Story Note
Wario is one of the bad guys (surprise?). He also reveals a strange weapon that is capable of instantly turning anyone into a trophy. The person you didn't save is turned into a trophy and carried off by Wario, who seems to be collecting them for some reason. Kirby starts to give chase, when he sees the timer is almost gone on the bomb, so he calls in a Warp Star to get him and the person he saved out.
In the end you see the colossal power of the sub-space bomb. But why is it creating a dimensional orb around the area? Whats the point?
End of level!
Cheats, hints, walkthrough index
Zelda is better than peach so save zelda so u can be shiek. Peach's best move is her special attack where she protects herself with a toad. But zelda is awesome!!!!
you know i recommend you save Zelda cause i found out that when you play as sheik he will be more powerful
If Zelda is not saved, will Wario turn her into a trophy? I love Princess Zelda.