- Games
- Guides
- Complete Guide to Monopoly GO!Palworld Walkthough GuideThe Walking Dead: Survivors Beginners ..Ravenlock Walkthrough
- Warzone 2 GuidesHogwarts Legacy Walkthrough and GuideFar Cry Primal Walkthrough and GuideVirtual Villagers Origins 2 Puzzles an..
- Fire Emblem Engage Walkthrough GuideLego Star Wars: The Skywalker Saga GuideSurvivor.io Walkthrough and GuideChained Echoes Guide
- Latest
- More
- General ForumsChat and have fun Video Game ForumsFind friend, get help Achievements & Trophies'chieve lists and hints to help
- Pokémon HubFind it all PokédexAll the stats ModsMods and and-ons
- Action Replay CodesAR Codes and cheats GameShark CodesGS Codes and cheats CodeBreaker CodesCB Codes and cheats
Submit Your Stuff· Send in your cheats, hints and codes
· Need help? Ask a question here Help a gamer Can you provide the answers for fellow gamers questions- Forums
- Pokemon
Log into your account here:
Not registered? Sign Up for free
Registration allows you to keep track of all your content and comments, save bookmarks, and post in all our forums.
-
PlayStation 5
PlayStation 4
PlayStation 3
PlayStation 2
PlayStation
PS Vita
PSP
-
Xbox Series X
Xbox One
Xbox 360
Xbox
-
Switch
Wii
Wii U
3 DS
Nintendo DS
Nintendo 64
Gameboy Adv.
Gameboy
GameCube
SNES
NES
-
Roblox
iPhone
Android
PC
FaceBook
Mac
Dreamcast
Arcade
- General Forums
- Video Game Forums
- Teams Forums
- Pokémon Hub
- Pokédex
- Technical FAQ's
- Achievements & Trophies
- Hall of Fame
- Enter a game name to find below:
-
- Or click here to search for specific content.
- All Our Full Guides More Game Walkthroughs Cheats, Hints and Codes Questions and Answers Recent Guide Updates
- Complete Guide to Monopoly GO!Palworld Walkthough GuideThe Walking Dead: Survivors Beginners ..Ravenlock Walkthrough
- Warzone 2 GuidesHogwarts Legacy Walkthrough and GuideFar Cry Primal Walkthrough and GuideVirtual Villagers Origins 2 Puzzles an..
- Fire Emblem Engage Walkthrough GuideLego Star Wars: The Skywalker Saga GuideSurvivor.io Walkthrough and GuideChained Echoes Guide
Thank you for printing this page from www.SuperCheats.com.
Remember to come back to check for updates to this how to and much more content for Windows 7.
How to create a Custom Login Screen
Published by SuperCheats Staff on Aug 31st 2013
 Disclaimer:
This requires at least average knowledge in tweaking settings of your computer. This also involved editing your computer’s registry which is a vital part of your system and may affect system stability if you mistakenly edit something. Do not attempt this if you’re not sure of what you’re doing.
Your background image should not exceed 256kb and must match the aspect ratio of your screen since it will be stretched.
- Click Start then type “regedit” in the search field. This will open the Registry Editor.
- Before making any changes, backup your registry first in case you accidentally mess up something. Click File then Export. Save it to a convenient location, like your C:\ drive for example.
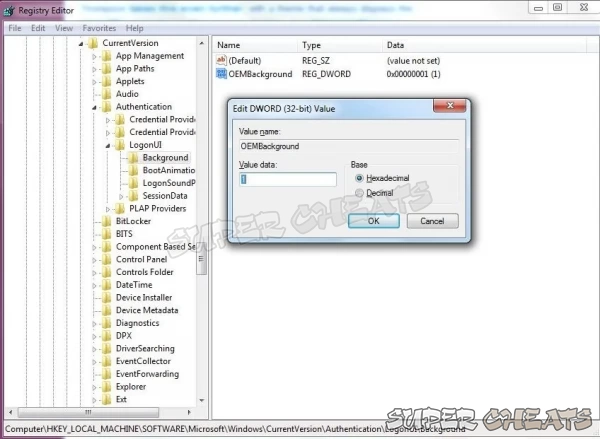
- Navigate to: HKEY_LOCAL_MACHINE\Software\Microsoft\Windows\CurrentVersion\Authentication\LogonUI\Background
- Double-click OEMBackground then set the value data to 1. Click okay.
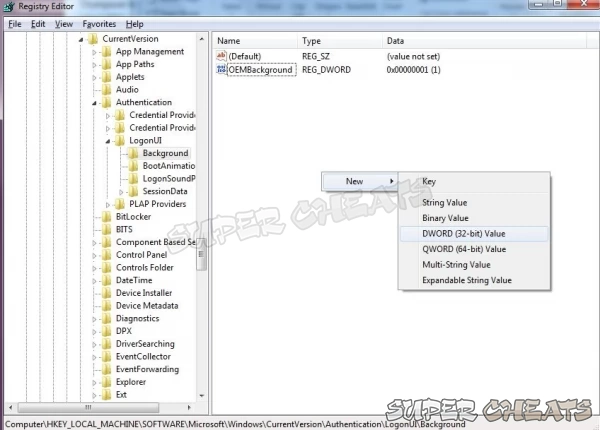
- If that key is not there, create one by right-clicking in the same window, select New then DWORD (32-bit value) and type the name as OEMBackground. Letters must have the same case as shown.
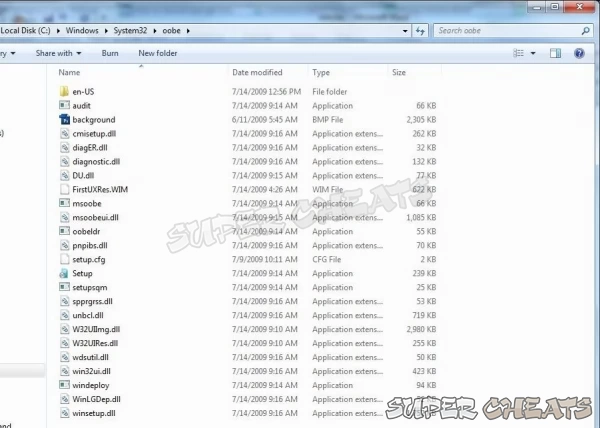
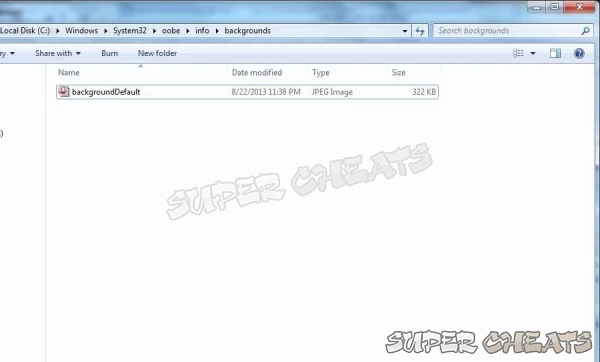
- Now click Start then paste this address on the search field: %windir%\system32\oobe\info\backgrounds You can also paste this address from a Windows Explorer window. If you get a message that the folder can’t be found, try searching up to “oobe” folder instead.
- If you don’t see an “info” folder, create one and create backgrounds inside it as well.
- Paste your preferred image in the backgrounds folder and rename it to backgroundDefault.jpg. Make sure that the image type is JPEG.
- Reboot your PC and your custom image should now appear.


Note: It seems that this works only on some versions of Windows 7. You can use third-party applications that will allow you change your logon screens without reboot or changing your registry. However, use and install these at your own risk.
Reference
Comments for "How to create a Custom Login Screen"
Table of Contents
- Back up your Files
- Disable Visual Effects
- Creating a User Account
- How to Clear Temp Folder
- Turn High Contrast Theme on and off
- Uninstall Internet Explorer 10
- Disable Aero Theme
- Add Run in the Start Menu
- Disable Caps Lock
- Viewing and Making your Files Hidden
- Recover from Sleep Mode
- Connect to a projector
- Set up Parental Controls
- Snipping Tool
- Sticky Notes
- How to Change your Computer Name
- Create a Super Hidden File or Folder
- Using Split Screen
- Enable/Disable Hidden Administrator
- Run old programs in Windows 7
- Determine your Windows 7 if it’s 64 bit or 32 bit
-
 Control Panel
-
 General Tips
-
 Hardware
-
 Networking
-
 Security
-
 Maintenance and Troubleshooting
Ask a question
Do you have a question about Windows 7?
Click here to post it.
Click here to post it.
Latest Help Articles
Windows 7 came with two versions which are the 32 bit and 64 bit. Both have different versions. One of the most comm..
Some programs won’t run because they are only meant to run on older Operating Systems or has compatibility issues. ..
Administrators have the access to every file to the computer. Hiding the administrator can be done with few simple st..

