Welcome to the C-Gear Universe
Pokemon Black 2 Walkthrough and Guide
by CMBF ![]()
Welcome to the C-Gear Universe
Before we continue with our adventure in the world of Pokemon, now is a good time to explore the massive power of the C-Gear System and what it can do for you!
– Receiving your C-Gear –
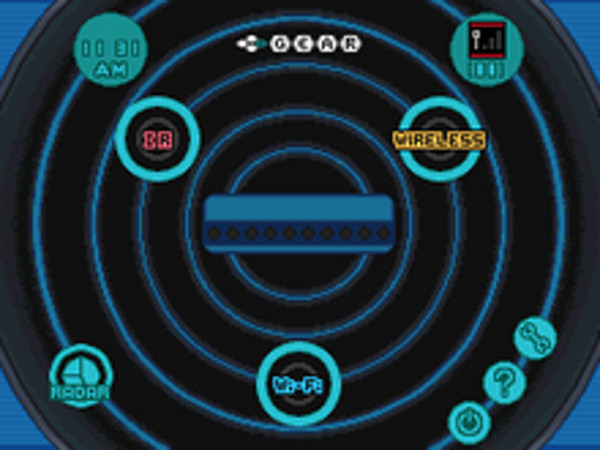
Cheren and Hugh then enter the School, and Bianca then gifts you with your own personal C-Gear, and how about that?! The C-Gear is more than just a part of the game, it is actually a program that runs on top of the game that links the game to the three different communications protocols that your Dsi/3DS is capable of using: Infrared, WiFi, and Wireless.
You are then shown a notice that makes you aware that, like a cell phone, when the C-Gear is turned on it is capable of broadcasting radio signals, and so like a cellphone it should be disabled when you are on an airplane or in other areas (like hospitals) where radio signal broadcasting is restricted. It asks you if you want to turn on the C-Gear – if you are not in a restricted area go ahead and say yes!
On the touchscreen of your console you now see the C-Gear Screen, which in addition to showing that it is enabled, also shows you the WiFi signal and strength gauge, the Infrared Detector, and the Radar.
Bianca reminds you that there is another Gym in Virbank City that you can battle at – but as we are not quite ready for that just now we file that away as useful information for the future – but hey, now the Hiker will allow us to pass him and head down the stairs, which is how we gain access to the route that will take us to Virbank City, so bonus! Go us!
If you are not familiar with the C-Gear go ahead and tap the “?” now to read the information and help system for it – it tells you about the capability of each mode:
– Infrared: Allows you to battle and trade with trainers (real-world players) who are basically in the same room with you, and its function to use the “Feeling Check” system which will gauge the compatibility of you and your trainer mate. You can also use the IR mode to exchange Friend Codes for your Pal Pad.
– Online Mode: Using the Game Sync button allows you to sleep a Pokemon and upload it into the Dream system via WiFi Connection. It points out that you have to have your console properly configured to communicate via the WiFi and Nintendo WiFi Connection in order to use that feature.
– Wireless: With the Wireless connection enabled and established you are able to activate your Xtransceiver to have video-chat sessions with your mates, basically any trainer you have in your Pal Pad who wants to chat with you! That option in the Xtransceiver uses the built-in camera on your console to broadcast your face to your friend, and theirs does the same for you. You can also access Entralink for the Dream system.
The Wireless system also controls the passive connection and presence detection, like Tag Log and Survey Radar. Using Tag Log allows you not only to detect other gamers/Pokemon Trainers, but also to participate in any Funfest Missions that they have active.
– Customization: This allows you to set up the screen the way you want as well as to set the ring tone for your device.
– On/Off: Just as you probably imagined, this is a convenient button to turn the C-Gear on or off as you like.
If you have a second DS/DSi/3DS with a Pokemon Black 2, or White 2 game in it, go ahead and turn that on and then press the Survey Button (Radar) and if the C-Gear on the second system is turned on, yours will query the other game for different information. Samples include Which game version, what starter Pokemon they chose, and how long they have been playing.
Adventures in C-Gear and the Entralink
– The Entralink and Funfest Missions –
Under the Wireless Menu there is an option you can choose called Entralink, which will instantly warp you to the Entralink Lobby if you are outside (you cannot do that inside most buildings, including Pokemon Centers) where you are greeted by the Entralink Host, who tells you about this new area and what you can do there. The tree nearby can be used to flag special mini-game missions called Funfest Missions, the first of which is a challenge to find 5 berries in 3 minutes!
The Berry Challenge begins with you being warped back to the game world, and you will see that a timer is running counting down the 3 minutes. What you need to do is look for and run onto the sparkling spots, as each will award you with a berry! There are only so many in the city, but you will find that you can leave the city and run along the routes, finding more sparkling spots on them, and even head for the next city for even more berry spots! The objective is not to find 5 berries, it is to find as many berries as you can manage - so collect as many as you can reach in the 3 minutes you have.
Once the counter counts down the mission ends and you are given the summary screen showing how many berries you managed to find and telling you how much Entralink Power you gained and whether or not you leveled up in the Entralink. You can then use your C-Gear and the Wireless Menu to return to the Entralink, where the Host will tell you about what you accomplished.
After you chat with him, talk to the Entree (the tree you got the challenge from) in order to receive your Pass Powers. There are a number of selections you can make depending upon the total Pass Power available to you – these include:
- HP Restoring Power ^ (Orbs Required = 2)
Immediately restores the HP of the lead Pokemon a little.
- HP Restoring Power ^^ (White Level Required = 2)
Immediately restores the HP of the lead Pokemon a lot.
- Exp. Point Power ^ (Orbs Required = 2)
Increases the Exp. Points from a battle a little. The effect lasts three minutes.
- Exp Point Power ^^ (White Level Required = 2)
Increases the Exp. Points from a battle a lot. The effect lasts three minutes.
- Exploring Power ^ (Orbs Required = 5)
Increases the chance of finding rustling grass and dust clouds a little. The effect lasts three minutes.
– Mission Types –
The first mission that you completed above is the introduction to the system - if you chat with the girl to the right of the Entree she will explain to you that you can receive different missions as you advance in rank with the Entree, as well as gaining additional types of missions by talking to and playing with other trainers in the Entralink. She cautions you to listen to other people when they tell you their wishes.
Raising the Entralink Level grants new types of Pass Powers (that are added to the basic list above), and she explains that your Entralink Level can raise as you do the missions – sometimes during the mission if you did particularly well in it!
The girl on the left-hand-side of the area will tell you about participants and collaboration.
When you begin a Funfest Mission trainers near you who are checking for Missions in the Entralink can join in your mission by using the Tag Log. Because linking for missions can take a brief delay she minds you that you should be patient and check the Tag Log repeatedly.
When you have participants in your missions, their actions count for your score, and items that are found in the same location are given to everyone in the mission. She warns you that sometimes you may not receive a score from a mission in another world (another trainers console) and while she does not explain that in detail, what she is talking about is when a connection gets cut or the data is not completely transmitted.
The girl at the top of the area is standing by the entrance to the Entree Forest, and she tells you that the Entree Forest connects dreams and reality... Basically when you put one of your Pokemon to sleep and it enters the Entree Forest, that is where its dreams may come true! When your Pokemon meets with another Pokemon – and in particular types you don't have that are new to you – that Pokemon may appear in the forest ahead, which is where you would need to go to capture it!
When your Pokemon wakes from a Dream, the Forest is where you want to go mates!
You can only receive Funfest Missions every so often – there are specific timers that have to expire based upon the level of the mission, so you will not be doing these over and over one right after the other – try to think of this as a value-added element to your game play rather than an end in and of itself, right mates?
Once you select the Pass Power that you want, it is loaded into your C-Gear, and you can then activate it back in the real world by tapping the Green Triangle on your C-Gear – but only do that when you actually want to use the power, since they have limited times as noted above. In order to accept the next mission you have to spend the points you have already earned and pick a power – just saying.
If you spend your points and after a few minutes you can chat up the Entree again to get the next set of missions – the Level 1 Missions – are available for you to choose from, which should be:
– Collect Berries: Collect 3 or more Berries within the time limit! Look for shining places in towns and on roads! Time Limit: 3 Minutes. Target: 3 Berries.
– Find Lost Boys: Find 4 or more lost children within the time limit! Speak to boys in towns and on roads. Time Limit: 3 Minutes. Target: 4 Children.
– Find Audino: Find Audino in rustling grass! Defeat or catch 1 or more Pokemon to accomplish this mission! Time Limit: 5 Minutes. Target: 1 Pokemon.
That should familiarize you with the Funfest Missions – be assured that I am a patient guide, so if you want to do some more of these, I will wait here for you until you are done or satisfied! Take your time mates, really!
Are you back? Already?! Excellent! Shall we continue then? Yes? Very well!
Before we get started there is one last element to the Entree that you should be aware of, and that is the option to check your stats – specifically the button marked “CHECK RECORDS” which, when you tap it, will reveal the following information to you (where X represents the number you achieved):
Entree's Total Level: X
Black Level: X
White Level: X
Available Pass Powers: X
Hosted Missions: X
Participated Missions: X
Completed Missions: X
The most participants: X
Top scores: X
Now that you have experienced that you are in the know for all of the aspects of the Entralink and Entree, so head to the bottom of the area for the fourth and last girl, who is standing beside the teleport pad that will return you to your world! Talk to her and she explains that, or just step on the pad and confirm that you wish to return home now!
Once you get back home be sure to save your game to make certain all your progress gets recorded!
 The CGear Interface for Pokemon Black 2 |
– Infrared Mode (“IR”) –
After you select the “IR” icon on the C-Gear Main Menu you reveal the IR Main Menu, which includes the following options:
– Battle: This is an amazingly obvious selection, the point to which is to permit a pair of real-world trainers the ability to grab their preferred battle team and mix it up face-to-face via the IR protocol, taking on their opponent and demonstrating not just who has the best Pokemon, but who really and truly understands their Pokemon, has a solid relationship with them, and knows which moves to use baby! Yeah! Battle! Violence! Woohoo!
– Trade: This is just what it sounds like, a direct system-to-system version of the action that you normally find by heading to the Pokemon Union Room, which is located on the top floor of your favorite Pokemon Center, and in which the trainers who happen to be in your immediate vicinity can gather together for trades, battles, exchanging friend codes, you know, pretty much everything that can be done via the Wireless protocol!
The primary difference between using the Union Room and using the IR or Wireless capabilities of the C-Gear being that where the C-Gear is a person-to-person system of connecting and interacting, the Union Room is more of a social event in which many people can be present, offering you the option of mixing it up, chatting, and otherwise chilling with your mates, with the whole point here being to trade Pokemon! Yeah!
– Feeling Check: Tapping this results in you being asked if you want to save the game – say yes – and then tap the “BEGIN CHECK” button to initiate the Feeling Check process. The console will start beeping, which indicates that it is actively processing your request, and you will then be prompted to tap the touchscreen ten times and then place your thumbs on it to be scanned (left and then right), at which point it will “process” the check, notifying you when it is completed.
The result of this is a numerical rating that is then translated into an alpha rating – to be honest I am not actually sure what the criteria is for this, or what it really means, so instead of telling you that I will tell you a joke: Buddha finds himself on the streets of Manhattan and he is hungry, so he goes to a hotdog cart and tells the vendor “Make me one with everything!”
Tapping the touchscreen automatically places the number of Sweet Hearts you received from this Feeling Check into the Medicine Case on your game, and tapping the touchscreen again returns you to the main Feeling Check Menu. At that point, you should tap the second button, which is labeled “RANKING” and that will display for you the complete list of all of the Feeling Check sessions you have ever completed with that game!
The listings includes how each check ranked, and the name of the trainer, the score, and a count of the number of check sessions you have successfully completed with that trainer! To the far right next to each line is the actual Pokemon that was the subject of this Feeling Check (that being the Pokemon that was in the number one position in the party of the trainer who you did the Feeling Check with).
You can swap in a different Pokemon in the number one slot (top left) and repeat this process to see what their Feeling Check score is. Just for full illustraiton when I completed the Feeling Check for my entire team with the other team (no duplication of Pokemon) the results were:
|
RANK |
NAME |
SCORE |
COUNT |
Pokemon |
|
1 |
CMBF |
83 |
6 |
Simisage |
|
1 |
CMBF |
83 |
6 |
Simpour |
|
1 |
CMBF |
83 |
6 |
Seismitoad |
|
4 |
CMBF |
80 |
6 |
Liepard |
|
5 |
CMBF |
78 |
6 |
Unfezant |
|
6 |
CMBF |
69 |
6 |
Archeops |
What does it all mean? Who can say for sure?! What we can say is that as a reward for you for each unique trainer (real-world person with their unique game card and ID) we received a number of “Sweet Hearts” in our Medicine Bag that are actually small nicely wrapped pieces of high-end chocolate (I prefer to presume that they are made by the candy mafia otherwise known as Godiva Chocolatier – who since 1926 has been hand-crafting chocolate candies that are on a level far above even the best of the best created in North America... Seriously, there is only one way to describe their awesome chocolaty goodness: NOM! NOM! NOM!
When you factor in the fact that their company is named after a naked hottie on a horse who rode sans-clothing through the village near the manor house in which she lived in order to – get this – prove a point! Cha! Epic! Add to that the fact that the Godiva Brand Sweet Hearts we receive for doing the Feeling Check restore 20 HP (that is 20 points of health) for the Pokemon that we feed it to, and hey, there you go! That's free HP mates! You cannot beat that with a stick! Just saying...
– Friend Code: Tapping this button results in asking if you want to save your game - say yes - and then you are prompted to make an Infrared Connection with a mate in order to exchange Friend Codes. This can be completed with a mate who has a DS/DSi/3DS and a copy of one of the games (Black, White, Black 2, or White 2) when they have their C-Gear turned on and they hit the IR button and select Friend Code as well.
Point the two consoles at each other in a manner consistent with the illustration on the screen and you will receive the message “The Friend Roster Has Been Updated” if the process is a success.
This screen also contains a summary of how many mates you have already registered in your Pal Pad.
Once you have completed the swap and registration of Friend Codes simply hit the back button ('B') or tap the Back icon.
– Back: this naturally returns you to the C-Gear Main Menu whenever you press it. The Back button is located at the bottom right side of the menu, and can be reached via shortcut by simply pressing the 'B' button.
 The XTranceiver Interface for Pokemon Black 2 |
– The XTRANSCEIVER in Wireless Mode –
First you will notice that after you select the Wireless Protocol from the C-Gear Main Menu the bottom touchscreen is your status screen, and in addition to offering you the choice of Entralink and Xtransceiver, it also includes a summary of the number of people present in the Union Room (the Union Room is the online Virtual space or room in which trainers gather to meet, talk, exchange codes, battle, and trade Pokemon). It also includes the Wireless Distribution Status, and the C-Gear Detected Status, which is very important since it tells you that another player with C-Gear enabled is actually nearby, which is sort of necessary for most of the interactive multi-player actions you can undertake using your own C-Gear.
– Xtransceiver: selecting this will begin the search process as your game and console looks for other trainers who are registered in your Pal Pad. Should it find any it will initiate a video chat in which you not only can talk to your mate, but see them as well (assuming that they are using a DSi or 3DS that is since the regular DS models do not have cameras).
Bear in mind that it can (and often does) take a moment for the console to detect the Wireless signal or WiFi network, and your console needs to be properly configured to access any available hosted network in order for this to work.
– The XTRANSCEIVER in WiFi Mode –
The difference between Wireless and WiFi modes is that using Wireless basically activates the low-power radio transmitter and receiver that is built into your device, allowing it to network with and connect to other consoles in your immediate physical area. This mode does not require you to have an Internet Point-of-Presence available, since the consoles are basically providing the POP for this limited communications mode. Using the Xtransceiver to chat with your mates via the Internet however is another issue entirely since a number of significant limitations and issues do apply in that case.
IMPORTANT FACTOID: The mechanism that is used for network communication in the games via WiFI and the Internet is paired to the console you use, so for instance when you us your game (whether that be Pokemon Black, Pokemon White, Pokemon Black 2, or Pokemon White 2) on a specific console it pairs the game card and the console exclusively.
This is significant for several reasons, starting with the fact that each game console (when we say console here we mean Nintendo DS, Nintendo DSi, and Nintendo 3DS including all of the different models of each), has built into it an Ethernet and Ethernet-aware and enabled WiFi adapter, which is in turn uniquely identified by what is called a MAC Address.
To better understand this, after saving your game so as not to lose any progress, tap the power button to reboot the device, and when you get to the main menu, select the System Settings icon, and then select (tap) the WIRELESS COMMUNICATIONS icon (or its equivalent on your device) in order to access the wireless communications screens and setup screens.
From here you can turn Wireless or WiFi on and off, as well as access the plethora of different configuration options, which includes the ability to specify your User Name, the User Message that your device will transmit to other devices by way of greeting (and which you can set to represent your personal outlook, a philosophical observation, or some other personal message). Most gamers tend to set the message to something like their name, or first name and last initial, as well as other information that helps to both identify them and differentiate them from the other gamers who may be present. When you are at an official Pokemon or Nintendo event that is always a good idea, since it makes it so much easier for you to be found specifically by anyone who is looking for you as they have to sort through all of the different people who are present and actively communicating.
Under the Profile tab you can also set the Color used on your system, your Birthday, while the Date Tab lets you set the day, month, and year for today's date. The Time tab does what you expect, and the Alarm tab lets you set an Alarm event by hours and minutes if you need to have one active. The Parental Controls tab allows you to enable or disable that restriction on your console, the Touch Screen and Mic Test tabs allow you to configure and verify the function of those two interface elements as well, and then there is the Internet tab, which is really what we need for this particular part of the guide!
Under the Internet tab you have the option to select Connection Settings, Options, and User Agreement – for our purposes though we want to select Options, and then System Information! Under System Information you will see the following items listed:
MAC Address: E0-E8-53-D8-24-18
Nintendo WFC ID: 1994-1953-7888-2000
The numbers above I basically made up – the real ones will not be what is above – but yours will be very similar to the above in format. Basically what these are as we have already touched upon is the MAC Address that is programmed into your device, and your Nintendo ID, which is a product that is determined by the serial number of the device and its MAC Address. As previously noted the MAC Address is the physical address of the network interface in your device, and this never changes. The Nintendo WFC ID is assigned to your device during the configuration process when you first set it up for use, and again once it is set, it never changes from then on.
This is significant in that the MAC Address never changes, as it is programed into the network interface, so while you will receive a different IP Address based upon (and assigned by) the network you are connecting through, the MAC Address always stays the same, and in fact it is part of the formula that is used to assign the identification number to your game and you!
Because of that, if you insert your game card into a different console, which naturally has a different MAC Address, the process by which it is ID'd changes. While you can do this and use the game and its online options, be warned that using a different console than the one you originally registered the game with will automatically delete all of the contacts in your Pal Pad and can alter your own ID number and address – it does this because the online portion of the game and system and its abilities to interact with other consoles that are owned by your friends relies upon the assignment of a unique ID to that game card.
Note: If your device is an original DS – meaning that it is not a Dsi or 3DS – all of the network settings are edited and configured from the game card itself, which you access by powering on our device and loading the main menu of your game (usually called the “Loading Screen”), which contains options like Continue / New Game / Mystery Gift / Battle Competition / Game Sync Settings / Nintendo WFC Settings / Mic Test / Relocator – with the important selection for our purposes being the Nintendo WFC Settings screen since that is where you will find the MAC Address and ID.
If you end up replacing your console, whether as an upgrade or because your old one died, you will need to reconfigure your game in order to talk with your mates, and that process includes re-entering their Nintendo ID's into your Pal Pad! You may also need to get them to do the same for your entry as well. Once you have done that though, you will then be able to make use of the Xtransceiver and its video chat function with very little effort indeed!
– Game Sync --
When you choose this from the C-Gear you will be asked if you want to save your game – saying yes is a good idea – and then you will be asked to confirm that you want to connect to the Internet and Nintendo WFC – again saying yes is a good idea :) as at this point assuming that you have properly configured your console to talk to the local WiFi switch/connection, you will initiate the Game Sync System automatically.
The process here can actually take a few minutes, but assuming that you have everything properly set up the game and your console will now be sending a connection request to the main Nintendo WFC server in order to have it issue you a “Game Sync ID” number. After a moment (depending upon the time of day, network traffic, the speed of your connection, and other factors this process can actually take as long as five minutes, and it should not be interrupted once you begin it) the bottom touchscreen should display a return screen at the top of which is the ten-digit ID Number which is an alpha-numeric mixture that uniquely identifies your game and console to the server.
You should write down this number on the inside back page of your game manual just for fits and shiggles. The return page confirms that your Game Sync ID number has been issued and received, and that you can verify it by selecting the Game Sync Settings from the Main Menu. Confirm this by hitting the action button and you get a screen that contains the following information:
“Access the Pokemon Global Kink website at http://www.pokemon-gl.com and complete the setup to use all of the features of Game Sync. Read the Instruction Booklet for complete details.”
More PB2 on SuperCheats.com
Well qualifying this with the fact that we have not actually used that app yet, it is our understanding that you don't. That is used to move Pokemon from game to storage and storage to game, not trade them.
how do you trade pokemon with the poke'transfer
Not as such - there is the story campaign - but this is not really a mission-based game mate.
are there any people on the game to talk to to give me missions