The Thin White Line (Part 2)
Thank you for printing this page from www.SuperCheats.com.
Remember to come back to check for updates to this guide and much more content for South Park: The Fractured But Whole
Follow this guide to hear about updates
Added:
Once done, check the desk for some loot then enter the code “1477” on the keypad to take the elevator. After reaching the bottom of the elevator, enter the Morgue first then loot the supply cabinet to the right and the lower right body drawer for some materials. Next, pull the stretcher with a dead body on the left then loot the Forensics Room Key from the robe’s pocket. Don’t forget to loot the materials inside a hidden container in the alcove where you pulled the stretcher from.

Leave the morgue and enter the forensics room this time. Wait for the monologue to finish until the lights get turned on and you can control your character once again. First, pop the electrical panel open then use Haywire to short it.

Next, stand near the door, use timefart Pause, then open the containment room’s door to quickly nab the key on the floor. Use that key to open the glass cabinet where the valve opening is enclosed then use Sandblaster on it to remove the cat’s corpse blocking the ventilation fan. This should clear out the deadly gas inside the containment room.

Enter the containment room this time and scan the green grate on the floor to use Diabetic Power and open it. This should reveal the Skeleton Key underneath. Get it then leave the room and open the skeleton gate on the rightmost side of the corridor. This should bring you to a new area and trigger a cutscene. You’ll be fighting an Elder God as a boss this time.

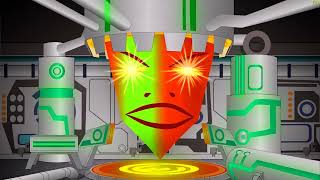
Shub Niggurath is a special boss fight. You cannot damage it directly and the battle has two phases per turn. For the first phase, Shib-niggurath will be exposed and the danger zone is much larger. This is where the boss will instantly kill anyone within the danger zone. Like other special bosses in the game, it has a turn gauge in the middle of the screen that automatically fills up over time, requiring you to perform quick decisions. Powers with knockback and those that will allow you to swap places with enemies will be very important in this battle. For this phase, you have to ensure that no ally is left inside the danger zone. Since Shib-niggurath’s turn gauge fills over time, it will be recommended to deliberately delay the end of your turn and wait for the boss’s turn gauge to fill up completely when all your teammates are outside the danger zone.
The enemies will have the first turn so interrupting them with a timefart is recommended. Next, you have to work your way in quickly pushing the enemies to the red tiles. This may include not defeating them completely. You can damage them and inflict status ailments but make sure that they’re not going to be knocked out by the turn ends. Your healer and support units should focus on buffing and healing your team since there’s no need for them to go on an offensive yet. Unfortunately, these enemies can also use knockback attacks so ensuring that you swap places with them when attacking will be a good overall strategy for this phase. After this phase, Shib-niggurath will release some egg sacs and more police cultists will arrive. This is where you should ensure that at least one of the cultists is within the danger / feeding zone when the boss’ turn comes in. The egg sacs explode when damaged; they deal minor damage but can knockback anyone around it. You can use this to your advantage if ever a cultist is positioned behind it. After successfully feeding the elder god with white meat, it will lose a significant amount of HP. You have to repeat this process for the entirety of this battle.

After successfully feeding the boss and damaging it, the phases will reset and more reinforcements will appear. Like before, your priority is to push enemies in the danger zone while keeping every ally safe. Repeat the same steps as before and remember to heal up as necessary. After winning, you’ll get the Necronomicon artifact, Ungodly Strength DNA, Mummy Costume Set, $4.91, and 350 EXP.


After the battle, you’ll leave the police station where another battle will take place. This time, you’ll be fighting your allies. You won’t be fighting them alone since Professor Chaos and Call Girl will be by your side at the start of the battle. Since the enemies will have the first turn, interrupt them with a timefart to gain the advantage. You have to knock out your mind-controlled allies to get them back to their senses. Since they’ll be at 1HP, you can have them consume healing items or heal them with powers to make them battle-worthy once more and turn the tide of battle. You can’t damage Dr. Timothy at the moment so you’ll have no choice but to deal with the mind-controlled heroes first.

After defeating the first wave of heroes, Dr. Timothy will take control of Captain Diabetes and Super Craig. He will also lower his shield, allowing you to damage him. He’ll be able to use his abilities as well, including Mind Rape which charms an ally and teleportation that gives him the freedom to move around the battlefield. Like before, prioritize the mind-controlled allies first and heal up as needed. Don’t hesitate to use a Summon like Moses to heal the entire party. If Cartman is controlled, just knock him out and let it stay that way. The fat turd deserves it. After defeating the two tanks, you can freely gang up on Dr. Timothy to defeat him and win the battle. You’ll obtain Energizing Codex artifact, Dr. Timothy’s Character Sheet, $5.77, and 350 EXP. After the battle, more cutscenes and the night will be over.

Anything missing from this guide?
ASK A QUESTION for South Park: The Fractured But Whole
Comments for The Thin White Line (Part 2)
Add a comment
Please log in above or sign up for free to post commentsNo comments yet. Tell us what you think to be the first.
Table of ContentsClose
- Walkthrough - 1st Day
- Walkthrough - 2nd Day
- Walkthrough - 3rd Day
- Walkthrough - 4th Day
- Side Quests
- Extras
- Collectibles
Guide Updates
Get notified of updates to this guide
Many of our guides get updated with additional information. To get an email when this guide is updated click below.
 Join us on Discord
Click to close