URGENT: Save Moga Village!
Monster Hunter Tri Walkthrough and Guide
URGENT: Save Moga Village!
Hunting Quest: Repel a Ceadeus
Unlocked: Complete “A Bard's Tale,” “The Wrath of Rathalos,” “The Volcano's Fury” and the “One Chance” Villager Request
Reward: 4200z
Contract: 400z
Time: 35 min.
Area: Underwater Ruin
Ceadeus is a whale-like Elder Dragon that resides deep within the underwater ruins near Moga Village. This is the creature that has been causing the Moga quakes and threatens the very existence of the peaceful seaside town. As the only hunter in the village capable of taking on such a terror, you're tasked with driving Ceadeus deep into the underwater ruins and inflicting enough damage to force it to flee at the end of the quest.
There's no doubt you're up against an intimidating foe here; Ceadeus is enormous in size with gigantic horns to match. However, you are more than capable of winning this fight with all of the skills you've gained in your quest thus far.
 Terrifying? Yes. Indomitable? Nope. |
As with any boss monster hunt, careful preparation is key. Cha-Cha's Ancient Mask is one item in particular you'll certainly need before setting out. You can change Cha-Cha's mask by interacting with him in Moga Village and selecting the “Change Mask” option from the menu that appears. With the Ancient Mask equipped, Cha-Cha can replenish your hunter's Oxygen Gauge when you give him the signal (by pressing the Select button to bring up the Hunter menu and then pressing the Start button). As the entirety of this fight will place underwater, you can understand why this mask is a necessity!
You'll also need a suitable weapon. Underwater combat is arguably easiest with a Lance, so it is strongly recommended that you select a weapon of this type. Although completing this quest is very much possible with any other weapon type, go with a Lance if you plan to follow this walkthrough in its entirety (and aren't looking for more general information about Ceadeus).
If you've been playing strictly offline up until this point, one of the best Lances available to you is the Babel Spear. The Babel Spear has a base attack power of 368, solid sharpness and boasts 16 points of defence. Crafting this weapon requires some hunting and mining to gather materials, though. This weapon line starts with the Iron Lance and branches at Knight Lance. Upgrade to Rampart (Isisium can be mined in the Tundra zone) and then Rampart (Rare Scarabs can be caught with a Bug Net in areas 1 and 2 of the Volcano zone) to reach Babel Spear, which requires five Uragaan Shells, two Uragaan Scutes and 15 Dragonite Ore to craft.
Along with a powerful weapon, make sure you have a set of armour that will allow you to take a couple of heavy hits. Most of the sets that can be crafted with materials from one of the five-star tier boss monsters should be fine. A full set of Lagiacrus armour is a good choice for the Olympic Swimmer skill, which increases your hunter's movement speed in water.
If you're crafting a brand new set of armour for this fight, stay away from the Rathalos set, which carries negative 20 Dragon element resistance. A lot of the higher-class armour sets carry negative Dragon resistance (the Lagiacrus, Uragaan and Barioth sets all carry a negative 10), but the Rathalos set is the worst offender.
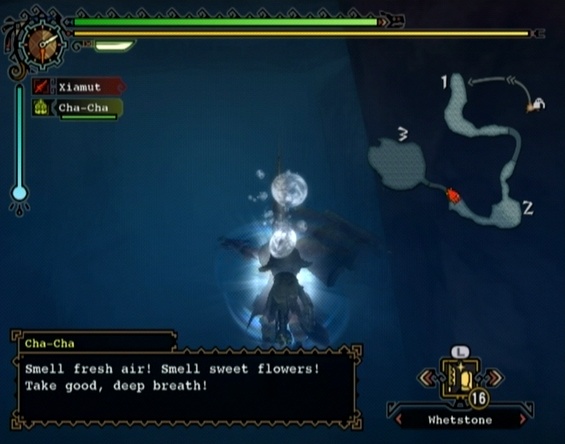 Cha-Cha can restore your hunter's Oxygen Gauge while wearing his Ancient Mask. |
Don't fret if you're already wearing a full set of Rathalos or Agnaktor armour and aren't up to crafting a whole new set, as you'll still be able to take a few hits from Ceadeus while wearing Rathalos or Agnaktor without being carted.
Once you're suited up, ensure you have 10 Mega Potions and a decent supply of Whetstones before setting out. If you happen to have any Waterblock or Dragonfell berries in your Item Box, bring those along as well, as they can be used to instantly clear the status ailments (Severe Waterblight and Severe Dragonblight respectively) a couple of Ceadeus's attacks can inflict. Waterblock Berries can be gathered in the Flooded Forest zone and Dragonfell Berries in Area 8 of the Volcano zone (or by carving Uroktor).
If this is your first time attempting this quest, a short cutscene will ensue showing Ceadeus moving into Area 1. Remove the Map, First-aid Meds, Rations and the Mini Oxy Supply items from the Supply Box and jump down the cliff at the north end of camp to get started.
Turn around once you've landed in Area 1 and you'll find yourself face-to-face with the terrifying Elder Dragon. The first 10 or so minutes of this fight will consist of Ceadeus simply moving from Area 1 into Area 3. Ceadeus's massive size makes it a slow swimmer and its attack pool is limited while it's moving through the first two areas, so it's very important you inflict as much damage as you can while Ceadeus makes its way to Area 3.
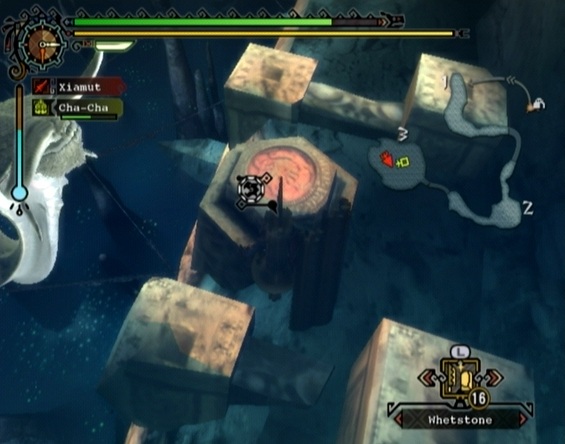
Ceadeus's weak spot -- no matter the type of weapon your hunter is wielding -- is its furry mane. Concentrate the majority of your attacks on this area as Ceadeus moves through to Area 3 to maximize damage. If you've outfitted your hunter with a Babel Spear as instructed, you should be able to break Ceadeus's mane well before it reaches Area 3. Trimming Ceadeus's mane not only acts as a damage indicator, but also yields a high chance of receiving Ceadeus Fur on the reward screen at the end of the quest. In fact, the only way to obtain the Ceadeus Fur monster part is by breaking Ceadeus's mane and receiving it on the post-quest reward screen.
 Concentrate your attacks on Ceadeus's furry mane to deal the most damage. |
You can also damage Ceadeus's hide and its tail if you attack these areas enough. The only way to obtain a Ceadeus Tail is by damaging its tail and receiving one on the reward screen at the end of the quest. Note that you can't cut Ceadeus's tail as you can the tails of some of the other boss monsters; instead, chunks of skin will appear missing on the surface of Ceadeus's tail to indicate that you've succeeding in “breaking” it.
Ceadeus's horns can also be broken (one will break off completely and the tip of the other will crack), but don't worry about that until Area 3.
If you're not seeking a Ceadeus Tail, focus all of your attacks on Ceadeus's mane. You should be very familiar with underwater combat by now, having bested the likes of Gobul and Lagiacrus in previous quests.
Ceadeus will rarely attack while moving through to Area 3. Any attacks it does use are easy to read and subsequently block. To remain unscathed, simply put up your shield or dodge back or to the side a couple of times when Ceadeus begins to ready an attack. You'll take minor hits from Ceadeus as it jostles you while moving through the area, but this amount of damage is easy enough to patch up with a healing item. Attack Ceadeus head on and steer clear of its flippers to avoid taking too much damage.
Be ready to swim away once Ceadeus reaches the south end of Area 1, as here it will use its water cannon attack to dismantle the rocks barring entry into Area 2. Get out of the way when Ceadeus opens its mouth and begins to charge up its attack. Once Ceadeus has destroyed the barrier and moves into the next area, sharpen your weapon and use Cha-Cha's Ancient Mask special ability to restore your hunter's Oxygen Gauge before following the Elder Dragon into Area 2.
Area 2 will play out much like Area 1. Just keep hacking away at Ceadeus's mane until Ceadeus reaches the end of Area 2. If you managed to trim Ceadeus's mane before it left Area 1, it should move through Area 2 in a hurry.
 Hack away at Ceadeus while it makes its way to Area 3. |
Once Ceadeus reaches the west end of Area 2, it will use its body to demolish the boulders blocking the way into Area 3. As before, keep your distance while Ceadeus destroys the barrier, then sharpen your weapon and restore your hunter's Oxygen Gauge before following Ceadeus into the next area.
Ceadeus becomes much more of a threat once in Area 3. Here, Ceadeus no longer moves on rails through the area and now has access to a number of powerful moves. Area 3 is where the fight will end, but you don't have to kill Ceadeus. In fact, killing Ceadeus at this stage is impossible. You just have to keep beating on Ceadeus and if you've dealt enough damage to it by the time the 30 minutes allotted for this quest are up, the Elder Dragon will flee and you'll complete the quest and win the game.
Keep an eye on your hunter's Oxygen Gauge throughout this fight. Be sure to signal to Cha-Cha to replenish the gauge before it depletes completely. If you're in a tight spot and Cha-Cha is unable to reach you or has been knocked out, use one of the Mini Oxy Supply items you found in the Supply Box back at camp. A Mini Oxy Supply will completely replenish your hunter's Oxygen Gauge when used. Swimming near one of the streams of air bubbles in the area will accomplish the same.
Be sure you're targeting Ceadeus's mane, as striking this area will inflict the most damage. There are also a couple of tools available to you in Area 3: a Dragonator at the northwest end of the area (look for some light and an orange button on the ledge about midway up), a Ballista at the end of the ledge to the left of the Dragonator button and a second Ballista on a platform off to the right of it. You'll certainly want to make use of the Dragonator, though, as it is simple to operate and packs a powerful punch.
You'll need ammo to operate a Ballista. You can find ammo by gathering at the broken crates nearby each one. With the ammo selected in your inventory, approach the Ballista and press the Y button to hop on. Use the Left Stick to aim (press R to zoom) and use X to fire. Press the B button when you're ready to leave the weapon. The Ballista can be useful for damaging Ceadeus's horns, but just be sure to this weapon only while Ceadeus is a good distance away.
 Use the Dragonator at the right time to punch Ceadeus in the face. |
It's easiest to skewer Ceadeus with the Dragonator while it's enraged. When Ceadeus enters rage mode, bright red spots will appear all over its underside and it will let out a deafening roar. The red spots will remain on Ceadeus as long as it's enraged and disappear once it returns to its normal state.
When Ceadeus enters rage mode, make your way over to the Dragonator at the northwest end of the area (look for light and an orange button along the ledge) and position yourself over the button. If you position yourself by the Dragonator button while Ceadeus is enraged, Ceadeus will at one point swim away from the Dragonator and then swim back over and slowly ascend up the wall to meet you. Ceadeus's puts itself right in front of the Dragonator while ascending the wall this way, allowing you to punch it in the face with the ancient weapon.
Be careful when you first approach the Dragonator because Ceadeus will likely still be focused on you and may attempt to ram you. Dodge Ceadeus's attack and it will most likely swim away as described in the paragraph above and then begin to swim back toward the Dragonator.
You'll need careful timing to get the most out of the Dragonator. Use the Dragonator just as Ceadeus's head is approaching the spikes to hit its face, which will hopefully remove one of its horns and crack the other if you haven't already accomplished this feat. Position your hunter so you have a clear view of the spikes and the approaching Ceadeus. You'll be able to activate the Dragonator as long as the button icon is hovering above your hunter's head, so you can position your hunter a bit over the edge for a better view.
You can use the Dragonator more than once during this fight, but you'll need to wait awhile after using it before you can trigger it again. A text box will appear onscreen that says “The Dragonator is ready for use” when the time comes. To maximize your damage potential with the Dragonator, be sure to use it as soon as it becomes available again and Ceadeus enters rage mode.
Using the Dragonator against Ceadeus
Once you've broken Ceadeus's horns, you can carve the horn that breaks off two times. Do not carve the horn while Ceadeus is near to avoid leaving yourself open to an attack.
As mentioned above, Ceadeus's move set expands once it's in Area 3. Ceadeus retains the rams and tail whip attacks you dealt with while moving through areas 1 and 2 (which are easy to anticipate and subsequently dodge or block with your shield) but gains access to a couple of deadly moves. Most devastating is its water cannon, which can inflict a gruesome amount of damage and Severe Waterblight, an annoying status ailment that greatly reduces the rate your hunter recovers stamina.
Ceadeus's hipcheck and charge moves are also capable of inflicting Severe Dragonblight, a status ailment that reduces your hunter's damage output and as well as your hunter's Affinity, which determines the chance of a critical hit with each strike (in this case rendering many of your strikes negative critical hits, dealing even less damage). Needless to say, Severe Dragonblight is a crippling status ailment that could very well jeopardize your success if you remain in that state for too long. All the more reason to avoid getting hit!
Both the Severe Waterblight and Severe Dragonblight status effects will wear off with time, but can be cured instantly with a Waterblock Berry or Dragonfell Berry respectively. Waterblock Berries can be gathered in the Flooded Forest zone and Dragonfell Berries can be gathered in Area 8 of the Volcano zone or obtained by carving Uroktor.
Ceadeus's water cannon move is the most powerful and dangerous in its arsenal. Before performing this attack, Ceadeus opens its mouth wide and swallows a large amount of water. Soon after, Ceadeus spews forth a torrent of water. This attack is easy to dodge if you're a fair distance away, but you may not be able to get out of the way in time if you're right up by Ceadeus's face attacking its mane. This attack cannot be blocked (unless you're wearing full Agnaktor and have the Guard Up skill) and will likely hit your hunter even if you're attacking Ceadeus's mane from the side.
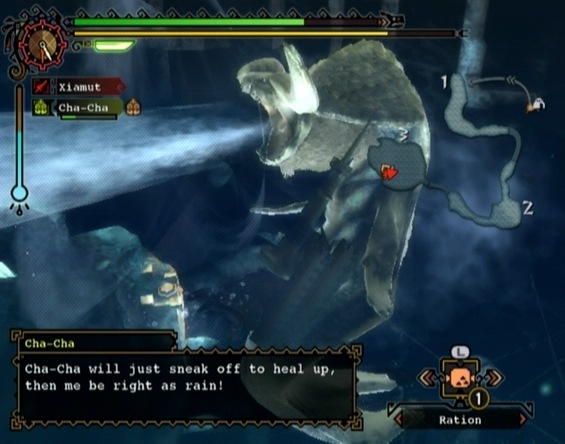 Ceadeus's water cannon is a killer. Steer clear! |
Avoiding Ceadeus's water cannon requires vigilance. As soon as you notice Ceadeus open its mouth and start taking in water (or hear the sound of water rushing in), move as far to the side as you can before Ceadeus releases the torrent. Don't bother sheathing your weapon because Ceadeus can perform this move quite quickly; just face toward Ceadeus's head and tap the B button to evade away as much as you can.
Ceadeus uses a variant of the water cannon move where it points its head up, gathers water and then fires the torrent directly in front of itself and then below. This attack is considerably easier to avoid as its range is narrower. Again, just drop what you're doing as soon as you spot Ceadeus charging this attack and evade away by facing Ceadeus and tapping the B button.
Keep battling Ceadeus and if you've dealt enough damage by the time the 30 minutes allotted are up, the Elder Dragon will flee and you'll win the quest!
Your time questing in Moga Village is not over yet! You can actually kill Ceadeus in the “Decisive Battle” post-game urgent quest as well as take on six challenging dual-monster quests. See the following section for details!
More Monster Hunter Tri Stuff
I like the walkthrough but they should have a walkthrough of the other 6 urget quest
it took me 2 trys to beat him. the whole 30min. 2nd took 5min.
I just beat this quest today, what I did was use the Thunderclap+ ls and full lagiacrus armor. 10 mega potions, 10 potions, 10 herbs, 2 max potions, 3 life powders, bunch of whetstones. focused all my attacks on his beard till he got to area 3, then focused my attacks on his head, with 10 minutes left I used the dragonator which took off his big horn and then with only 5 minutes left I was attacking him like crazy everywhere and then managed to make him flee with 3 minutes left. This battle is hard but if you come prepared it can be easy. Good Hunting
This is a very helpful guide. If you cannot make the babel spear use Rampart+ Be sure to bring cha cha with ancient mask and if he dies to bring some oxygen supplies. I would actually not recommend a longsword I think lances are more practical underwater. Bring Lagiacrus armour as highly upgraded as possible with vitallity jewls.