Moga Village
Monster Hunter Tri Walkthrough and Guide
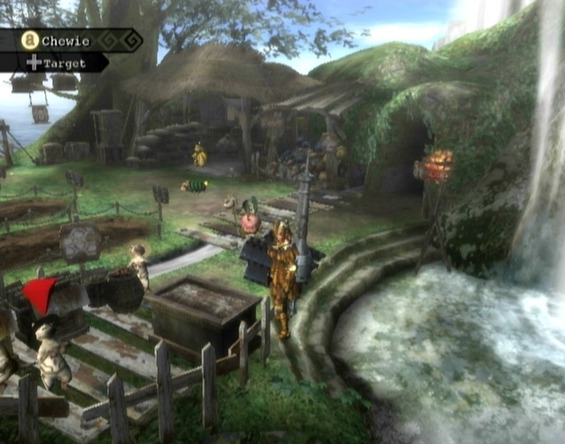
Moga Village
Monster Hunter Tri's offline mode takes place in Moga Village, a small, peaceful fishing town. Read below for information on all of the amenities you have access to.
Hunter's House
Your hunter's house is accessible through the curtained doorway to the right of where the Village Chief sits and at the bottom of the steps that lead up to the Wyverian Artisan. Inside you'll find a bed and your Item Box.
Use your bed to save your game or shift night into day. The Item Box is where you can store all of your equipment and items. Your hunter's Item Pouch only holds 24 items, so it's a good idea to store away unnecessary items between quests. Via the Item Box menu, you can also change your hunter's appearance (limited to hair colour, hair style, clothing and clothes colour), as well as register and switch between sets of equipment.
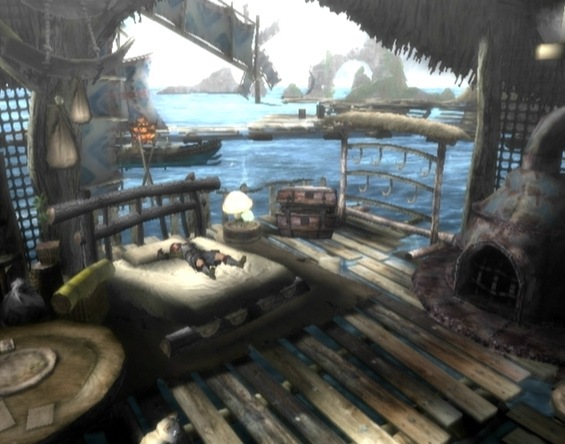 The Hunter's House is your space in Moga Village. |
Chamberlyne is your Felyne helper. Speak to Chamberlyne to place or remove furnishings in your hunter's house or get data for the Arena mode stored on your Wii console or Wii Remote.
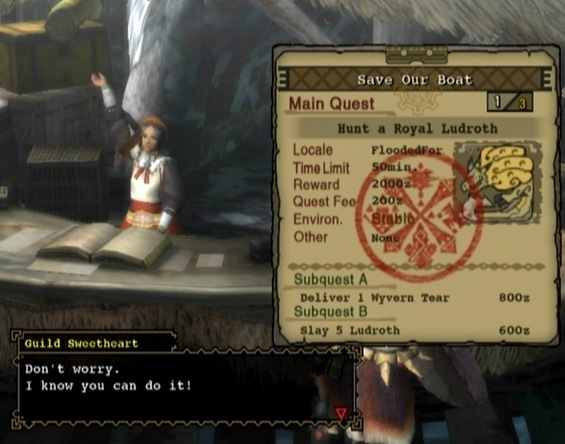
Quest Counter
Before you can set out on a quest, you must speak to the Guild Sweetheart at the quest counter in the top-left corner of Moga Village. There are five tiers of quests in the offline mode, ranging from one- to six-stars. You must complete certain key quests in one tier and then an urgent quest to move up to the next highest tier.
Enter a tier and select one of the quests listed to bring up an information pane. Look at the top of the pane to determine the main quest objective and the bottom of the pane to determine the objective of any subquests. You'll also find listed the map the quest takes place on, the amount of time allotted for the quest, the monetary reward for completion, the fee for accepting the quest and the condition of the quest environment.
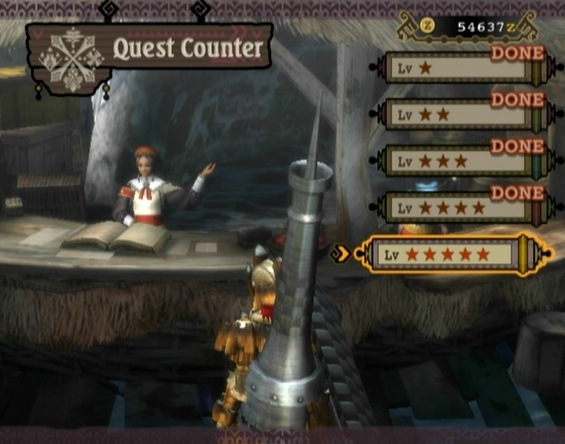 You can undertake quests by speaking with the Guild Sweetheart at the quest counter. |
Once you've accepted a quest, set out by heading to the end of the pier through the gate to the left of the quest counter.
Moga Woods
Cross the bridge to the right of the Wyverian Artisan to access Moga Woods.
Moga Woods is a changing instance of the Deserted Islands map. There is no time limit in Moga Woods, making it an ideal place to gather certain materials or try out a new weapon type. Kill monsters in Moga Woods and you'll earn Resource Points, which are required to upgrade Moga Farm and unlock new masks for Cha-Cha through villager requests. You may also be rewarded with tradeable Commodity items and other valuables when you report back to the Chief's Son.
Along with smaller monsters such as Kelbi, Aptonoth and Jaggi, large monsters such as Qurupeco and Royal Ludroth also inhabit Moga Woods. Kill a boss monster while in Moga Woods and you'll be rewarded with a large amount of Resource Points and the possibility of receiving a rare Commodity when you report back to the Chief's Son. You can trade these commodities to the Argosy Captain for various hard to find items.
 Hunt large monsters in Moga Woods to earn rare commodities and tons of Resource Points. |
Because Moga Woods is a changing instance, you may not encounter the same monsters on different days. To determine the large monsters inhabiting Moga Woods on a particular day, speak to the Chief's Son and select “Moga Forecast” from the Stockpile menu. You can see which large monsters inhabit Moga Woods on the current day as well as look ahead to tomorrow and the day after.
Great Jaggi, Qurupeco, Royal Ludroth, Rathian, Rathalos and Lagiacrus are the only boss monsters that will appear in Moga Woods. The possibility of these monsters appearing in Moga Woods will be unlocked as you complete more quests.
Stockpile
The Stockpile is where you can report your kills in Moga Woods, convert items into Resource Points and fulfill villager requests. Fulfilling villager requests requires Resource Points and specific items. More villager requests will become available as you complete more quests. Fulfill villager requests to upgrade Moga Farm and unlock new masks for Cha-Cha.
Killing monsters in Moga Woods is one way to amass Resource Points, but you can also convert items to generate resources via the Stockpile menu.
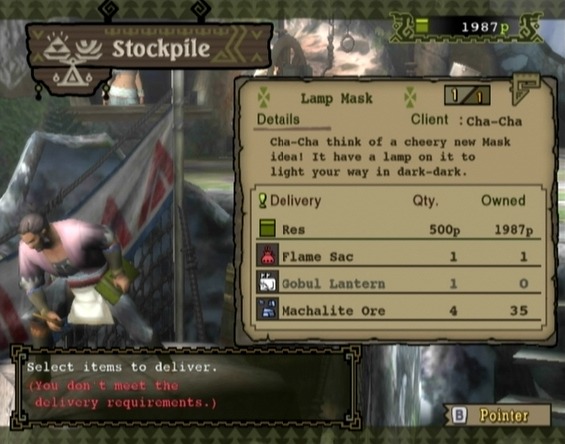 Fulfill Villager Requests to upgrade Moga Farm and unlock new masks for Cha-Cha. |
Fishery
Speak to the Fishmongress in the bottom-left corner of Moga Village to bring up the Fishery menu. You can spend Resource Points to dispatch one to three boats in pursuit of fish and/or treasure. There are several different regions you can the Hunting Fleet to. You'll unlock more regions as you complete more quests
You can equip a boat with a tackle before dispatch to improve its catch or reduce the length of its voyage. For a tackle to have an effect, it must match the region you're sending the boat to. For example, equipping a Treasure Tracker tackle to a boat headed to the Dark Waters, Moga Strait or Abyssal Volcano region will have the desired effect, as these are all treasure hunting regions. The same tackle would not have any effect if you sent the boat to the Moga Coast, Moga Shallows or Moga Deep region, as these are all fishing regions (use Fish Finder for fishing regions).
Each boat in the fleet – the Captain, Redspear and Blackspear – can be upgraded twice. The upgrades for each ship are available for trade from the Argosy Captain. Upgraded boats will bring in a larger haul and complete trips in less time.
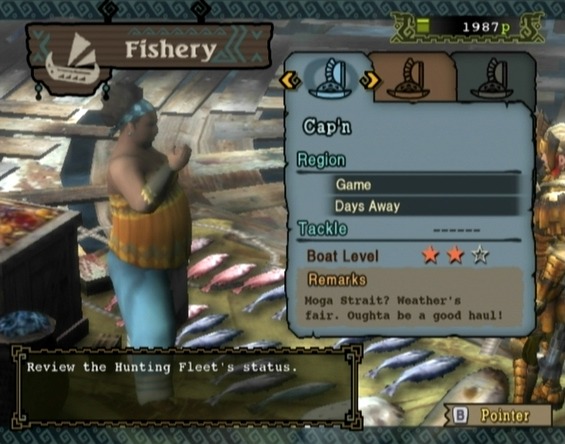 Dispatch boats at the Fishery in search of fish and treasure. |
When the fleet returns to Moga Village, speak to the Fishmongress and select “Check Haul Box” from the menu to collect. You can determine if the fleet has returned by checking for the men and their boats south of the Fishmongress or by selecting “Moga Village” in the Info menu to view the fleet's status.
Argosy
The Argosy Captain will appear in Moga Village after you complete the two-star urgent quest “No Love For Ludroth.” You can trade with the Argosy Captain using the Commodity items you receive as reward for hunting in Moga Woods. The captain has a variety of uncommon and rare goods up for trade, many which you can't find anywhere else.
You can barter for two different kinds of trade goods with the Argosy Captain: uncommon trade goods and rare commodities. Uncommon trade goods tend to be ingredients and items you can use in the field, while rare commodities are things like furnishings for your hunter's house and ability tomes for Cha-Cha
Select the “Trade” option to barter for uncommon trade goods. On the trade menu, you must choose the goods you want to trade for and make an offer. Each Commodity has a trade value represented by a green bar for your offer and a yellow bar for the goods you want to trade for. To make a trade with the captain, the combined trade value of the items you offer must be greater than or equal to the trade value of the goods you're trading for.
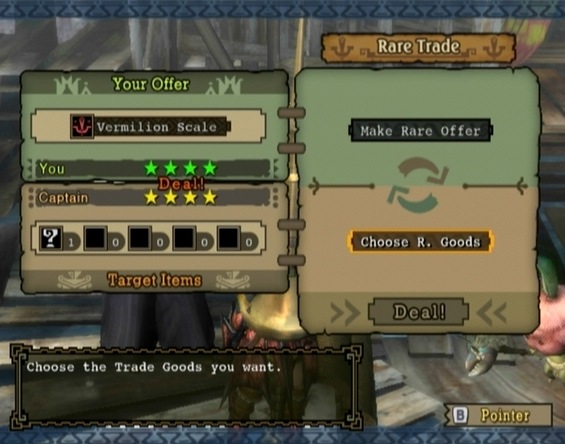 You can trade commodities with the Argosy Captain for a variety of goods. |
You can stack commodities, offer several different types of commodities and choose more than one item to trade for, so long as the total combined value of your offer is greater than or equal to the value of the captain's items. “Deal!” will appear between the green and yellow bars on the trade screen when you've offered items of an appropriate value for the goods you've selected.
When trading for rare commodities, you can only put a single rare Commodity up for trade. Each rare commodity has a star rating ranging from one to four stars. To trade a Rare Commodity with the captain, you must offer an item that has a star rating greater than or equal to the rare item you choose. You can choose more Rare Commodity to trade for, so long as the single rare Commodity you're offering has a star rating greater than or equal to the combined number of stars of each rare good you choose.
Choose the “Request Stopover” option and you can request the Argosy Captain visit or bypass certain destinations on his next trip. The trade goods the captain brings back when he returns from a voyage depend on the destinations he visited. The more destinations you request the captain visit, the longer his next journey will take. There are three destinations total (Farmer Realm, Hunter Realm and Wyverian Hub), which are unlocked as you complete more quests. You can give the captain a voyage aid (a Power Paddle or a Perfect Paddle) while he's in Moga Village to shorten the duration of his next trip
Canteen
The Itinerant Cook will appear in Moga Village along with the Argosy Captain after you complete the two-star quest “No Love For Ludroth.” From then on, you can find the Itinerant Cook next to the Guild Sweetheart at the quest counter.
You can use zenni or Resource Points to order a meal at the Canteen to change your hunter's stats and acquire Food Skills. Food Skills will remain active for one quest but will wear off if your hunter falls in combat. The ingredients and preparation method you choose when ordering the meal will determine the effects. Ingredients marked as fresh raise the likelihood that several skills will activate.
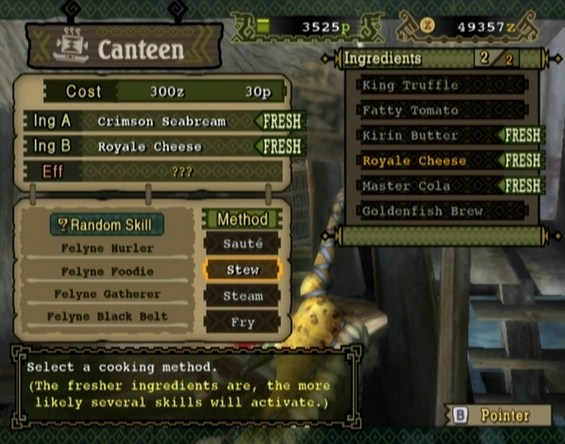 Order a meal at the Canteen before a quest to activate (beneficial or detrimental) Food Skills. |
Select two ingredients and a list of four cooking methods will appear. To the left the list of cooking methods is a list of the possible Food Skills the meal will activate if you match the highlighted method with the ingredients you selected.
Food Skills can have a beneficial or detrimental effect. Needless to say, if you're experimenting and you end up saddled with crippling skills, get rid of them before departing. You can do so by selecting “Quit Game” from the Hunter menu, saving your game and then reloading your hunter. You can try another recipe if you'd like or cut your losses and set out.
There are many Food Skills and all have different effects. The Monster Hunter Wiki has a complete list of Food Skills and their effects, as well as a list of food type combinations and their effects. You can view those lists here: http://monsterhunter.wikia.com/wiki/MH3:_Kitchen_Skills
Market
Speak to the Gal with the Goods behind the table in the bottom-left corner of the village to view her wares. There are a number of items you'll find useful in your questing, namely Potions, Whetstones, Iron Pickaxes and Trap Tools. She also carries the first three volumes of the Book of Combos, which will improve your chance of success when combining two items. You'll also find an Organizer Guide and a Pack Rat Guide, which will increase the size of your hunter's Item Box.
There are sales on certain days. On such days, all items save for the combo and storage books cost half as much zenni. Take advantage of sale days; you can select the “Buy, Send to Box” option from the Market menu to purchase large quantities of items without having to run back and forth between the merchant and your Item Box.
Smithy
The Wyverian Artisan is by the bridge to Moga Woods at the top of the stairs in the top-right corner of the village. Speak to the artisan to forge weapons, armour or decorations, or upgrade weapons and armour to stronger forms. See “Equipment Forging” under “The Basics” section to learn more.
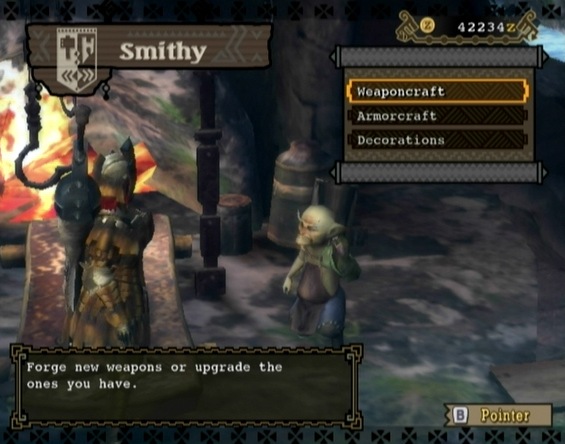 The Wyverian Artisan can craft and upgrade weapons and armour. |
Moga Farm
Cross the bridge in the bottom-right corner of Moga Village to access Moga Farm. You can spend Resource Points at Moga Farm to put your Felyne helpers to work farming plants, mushrooms, insects or honey.
You'll have one Felyne worker to start, but will gain a couple more as you complete more quests. To set your helpers to work, speak to the Head Farmer to bring up the Farm menu and select “Cultivate.” You can assign each Felyne to harvest a particular item. You must own at least one of the item you want the Felyne to produce.
After selecting a source, you can select a fertilizer to enrich the crop. Choosing a fertilizer will increase the number of the source item the Felyne worker is able to cultivate during each cycle.
All harvestable items fall under one of four categories: Fields, Shrooms, Insects or Honey. Not all items can be harvested (e.g., Thunderbugs). If you possess an item and it doesn't appear on the list when you're selecting a source, this means that item can't be harvested.
 The Felyne farmers can cultivate Fields, Shrooms, Insects and Honey. |
Select “View Farm Status” on the main Farm menu to view the level of each of the four facilities. The higher the level of a facility, the more cycles of an item you can assign a Felyne to cultivate. Complete villager requests via the Stockpile to upgrade your facilities (refer to the “Villager Requests” section for help with that). With a fully upgraded facility, you can assign a Felyne to a maximum of ten cycles. One cycle passes each time day changes to night and vice versa.
Farming requires Resource Points, but not very many. As such, it's good to always have your workers assigned to cultivate something, with you checking in every now and then to harvest the crop. Select “Check Crop Box” from the main Farm menu to see what the Felynes have produced.
Cha-Cha
Cha-Cha is your Shakalaka companion. He'll join you after you complete the “Shakalaka Savior” urgent quest at the end of the two-star quest tier.
You can set Cha-Cha to accompany you on quests by speaking to him in Moga Village and selecting “Invite on Quest” at the top of the menu. Likewise, select “Leave in Village” while Cha-Cha is at your side if you don't want him to follow you when you depart.
Cha-Cha can attack enemies, gather from gather spots and carve additional materials for you. He'll also dance to boost your hunter's Attack, Defence, or Health.
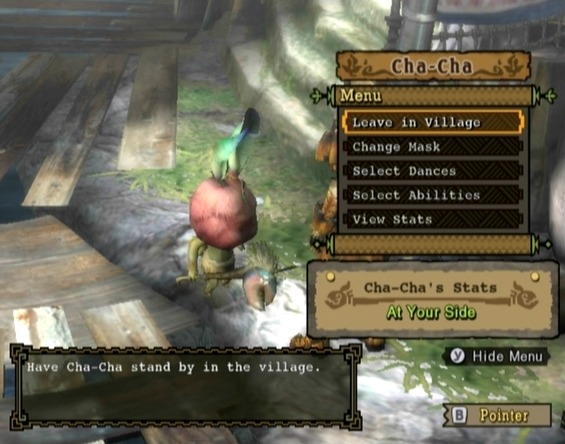 Interact with Cha-Cha while in Moga Village to access the Cha-Cha menu. |
You can change the dances Cha-Cha uses to create different dance effects. Cha-Cha has four different dances: Rah-Rah Dance and Ooga-Boo Dance he has by default, and Wakka-Wakka Dance and Boom-Boom Dance he can learn if you by trade rare commodities to the Argosy Captain for the tomes. You can set two of Cha-Cha's dances using the “Select Dances” option in Cha-Cha's menu to create different dance effects.
Cha-Cha wears the Acorn Mask when you first meet him. There are seven different masks in the game, each with its own special ability and effects. You can unlock additional masks for Cha-Cha by completing villager requests via the Stockpile menu. More of these villager requests will become available as you progress through the offline mode. Refer to the “Cha-Cha Masks” section of this guide for more information.
Each mask has one, two or three ability slots, which you can set using the “Select Ability” option in Cha-Cha' menu. The number of ability slots available to you depends on the mask selected as well as Cha-Cha's mastery level of that mask. Cha-Cha's mastery of a mask will increase the more he wears it.
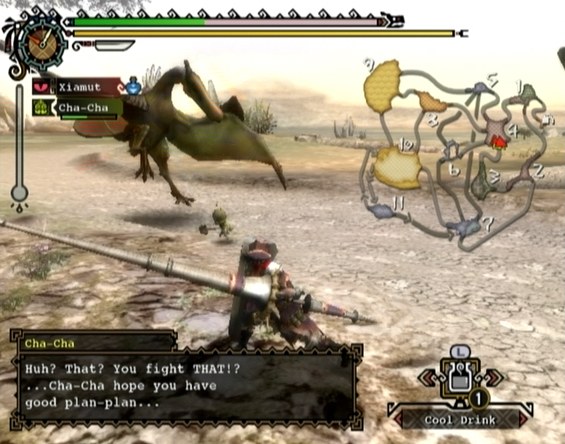 Cha-Cha can attack enemies, gather from gather spots and carve additional materials for you. He'll also dance to boost your hunter's Attack, Defence, or Health. |
You can signal Cha-Cha by first pressing the Select button to bring up the Hunter menu and then pressing the Start button. This is how you can trigger the abilities of certain masks, such as the ever-useful Fluffy Mask.
Some mask abilities require you give an item to Cha-Cha. To do so, open your hunter's Item Pouch, select the item you want to give to Cha-Cha and select the “Give” option at the bottom. Not all items can be given to Cha-Cha, so this option may be greyed out. As well, giving Cha-Cha healing items and meat will restore his health and stamina respectively.
More Monster Hunter Tri Stuff
No comments yet. Tell us what you think to be the first.