Chapter 9: The Long Night
Thank you for printing this page from www.SuperCheats.com.
Remember to come back to check for updates to this guide and much more content for Valkyria Revolution
Follow this guide to hear about updates
Last Updated:
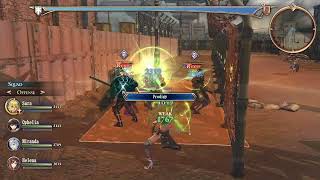
Mission: Wildcat Hunt
Recommended Level: 40
Victory: Rout the Wildcat
Optional: Capture all bases (Hard) 0/2

In this mission, you can only deploy one party member. Normally scouts with sniper rifles will be the perfect option for stealth / assassination Missions but in this case, I’ll be using my trusty sapper, Sara with the intention of capturing bases as well. A well-leveled sapper with the right combination of skills will be capable of healing herself and crowd control.
Once the mission starts, continue following the mountain path. Don’t remain idle since the Wildcat somehow sees you from below and will attempt to snipe you. The first base is located one ledge below where the cannon is mounted (1) to the western side of the gorge. Continue until you reach the ladder and slide down. Head towards the first base and engage the enemies there. There’s only a handful of enemies guarding it so you shouldn’t have problems capturing it. After capturing it, loot the supply cache there and take the ladder up to the next ledge.

Defeat more enemies along the way then slide down the ladder to the north. Snipe or gun down the patrols walking around nearby before jumping off the wooden platform. Now to reach the second base, you’ll have to go through the heavily guarded, fenced-off area in the middle (2). Fortunately, the fences will able to stop the shocktroopers’ heavy machine gun fire. Stay outside the fence and lure the individual enemies to come to you so you can deal with them individually and away from the shocktrooper and shieldbearer commanders inside.

When ready, rush inside and immediately throw grenades or use AoE attacks to flush the enemies out of cover and create an opening for you to make follow up attacks. If you decide to use a sapper, it will be a good idea to cast Recovery Field in a nearby spot inside the compound so when you rush and block attacks, you’ll still recover HP from the lingering effect of the AoE heal. Finish off the remaining soldiers and push east.

You have to break through another enemy blockade (3) so destroy them with AoE spells or grenades. Eliminating this small group will allow you to finally take over the base and complete the optional objectives.

Simon the Wildcat is located in the grassy area to the southeast of the second base (4). Take out the remaining soldiers around him then eliminate him with ease. He’s a pushover so you don’t need to take precautions against him. You can even snipe him to save yourself the trouble of pursuing him further. Mission complete.


Chapter 9: Mission: Wildcat Hunt
Mission: Defend Molda
Recommended Level: 42
Victory: Defend Molda outpost
Optional: Rout all Aces (Severe) 0/1

Once the mission starts, head towards the center of town (1) to engage the first light tank squad. Defeat all enemies along the way and engage the first light tank. There are two gatling light Tanks in the area so you’ll have no choice but to take some damage. Make sure to control your sapper so you can heal up your party if their HP start to deplete quickly from enemy fire. Concentrate on one tank at a time; since they’re located far apart each other and will attack you from range, you won’t be able to lure them together to take advantage of grenade and AoE spells. Alternatively, you can snipe and target the pilot’s head to deal critical damage instead of attacking the tank parts.

After taking out the first light tank squad, you’ll get an update about the enemy reinforcements that will arrive from the west (2). Head to the marked location in your minimap to engage the bladed armored tank. Beware of its frontal attacks as you’ll get heavily damaged. Flank it and focus your attacks to disable it and take it out. After defeating the enemy forces here, more enemies will arrive from the main gate to the south. Head there and take note of the supply cache location (3). Go back for it a bit later once you’re not detected.

Engage the next tank group to the south and take them on. After defeating this squad, three more Tanks (two gatling, one armored blade) will appear further south, as well as some foot soldiers. Prioritize engaging the two gatling tanks first since they’re near each other and letting them do their job will put you in grave danger because of their powerful stream of bullets from long range. This will also force the armored blade tank to go to your position instead, giving you more opportunities to damage all three tanks with AoE spells and grenades. After defeating them, make sure to loot the supply cache (4) near the boundary before heading to the next mission objective.

The heavy tank you need to engage is located in the middle of the base so you can push through the main gate. There’s a light tank waiting for you there and another supply cache (5). Destroy the tank and loot the cache to continue.

Before heading to the middle of the base, the ace that you need to hunt for the optional objective is located in the southwestern lot within the base’s walls. (6) This is an armored melee tank so take it out like how you normally would to complete the optional objective.

Once ready, head to the middle of the base and engage the gatling tank. You’ll have to do this since either way, you’ll still sustain damage from getting sniped from range by either the heavy tank or this gatling tank. You have to watch out for the heavy tank’s non-explosive pointed rods as they deal fatal damage, capable of fully depleting a character’s HP, even in full health. These are also almost unblockable as you’ll still suffer heavy penetration damage even with your guard up.

After getting rid of the gatling tank, engage the heavy tank up close to prevent it from using its devastating metallic projectiles. However, you still have to watch out for its damaging melee attacks like Sweep and Crush. The heavy tank’s core is close to the ground so it will be better to spam your AoE attacks with it as your primary target whenever you have the chance. Otherwise, you’ll have to attack its legs to temporarily disable the part and render the tank immobile for a few seconds. Keep doing this, preferably with the core within your reach and just evading whenever the tank jumps and attempts to crush you, until it is finally destroyed. Mission complete!


Mission: Logistics Hub Raid (Strike on Velgiev)
Recommended Level: 44
Victory: Seize Velgiev
Optional:
- Route all aces (Hard) 0/1
- Destroy all explosives (Hard) 0/12
This is the main operation in this chapter and will be composed of smaller sections. For the optional objectives, you’ll have to detonate the red explosive barrels scattered in the map. Refer to the map below for their exact locations.

Once the mission starts, head to the first enemy position and destroy them with AoE spells and grenades. After clearing the path, check out the fenced off area (1) where the first set of explosive barrels are located. You should be able to destroy 6 of them here. Destroy the Dragoon Type M2 tank before moving forward.

Continue heading east towards the container yard. Eliminate all enemies you find along the way. There’s a supply cache on the top of a shipping container in the middle of the yard (2), with three enemies guarding it. Take out the guards and note of the location since you’ll have to loot it when you’re not detected by nearby enemy forces.

Continue further east and you’ll encounter more patrols and another explosive barrel set in the middle of the path so make sure to detonate that as well. You can climb up the container van where the supply cache is located to get a good view around the immediate area. You can even snipe or attack enemies from that position if you want.

The ace you’re hunting down is located in the easternmost platform of the warehouse (3). You can access this climbing up the ladders of the containers vans southeast corner of the yard. After defeating the ace and its escorts, climb down to the yard and circle around to the northeast corner to continue.

Before heading northwest, loot the supply cache in the northeastern corner (4). Continue west and take out the patrols. The last set of explosive containers are found here so it’s impossible to miss them. Make your way to the main enemy outpost in the middle north of the map. There are a lot of enemies waiting for you there so laying a smokescreen will help minimize the damage you’ll take from them. If you either thrown the enemies in confusion or made them blind temporarily with smokescreen, you should be able to sweep off the foot soldiers before defeating the commander inside the Dragoon Type-M2 tank. After the defeating it, a cutscene will trigger.


Explosives Search and Ace Hunting
After the cutscene, you’ll have to break through another set of enemies. Aside from the troops in the middle of the path, another Type-M2 tank along with some foot soldiers escorting it. As usual, take out the foot soldiers before concentrating on the tank. This is the last batch of enemies you have to deal with to complete this mission.

Breakthrough
Mission: Logistics Hub Raid (Skirmish at Velgiev)
Recommended Level: 44
Victory: Seize Velgiev
Optional:Route all aces (Severe) 0/1
The mission will start with the area covered in enemy smokescreen. You need to break through straight ahead and engage enemy units as they appear. You won’t be able to completely run past them since the battlefield will be locked down until you clear all the enemies. Remember not to waste your attacks on enemies as they appear; you have to wait for their health gauges to appear in order to damage them. Attacking them too early won’t damage them. Keep an eye of enemies that will also arrive from the rear.

After eliminating enough enemies, the blockade will be removed and you’ll be able to run towards the escape point. On your way out, an enemy ace aboard a Type-M2 will arrive, along with advanced units. Head back and engage them. After getting rid of him and all enemies, head to the escape point for another cutscene.

Through a smokescreen
Boss: Grand General Viktor
After the scene, you’ll be controlling Amleth alone in this boss fight against Grand General Viktor and his twin-headed snake vehicle. Since Amleth is alone in this battle, you have to fight defensively, as your healing capabilities is very limited. The boss’s attacks are very predictable and easy to evade so don’t be greedy with your attacks and always prioritize getting out of the damage area that will appear right before Viktor attacks. You also have to watch out for the cannon fire that will come from the middle of the snake’s body. You can destroy those to lessen the threat.

The vulnerable parts of the snake is its heads and necks (few segmented portions near the head). Use fire melee attacks to take advantage of Amleth’s high ATK rating and the boss’s weakness to it. Don’t hesitate to use items to replenish your HP and RP until you defeat this boss quite easily.

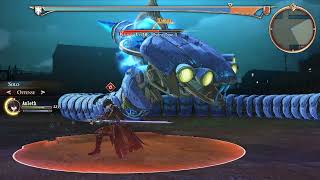
Boss: Grand General Viktor
Anything missing from this guide?
ASK A QUESTION for Valkyria Revolution
Comments for Chapter 9: The Long Night
Add a comment
Please log in above or sign up for free to post commentsNo comments yet. Tell us what you think to be the first.
Table of ContentsClose
- Basics - Combat
- Basics - Game Mechanics
- Walkthrough (Operations)
- Circles
- Archives of the Revolution
- Extras
Guide Updates
Get notified of updates to this guide
Many of our guides get updated with additional information. To get an email when this guide is updated click below.
 Join us on Discord
Click to close