Horde Encounters
Thank you for printing this page from www.SuperCheats.com.
Remember to come back to check for updates to this guide and much more content for Pokemon Omega Ruby
Follow this guide to hear about updates
Last Updated:
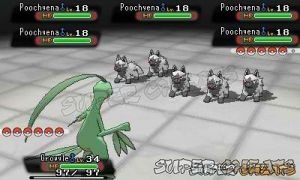
Horde encounters are introduced in Pokemon X and Pokemon Y, and now they're back in Pokemon Alpha Sapphire and Pokemon Omega Ruby.
In Horde battles, a single Pokémon from your team will have to fight a group of wild Pokémon. Winning these encounters provide tons of EXP and faster EV (Effort value) accumulation for the Pokemon you used but don't underestimate these encounters. The Pokemon in the Horde team may be lower leveled than you but they take individual turns. This means your Pokemon will get attacked several times before it can retaliate. Having moves that can target multiple enemies is the best way to eliminate all opposition.


The list of locations and Pokemon you'll meet in Horde encounters are listed below. List courtesy of Serebii.net.
| Pokemon | Location | EV Points |
| Zigzagoon | Route 101 | 1 Speed Point(s) |
| Route 102, 103, route 104 - North, Route 104 - South, 116 | ||
| petalburg Woods | ||
| Poochyena | Route 101 | 1 Attack Point(s) |
| Route 103 | ||
| Seedot (OmegaRuby) | Route 102, 114 | 1 Defense Point(s) |
| Lotad (AlphaSapphire) | Route 102, 114 | 1 Sp. Defense Point(s) |
| Ralts | Route 102 | 1 Sp. Attack Point(s) |
| Wingull | Route 103 | 1 Speed Point(s), route 104 - South, 118, 121, 123 |
| Taillow | route 104 - North | 1 Speed Point(s) |
| Plusle | Route 110 | 1 Speed Point(s) |
| Magnemite | Route 110, New Mauville | 1 Sp. Attack Point(s) |
| Minun | Route 110 | 1 Speed Point(s) |
| Sandshrew | Route 111 - Desert | 1 Defense Point(s) |
| Numel | Route 112 - North, Route 112 - South | 1 Sp. Attack Point(s) |
| Machop | Route 112 - North, Route 112 - South | 1 Attack Point(s) |
| Spinda | Route 113 | 1 Sp. Attack Point(s) |
| Skarmory | Route 113 | 2 Defense Point(s) |
| Swablu | Route 114, Route 115, Sky Pillar 1F-5F | 1 Sp. Defense Point(s) |
| Nincada | Route 116 | 1 Defense Point(s) |
| Skitty | Route 116 | 1 Speed Point(s) |
| Electrike | Route 118 | 1 Speed Point(s) |
| Kecleon | Route 118, 120, 121, 123 | 1 Sp. Defense Point(s) |
| Oddish | Route 119, 120, Safari Zone - North East, Safari Zone - North West, Safari Zone - South East, Safari Zone - South West | 1 Sp. Attack Point(s) |
| Marill | Route 120 | 2 HP Point(s) |
| Shuppet | Route 121, 123, Mt. Pyre exterior, Mt. Pyre 1F-4F, Mt. Pyre Summit | 1 Attack Point(s) |
| Wurmple | petalburg Woods | 1 HP Point(s) |
| Shroomish | petalburg Woods | 1 HP Point(s) |
| Whismur | Rusturf Tunnel | 1 HP Point(s) |
| Zubat | Granite Cave 1F -B2F, Cave of Origin 1F-B4F, Cave of Origin - Side Path | 1 Speed Point(s) |
| Scorched Slab B1F - B3F, Seafloor Cavern - Room 2-10 | ||
| Meteor Falls - 1F, 1F Room 2-3, Meteor Falls - B1F Room 2, B1F | ||
| Shoal Cave - High Tide Room 1 and 2, Low Tide B1F-B3F, Low Tide Room 1 & 2 | ||
| Victory Road - 1F, 1F Room 2, B1F | ||
| Makuhita | Granite Cave - 1F | 1 HP Point(s) |
| Aron | Granite Cave - B1F, Victory Road - 1F, 1F Room 2, B1F | 1 Defense Point(s) |
| Mawile (OmegaRuby) | Granite Cave - B2F | 1 Attack Point(s), 1 Defense Point(s) |
| Sableye (AlphaSapphire) | Granite Cave - B2F | 1 Attack Point(s), 1 Defense Point(s) |
| Voltorb | New Mauville | 1 Speed Point(s) |
| Doduo | Safari Zone - North East, North West, South East, South West | 1 Attack Point(s) |
| Psyduck | Safari Zone - North East, North West, South East, South West | 1 Sp. Attack Point(s) |
| Bagon | Meteor Falls - B1F Room 2 | 1 Attack Point(s) |
| Spheal | Shoal Cave - High Tide Room 1 & 2, Shoal Cave - Low Tide B1F-B3F, Shoal Cave - Low Tide Room 1 & 2 | 1 HP Point(s) |
| Snorunt | Shoal Cave - Low Tide B3F | 1 HP Point(s) |
| Meditite | Mt. Pyre - Outside, Mt. Pyre - Summit | 1 Speed Point(s) |
| Vulpix | Mt. Pyre - Outside, Mt. Pyre - Summit | 1 Speed Point(s) |
| Golbat | Sky Pillar - 1F-5F | 2 Speed Point(s) |
| Ariados | Sky Pillar - 1F-5F | 2 Attack Point(s) |
| Loudred | Victory Road - 1F, Victory Road - 1F Room 2, B1F | 2 HP Point(s) |
Horde Trainer Battles!
Now you can fight five trainers at once in Pokemon AS/ OR. The mechanics are pretty much the same with the wild horde encounters where the enemies are much lower-leveled than your Pokemon's average level and you'll still get tons of EXP for winning the battle.

Anything missing from this guide?
ASK A QUESTION for Pokemon Omega Ruby
Comments for Horde Encounters
Add a comment
Please log in above or sign up for free to post commentsNo comments yet. Tell us what you think to be the first.
Table of ContentsClose
- Introduction
- New and Improved Features
- Special Demo Version
- Get a Shiny Beldum!
- Compatibility with Pkmn X/Y
- New Mega Evolutions
- Legendaries
- Primal Pokemon
- Eon Pokemon
- Version Exclusive Pokemon
- Starter Pokemon
- Characters
- Basics
- Pokemon Contests
- Connectivity
- Online Battles
- PokeNav Plus
- Move Tutors
- Walkthrough
- Extras
Guide Updates
Get notified of updates to this guide
Many of our guides get updated with additional information. To get an email when this guide is updated click below.
 Join us on Discord
Click to close