Madarame Palace (Part 1)
Thank you for printing this page from www.SuperCheats.com.
Remember to come back to check for updates to this guide and much more content for Persona 5
Follow this guide to hear about updates
Last Updated:
Persona List and Map

Click the image to view the full resolution

Click the image to view the full resolution
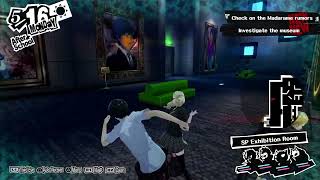
(First visit on 5/16, Monday, story progress)
You’ll start outside Madarame’s museum. Save your game first the climb on top of the van to scale over the walls. Once inside, just follow the straight path to the gardens to the east, stealing any highlighted containers along the way. Jump across the different ledges until you reach the rooftop. Interact with the skylight to infiltrate the museum.


There are no enemies at the moment so use this time to explore the area. Make your way to the exhibition room where you can find the portrait painting of the guy whose shadow you fought during your first visit in the Mementos.

Continue heading south until you reach Yosuke’s portrait. After the conversation with your teammates, head to the reception area to the west. There are two chests here and a pamphlet that you need to pick up. Loot the Protect Mask from the chest beside the stairs. The other chest is locked so if you have a spare lockpick you can immediately obtain the Training Whip, Pearl, and Snuff Soul from it.

Before moving forth, pick up the pamphlet to get the map of the first half of the palace then head to the next room. After reaching the center statue behind the reception area, you’ll be back in reality and time will pass to evening.

Museum 1F
The earliest time where you can visit Madarame’s Palace on your own free time is on May 18 onwards. However, you won’t be able to secure a route to the treasure yet; you’ll be limited up to the Central Garden area due to some story-related events. During your second visit, your objective is to reach it. Since there are new shadows here, try your best to get new ones and fuse them immediately to enhance your compendium and gain access to better personas.

Your objective for this infiltration is to at least reach the infrared barrier in the Central Garden. You won’t be able to get past this until you find the obstacle in the real-world. If you happen to reach that checkpoint and you still have SP and supplies to spare, you can go ahead and train there to maximize your time and increase your funds.
After entering the palace, make sure to visit the Velvet Room. From hereon, the Twins will ask you to show them Personas with specific skills. For this instance, you’ll be asked to bring a Jack Frost with Mabufu. This should be easy since Jack Frost can learn Mabufu early with the help of the Magician’s Rank 2 Arcana Burst. Once you have that persona, talk to the twins and show them the Jack Frost you created to unlock the Strength Confidant. This will also give you access to Group Guillotine, a fusion method that will require three personas to create a more powerful one.

Starting from your infiltration point in the Museum Entrance’s skylight, you’ll notice that the security lasers are already activated. Touching these will increase the security level by a set amount. You can detect these lasers using your third eye so you have to use that ability while exploring the floors. There are certain gaps in these security tripwires that you can slide or jump over. If you see one, approach the tripwires then press X to do the appropriate action.

Navigate the SP Exhibition Room. When you reach the hallway where Yusuke’s portrait is located, you can press the blue button by the door to remove the gate and give you access to your entry point. Now continue to the lobby and past the statue to the north to reach next unexplored area of the current floor.

In the next corridor, the door to the left will be locked so you need to head to the right. Go to the north and get past the two tripwires to reach the first safe room. Enter it and save your game.

Exit the safe room then go left, then north to find a chest in the corner containing a Straw Doll. Next, navigate along the maze-like corridors and check out the southwestern corner of the current gallery to find a chest containing a Muscle Anklet.

Continue to the next hallway and before going north, head south and follow the corridor so you can unlock door locked door earlier from this side. Once done, continue north to reach the stairs leading to 2F.
Museum 2F

Continue to the main hall in the middle and attempt to get past the golden vase to trigger a cutscene. After the scene, turn around and climb up the nearby ledges to reach the storage area with a lone shadow guard. Ambush the guard then press the blue button to lower the glass partition and free Ann. Talk to her to have her rejoin your party.

Climb up the ledge once again and and this time continue to the other storage area across the room. Use your third eye to find the glowing painting. Examine it to move it and reveal the button. Press it to free Ryuji. Talk to him to regroup to your party.

Next, you have to free Morgana. Use your third eye to find a the vent entrance on top of the boxes in the same storage room. This vent will take you to the nearby security room. Examine the control terminal in the corner of the room to discover that you’ll need a password to operate it.

Exit the room and you’ll automatically hide to eavesdrop on the two guards talking about the password. After this scene, defeat the shadow guard then enter the credentials on the terminal to disable the laser tripwires. Talk to Morgana then examine the gold vase. A treasure demon will appear so chase after it and attack it to trigger a battle.


Treasure demons give a lot of EXP and money when defeated but you have to defeat this in one turn. This particular treasure demon is called a Regent and the weakest of its kind (you’ll encounter more powerful ones with different strengths and weaknesses) It’s strong against everything except for Nuclear and Physic skills.

For this battle, you need to capture it so you can register it in your compendium. You won’t be able to equip it or switch to it in battle but it’s a perfect fusion material, with a huge variety of all-damage skills. It’s imperative to get this shadow to join you since it will be registered in your compendium, allowing you to buy it later should you need its specific skills. Once registered, you can then kill the other same-type treasure demons you encounter for their exp and money rewards. Since you probably don’t have a persona with a psychic or nuclear skill at the point where you first encounter the treasure demon, you can rely on Morgana’s Lucky Punch skill which has a high chance to deal critical damage and knock it out, making it vulnerable for an all-out attack or negotiation.

After defeating the treasure demon, continue forth and you’ll encounter an impassable corridor. Use your third eye to find a ledge to the right that you can climb on. There’s a lone shadow there so defeat it and check the bathrooms for a breakable object and a chest containing an Ice Ring. Backtrack to the main corridor then turn right to find this floor’s safe room.

After saving the game, head to the west and go upstairs. At the end of the upper corridor, you’ll find a chest containing a Physical Ointment. The lower corridor has a breakable object that may contain a treasure demon. Continue to the northwest galley this time. As soon as you enter, you’ll be trapped by electrical fences. Quickly hide and take out the enemies to maintain your advantage. You have to defeat the strong enemy with the aura in order to loot the chest in the western side of this gallery. Once clear, loot the Exorcism Water from it.

To disable the electrical fence, use your third eye to locate the highlighted painting. Remove it to find a switch behind. Press it to disable the fences then continue north to reach the next area.

Central Garden
The safe room is located directly to the south but you won’t be able to use it yet. To continue with the story, head north to the middle to trigger a cutscene. After that, you may go back south and use the safe room.

Note: If you reached the barrier in Central Plaza, a series of events will take place in the following day where Ann and Morgana will execute their plan to open the locked door in Madarame’s home, disabling the barrier in his palace. That said, you won’t get any chance to upgrade your equipment or buy supplies.
If you’ll stretch out your team’s resources, you should be able to save up to 100,000 yen and get up to LV19, giving you access to more Personas which will help a lot in clearing the palace. A good farming spot is the small gallery in the northwest corner of 2F, where you got trapped earlier. There are two shadow groups here that have five individuals. One group has five Mokois (weak to wind) and five onmorakis (weak against shot and Bless attacks) Each successful battle against the Mokoi group gives over 100exp and over 2500 yen. They reload whenever you change floors. The 3F savepoint is conveniently located near this spot so you can always save whenever you clear the gallery.

The normal shadows with a group of five Mokois are exceptional source of income at this point of the game, especially if you have Morgana’s Magaru skill handy. By farming them earlier, I was able to save up over 100K yen, which I used to buy the SP Adhesive 3 from Tae Takemi’s accessories menu (requires Death Confidant Rank 5). If you’re also able to rank up her rank to LV7, all items in her shop will be sold for 50% off, allowing you to buy this item at a much lower price.

Equip that to Morgana to have him recover 7SP per turn. Magaru only costs 8 SP so imagine spending a long time farming the Mokoi group that drop almost 3K yen per battle. You can also keep using physical Skills that consume HP while having access to Morgana’s healing skill.
Tip: While here, make sure to get a Mokoi so you can fuse it later with Regent to create a Matador with Magaru skill, specifically needed to raise the Twin Wardens (Strength) confidant’s rank to LV3
Anything missing from this guide?
ASK A QUESTION for Persona 5
Comments for Madarame Palace (Part 1)
Add a comment
Please log in above or sign up for free to post commentsNo comments yet. Tell us what you think to be the first.
Table of ContentsClose
- Basics
- Confidants
- April
- May
- June
- July
- August
- September
- October
- November
- December
- Epilogue
- Palaces
- Persona List
- Skill List
- Extras (Trophies, Cheat Sheets, etc)
Guide Updates
Get notified of updates to this guide
Many of our guides get updated with additional information. To get an email when this guide is updated click below.
 Join us on Discord
Click to close