Skulltulas (Hard / Hero Mode) 1
Thank you for printing this page from www.SuperCheats.com.
Remember to come back to check for updates to this guide and much more content for Hyrule Warriors
Follow this guide to hear about updates
Last Updated:
Note: This is a video-heavy section so to avoid lag when loading the videos, we will be dividing this to two separate pages.
After completing Legend Mode once, a Second Gold Skulltula will appear on each scenario stages. However, these will only be available in Hard or Hero mode difficulty and for only specific warriors or weapons. There are specific conditions for each Skulltula so make sure to reach the battle conditions first before starting a scenario to know which warrior and weapon to use.

01: Armies of Ruin
Warrior: Link
Weapon: Hylian Sword
Condition: Execute Zelda 's strategy while repelling the advance of the enemy forces.
Continue with the mission until you reach the Fairy Fountain and summon the Fairy to lay waste on the enemies to the north. The Gold Skulltula will appear in the Castle Keep's eastern gate. It should be in the open, crawling on the side of the barrels there.

Castle Keep Skulltula
Warrior: Impa
Weapon: Giant Blade
Condition: Defeat Wizzro without allowing a bombchu to be destroyed while also keeping Sheik Safe
Basically, you have to defeat Wizzro while keeping the bombchus and Sheik. Continue with the mission until you get the objective to find another bombchu which is located in the Central Keep. Don't heat there yet; instead, capture the stockroom first and the nearby checkpoints as well as whittle down the enemy forces around the stockroom and the cave exit. This will make it easier for you to defend the bombchus later on.
Now capture to Central Keep until the main objective tells you to escort the two bombchus to destroy the massive stone spire blocking the cave exit. Wizzro will then intercept your bombchus, along the bulk of the remaining enemy forces. After defeating all of them and after detonating the bombchus on the stone spire, the skulltula will appear in the northeast. Head past Crystal Cave's northern gate and you'll find a ledge that you can access using the hookshot. The skulltula is located there.

03: Sorceress of the Woods
Warrior: Link
Weapon: Fire Rod
Condition: Reduce Gohma's Strength to half or less before the Great Deku Tree is in danger while keeping Impa and Sheik alive.
Proceed with the scenario normally until you get to the boss fight against Gohma. Exploit his weakness gauge so you can deal a heavy blow and reduce its HP to 50% or below quickly. Once done, the Skulltula will appear to the west of the Fairy Fountain. Head there, switch to your hookshot and find the elevated ledge to the left of the Fountain where the skulltula is lurking.
04: Sorceress of the Valley
Warrior: Link
Weapon: Hylian Sword
Condition: Defeat Volga within three minutes then find the Manhandla Stalk.
Volga will head towards the East Temple so head over there to intercept him. Ignore the Darknut with him if you can; just concentrate on Volga and exploit his weakness to defeat him quickly. Once he's taken care of, continue with the mission until you get the objective to take on the Manhandla.
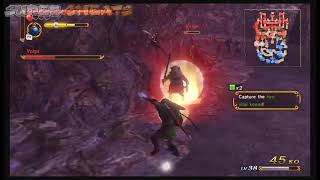
Volga rush
Once Manhandla appears, fight it until you force it to retreat. Defeat marked Manhandla Stalks in the map until you reveal the real Manhandla. Once you reveal it, the Skulltula will appear in the Ruins. Head there and just take the main stairs in the middle to find the Skulltula in plain view.

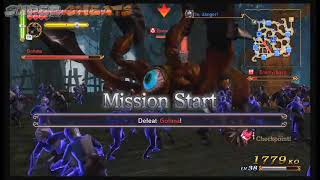
5A: Land of Myth
Warrior: Sheik
Weapon: N/A
Condition: Defeat Darunia two or more times and open the gate of the Enemy Base after defeating at least 1,500 foes
Continue with the mission then defeat Darunia once when he's making his way to the allied base. He'll retreat temporarily so just proceed by capturing any keeps and destroying more enemies until you reach the KO quota. Once Darunia re-appears, he will make his way to the West Boulder Keep. This will coincide with Impa's plan to take over the West Boulder Keep. Defeat Darunia the second time around then help Impa reach the West Boulder Keep. Successfully doing this will destroy the large urn outside the Chief's Room. This will open the doors leading to the keep and the skulltula is found where the giant urn is once located.

Death Mountain Second Skulltula
5B: Land of Twilight
Warrior: Lana
Weapon: Book of Sorcery
Condition: Defeat Midna before Cia flees the battlefield, then take the Bridge Keep.
Once Midna appears in the map, head to her location and engage her in battle. She'll be surrounded by her army and she'll be tough since she's boosted by the strongholds under her Twilight power. After defeating her, wait for her to fall back to the bridge. You can take out a few twilight locations to weaken her then head to her main stronghold, the Bridge Keep. Capture the Keep and the skulltula will appear on the gate to the north.

Rushing Midna before she confronts Cia

5C: Land in the Sky
Warrior: Link
Weapon: Hylian Sword
Condition: Defeat Ghirahim before he arrives at the Allied Base, and then use the Magic Circle.
To make the Gold Skulltula spawn, you have to complete two conditions. The first condition is to defeat Ghirahim before he reaches the allied base. He'll be staying in the Academy Keep which will remain closed until Fi successfully delivers the soup to Levas and have him fix the path. Once that's done, you can head directly to the Academy Keep and wait for it to open to fight Ghirahim.

The second condition will be fulfilled only during your fight with Volga. Keep damaging him until he powers up. Head to the Fairy Fountain, defeat a couple of Aerolfos guarding the entrance then activate the magic circle to summon the Fairy and weaken Volga. After these conditions, the Gold Skulltula can be found lurking on the ground, north of Academy Keep, near a giant pumpkin.

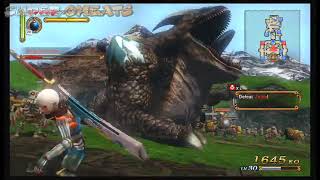
6A: The Water Temple
Warrior: Impa
Weapon: Giant's Knife
Condition: Defeat King Dodongo within three minutes of his arrival while keeping Sheik alive.
Continue along the mission until you free Ruto and access evil Zelda's chamber. She'll summon King Dodongo shortly after you find her. Head to the field by the Temple entrance to fight King Dodongo. If your level and weapon is good enough, you should be able to defeat it in less than three minutes by exploiting its weakness. It's possible to break its weakness gauge completely in one go by using Impa's water daggers rain combo. Once defeated, head north back to your main base then find the Gold Skulltula on the ledge where you can jump in at the start of the mission for a surprise attack.
6B: The Shadow King
Warrior: Midna
Weapon: N/A
Condition: Defeat Argorok while maintaining health of at least 50% and keeping Agitha alive.
Keep going in the battle until you're able to use the Fairy Fountain and bring down Argorok to your level so you can fight it for the third and final time. Keep an eye also to Agitha's HP and prioritize rescuing her if needed. As you whittle away Argorok's life, make sure to save often, preferably after every successful smash of its weak point. This battle will be a lot harder with all the Fiery Aerolfos and ReDead Knights joining the fray. Just save your SP attack to control the crowd and make sure you don't get caught by Argorok's attacks. Heal up when your hearts drop below 75%. If ever any enemies in the immediate area drop a bomb power-up, use it to whittle down the annoying ReDead Knights and Fiery Aerolfos around Argorok.
Once the conditions are met, the Gold Skullkula will appear in the south gate of the enemy base.

06C: Sealed Ambition
Warrior: Link
Weapon: Fire Rod
Condition: You have 15 minutes. Stop The Imprisoned from destroying any keeps, and open the Enemy Base.
Take note that the timer mentioned here includes the start of the mission itself. You can defeat the Imprisoned without 5 minutes at least and the key to keeping your time short is by completing the objectives as quickly as possible, leading to the Imprisoned's release.
First, head to the East Keep and capture it. This will open the northern gate where you can defeat the Gatekeeper outside the East Temple Keep. After defeating the Gatekeeper, head south to the East Cannon Keep and capture it. Once the Turncoat Soldiers appear, defeat a few of them until Fi analyzes the battlefield and give you the approximate locations of the Turncoat Leader. Ignore the enemies and head towards the marked Keeps. Once you enter the Keep where the Turncoat Leader is located, he will appear and attack you. Defeat him as fast as you can to force the other Turncoat Soldiers to retreat and the Imprisoned will be released shortly after. If done correctly, this process will take around 4-5 minutes.
Before the summoning cutscene triggers, head to the center of the map, in the lowest part of the plains where the Imprisoned will appear. Here, this monster won't move immediately until the next mission update, allowing you to destroy its toes before it can even take a single step. You can also almost instantly reveal its weak spot by using strong combos with your fire rod. Keep exploiting the Imprisoned's weakness until it gets near the West Cannon Keep. Capture it if you haven't then use the Groosenator to take it down. This will damage the Imprisoned heavily and will be vulnerable for a few seconds. Use the nearby stairs to reach it while it's stunned to smash its weakness gauge.
While it's one its way to the East Cannon Keep, keep destroying its toes and smashing its weak point until you slowly whittle its HP down. If you're able to deal enough damage, its HP should be around 20-25% right now, which should be low enough for the Groosenator's blast to defeat it in one shot.
The Gold Skulltula won't appear immediately so head to the temple and defeat any captain-level enemies along the way. Once it appears, you'll find the Gold Skulltula on the wall of the East Temple Keep.

07: The Sacred Sword
Warrior: Fi
Weapon: N/A
Condition: Defeat 2,000 enemies, discover all the sealed statues, and repel Wizzro. (The statues must all be discovered by the player, not Impa, Midna or Darunia.)
You have to find all the statues yourself, not any of your allied NPCs. You don't need to wait for the game to zoom in to the statue to “discover” it; once you found the statue and get near it, you can proceed to the next one without waiting for the game to acknowledge you found it. Next, continue with the mission until you defeat 2,000 enemies. Once you get the task to assist Link in drawing out the Master Sword, Wizzro will appear shortly. Defeat him and force him to flee to complete the task.

Meeting the conditions
The Gold Skulltula should appear in the same area within the temple as where the Master Sword is kept.

Gold Skulltula spawn location
Anything missing from this guide?
ASK A QUESTION for Hyrule Warriors
Comments for Skulltulas (Hard / Hero Mode) 1
Add a comment
Please log in above or sign up for free to post commentsTable of ContentsClose
- Basics
- Weapons
- Legend Mode
- Adventure Mode
- Collectibles: Skulltulas
- Collectibles: Heart Containers
- Collectibles: Heart Pieces
- Bazaar
- Badges
Guide Updates
Get notified of updates to this guide
Many of our guides get updated with additional information. To get an email when this guide is updated click below.
 Join us on Discord
Click to close
I did everything exactly the way its supposed to be donem in water temple.
Dodongo got summoned at 10:07 into the fight. And was killed 12:40 into thrle fight. And Sheik is alive.
Now unless im retarded. Or the rules of mathematics somehow changed.
Why didnt the skultulla appear. Im on hard mode. Killed him in under 3 min. Still no skultulla. This is like my 5th time doing this in under 3 minutes.l and still nothing. Its kinda pissing me off.
I had that particular skull derp on me once as well before getting it, and I've had several others just not appear after their conditions are met. One adventure map skull required 7 successful attempts before finally spawning properly