Dig Site
Wolfenstein Walkthrough and Guide
Wolfenstein Guide - Walkthrough
Dig Site
Before moving on to this mission, you first must visit the Black Market in Midtown West. Follow the man through the marked door and drop down the trap door to reach the Black Market. By speaking to the man standing in front of the opening in the wall, you can buy upgrades and ammo for your weapons. Collecting enemy Intel in the levels will unlock new upgrades for purchase. Select a locked upgrade to determine in which level the Intel to unlock that upgrade is found.
Once you’ve been to the Black Market, climb back up the ladder and follow the man to the Kreisau Circle Safe House to meet with Erik Engle. At the Safe House, make your way down to the basement and speak to Erik Engle and Caroline Becker.
After a short chat, you’ll be instructed to meet your driver at the mission start point. Exit the safe house and start following the man to the truck. You’ll meet some resistance along the way, so take the time to clear them out before pressing on. Once through the Nazi road block, open the large wooden door and interact with the truck when prompted to travel to Dig Site.
Objective: Find the Thule Medallion
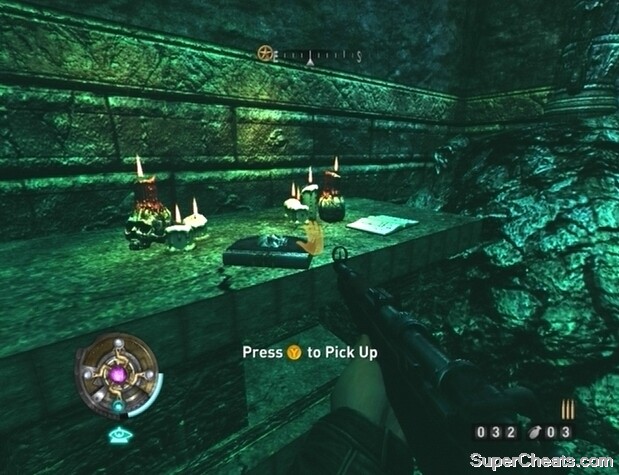
After the cutscene, turn left and look next to the wooden shelf to spot GOLD (1/11). Leave the tent and hit the Nazi outside with a melee attack by clicking the Right Stick. Do the same to the Nazi behind the sandbags further up, and then head northwest and enter the tent there. Open the container between two of the beds in this tent to find GOLD (2/11). Look for an identical container between two of the beds on the opposite side of the tent and open it to find GOLD (3/11).
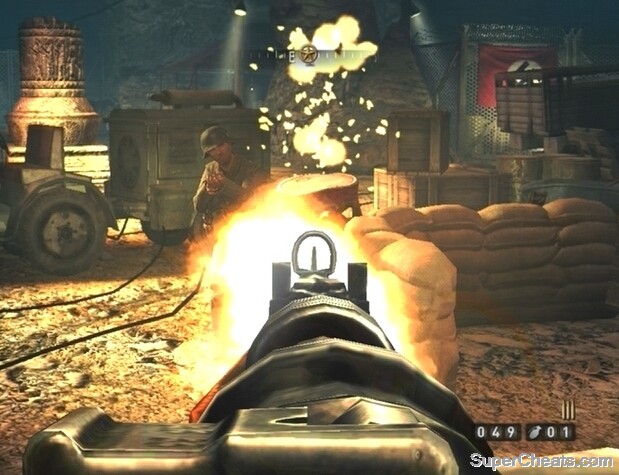 Use your Kar 98 to kill the Nazis in the opening area. |
When you have the two pieces of gold, head back outside and start picking off the Nazis in this area with your Kar 98. There are a couple of conveniently-placed explosive barrels in this area, so make use of them. Try tossing a grenade behind the overturned pillar through the opening at the north end of this room to blow apart the enemies there.
There’s a bunch of ammo and INTEL (1/6) below the canopy in the southeast corner of this area, so be sure to collect those items before moving on. When you have the first piece of Intel, enter the corridor through the opening in the wall at the north end of the area. As you move down the corridor, keep an eye on your left for INTEL (2/6) on a table next to some ammo and grenades. With that, continue moving to the end of the corridor to reach some steps.
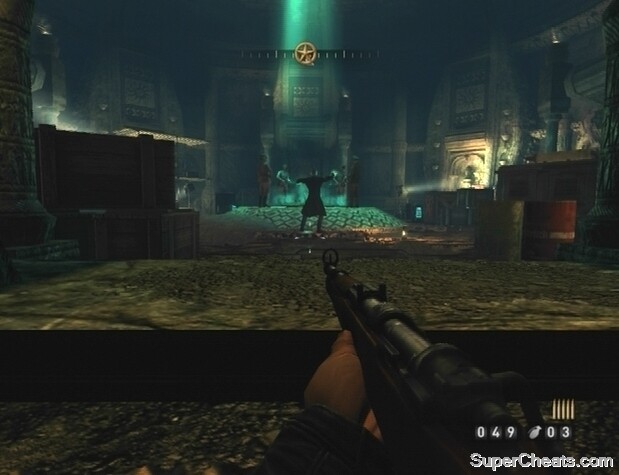
A Scribe and some Nazis guard the Thule Medallion. Scribes are powerful enemies who use magic to shield their allies and launch projectiles. They can also use a Veil Speed power to avoid enemy fire. Before starting up the steps, crouch and slowly move up until the Scribe, who has his back turned, is in view.
 Nazi Scribes can shield their allies with Veil and throw projectiles. |
Switch to your Kar 98 if you don’t have it out already and take aim at the Scribe’s head. If you can manage a headshot, the Scribe will slump over immediately after, saving you the trouble of facing him normally. The accompanying enemies will scatter, so use your Kar 98 to pick them off as they pop out from cover.
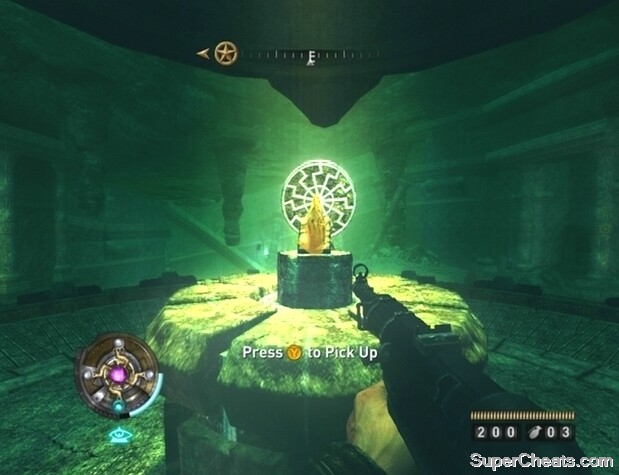
When the room is clear, the Thule Medallion is yours for the taking. Approach the strange object in the middle of the room and press the Y/Triangle button when prompted. The Thule Medallion will appear, allowing you to pluck it up for your own use.
Objective: Follow Sergei’s Instructions.
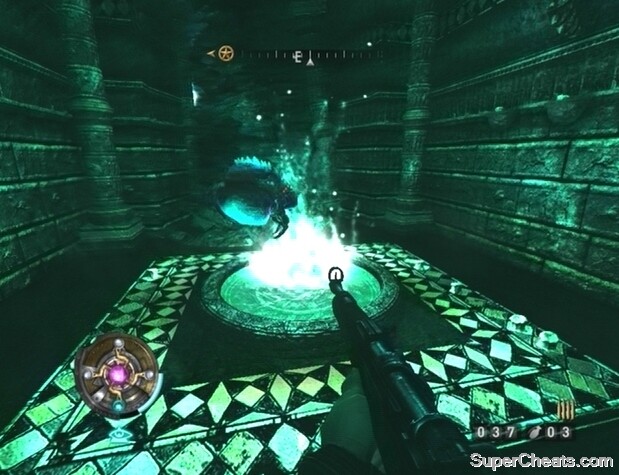
Sergei is well-versed in the mysterious powers that the Nazis seek to control, and so he will teach you about the Thule Medallion. With the Thule Medallion, you can trigger Veil Sight by pressing down on the D-pad. While active, you will be able to see strange spectres called Geists. While not enemies per se, those in the area can become hostile if you kill one of their kind. Killing a Geist that is floating near an enemy will often cause a stream of electricity to zap that enemy. Don’t use this tactic too often though, as the next time you enter Veil you may find yourself overwhelmed by hostile Geists.
The main purpose of Veil Sight is to identify enemy weak points and also reveal secret passages.
 Stand in Veil Pools to recharge your medallion. |
Objective: Recharge your Medallion.
As Sergei explains, the meter on the medallion in the bottom-left corner of the screen represents how much longer you can utilize an active Veil Power. Veil Pools can be used to replenish your Veil Energy. Toggle Veil Sight and look to the south or north end of the room to spot a Veil Pool. Stand in one of these pools and your medallion will soon be recharged. Though Veil Pools are more evident while using a Veil Power, you can still use them to recharge your medallion without a Veil Power active.
Objective: Use the Veil Door.
With Veil Sight active, you can move through Veil Doors. To identify a Veil Door, look for a Black Sun symbol on the wall. While moving through a Veil Door, do not switch off Veil Sight, as doing so will effectively kill you.
Objective: Find the Crystal.
Once through the Veil Door, move to the other end of the corridor and blast the Nazis through the Veil Door at the opposite end. There’s another Scribe in this room, so try to headshot him with your Kar 98 while he is busy shielding his allies. When the immediate area is clear of enemies, look for INTEL (3/6) by the broken crate and scaffolding right by the Veil Door you entered through. GOLD (4/11) is in an open container below the Nazi flag across from the Intel.
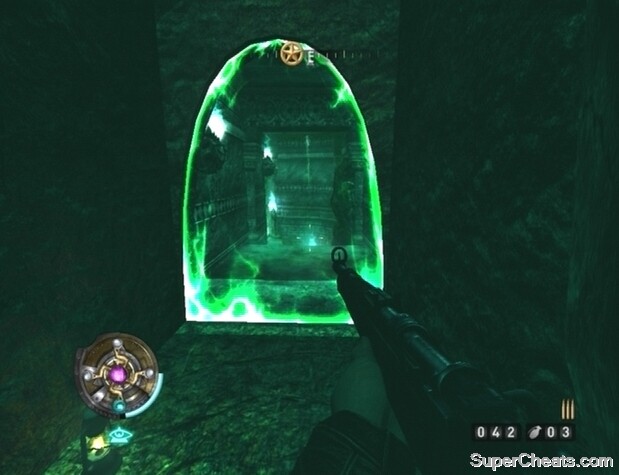 Activate Veil Sight to reveal and access secrets such as the Veil Door pictured here. |
When you have the Intel and Gold, move further north into the area. There may be a couple of enemies by the mine cart track; if so, kill them before doing anything else. With the immediate area clear, look northwest from the west end of the mine cart track to spot another Veil Door. Toggle Veil Sight, hop through the Veil Door, and move to the end of this corridor to spot TOME (1/1) on the table there. Tomes of Power are used to unlock upgrades for your Veil Powers, but are usually quite hard to find.
With the Tome in your possession, hop back through the Veil Door. Climb up the ladder right next to the Veil Door and continue climbing up to the top platform. GOLD (5/11) is in an open container on this platform; you’ll have to crouch to reach it. When you have the Gold, drop down and look for GOLD (6/11) on the ground between the two pillars just before the bridge. Cross the bridge and proceed through the opening in the wall. Through the opening, look north to spot a ladder. Climb up the ladders to the top platform. Move to the north end of the platform along the western side of the corridor and drop down to the lower platform; GOLD (7/11) is in the open container in the alcove here.
 Collect Tomes of Power to unlock purchasable upgrades for your Veil Powers. |
Once you’ve collected the Gold, drop down and move to the end of the corridor to reach the next area. There’s another Scribe here, as well as a large masher in the middle of the room. Try your best to headshot the Scribe through the opening while his back is turned. If you fail to do this, just be sure to shift to the right to avoid being hit by the projectiles he throws at you.
When the Scribe id dead, hang back and pick off the Nazis through the doorway. When the room is clear, approach the steps that lead up to the crystal and look for INTEL (4/6) on the table northwest of them. GOLD (8/11) is on the ground along the platform east of the Intel. Return to the steps and look for a broken crate southeast of them; GOLD (9/11) is in the open container in front of the crate.
After collecting the treasures in this room, start up the steps that lead to the crystal. Toggle Veil Sight and walk along the highlighted path on the circular platform to avoid being crushed.
 Activate Veil Sight and walk on the highlighted path to reach the crystal without being crushed. |
Objective: Find a way out before you are crushed.
Collecting the crystal grants you the Mire Veil Power. When toggled, Mire will slow everything around you. Your New Veil Power will be triggered automatically at this point, allowing you to escape before the masher crushes you. Walk down the steps as they descend and look for an opening in the middle of the platform (west) that they surround. Hop through the opening to safety.
Objective: Navigate the temple traps with Mire.
Recharge your medallion using the Veil Pool at the north end of the corridor. The first trap is at the south end of this corridor. Standing on the two panels before this stretch will trigger a group of mashers. Wait until the mashers have retracted completely, and then trigger Mire and sprint through to the other side. Once through to the other side, use the Veil Pool to your left to recharge your medallion.
The next two traps continuously launch projectiles at the wall at the other end of the stretch. The Mire ability comes in handy here once again. Activate Mire and enter the shooting range. Dodge to the left or right in accordance with the approaching projectiles to avoid them and continue forward. At the end of the first stretch, switch off Mire and use the Veil Pool in the alcove to recharge your medallion. Use Mire again to cross to the other end of the second firing range. Stand in the Veil Pool at the end to recharge your medallion. Then, activate Veil Sight and climb up the now visible ladder.
Using Mire to navigate the temple traps.
Walk up the pillars at the top of the ladder and hop onto the higher platform. Continue heading east here—hopping past the overturned pillars and rubble and ignoring the doorway that you come to—and you’ll reach GOLD (10/11) on the broken piece of ground at the end. When you have the Gold, hop back over the rubble and proceed through the doorway there.
Objective: Cross the bridge to reach the excavation area.
Use the Veil Pool to the left of the bridge to recharge your medallion. Then, stand before the bridge and activate Mire when it begins to crumble. With Mire triggered, walk along the remaining bits of bridge to cross to the other side. As soon as you are on the other side, turn left (east) to spot INTEL (5/6) on top of an open crate. With that, head up the steps and into the next area.
Objective: Dynamite the Portal.
Stand on the platform at the other end of the room to raise the door there. Step off of the platform and the door will fall back down. While standing on the platform with the door fully raised, activate Mire and sprint through the door while it slowly falls. A steam of Veil runs through the middle of this area; activate Mire and effortlessly kill the soldiers in this room and the next, running back to the Veil stream to recharge your medallion as necessary. You can also absorb energy from the blue Veil Energy containers.
When the room is clear, approach the Portal and hold the Y/Triangle button to plant the Dynamite. With the Dynamite set, move far enough away for the dynamite indicator to disappear to ensure that you won’t be caught in the blast.
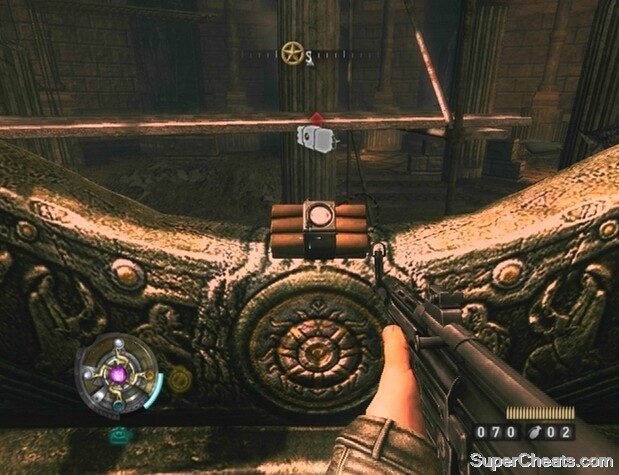 Plant Dynamite on the Portal and back away until the onscreen proximity indicator disappears to avoid being caught in the blast. |
Objective: Escape to Midtown.
When the Portal has been destroyed, start following the marker on your compass back to the previous area. Once you’re back in the room with the crumbling bridge, look west to spot a tunnel opening and some enemies. Clear away the enemies and follow the tracks directly west to reach an open container with GOLD (11/11). With that, start following the tracks south. Toggle Veil Sight if you’re having difficulty seeing, and look on the support to the left of the solitary mine cart that you come to for INTEL (6/6).
At the top of the incline just beyond the Intel is an enemy on a mounted MG42. Use the Veil Pool west of the incline to recharge your Medallion and then activate Mire. Move up the incline, dodging the fire from the MG42 as you do so, and blast the gunner and any other soldiers you can before your Veil Energy is completely depleted. If your Veil Energy is low and you are so far unsuccessful at killing the gunner, sprint back to the Veil Pool to recharge and try again.
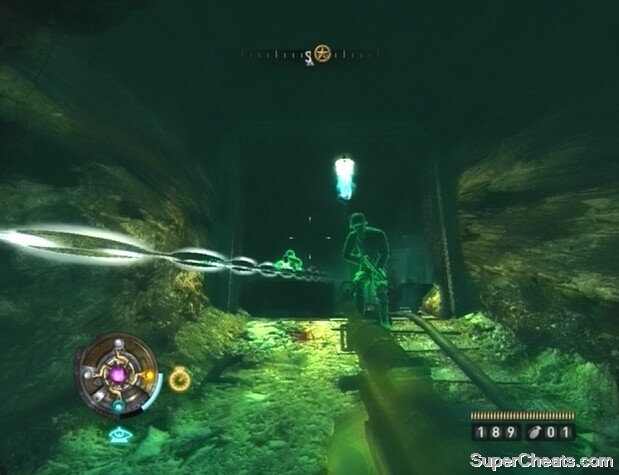 Use Mire to get close enough to kill the MG42 gunner in the tunnels. |
When the way is clear, continue to the other end of the tunnel. This next room is full of enemies, so take your time or activate Veil Sight and rush through. Follow the marker on your compass to a lift. Use this lift to return to Midtown West.
after you get the gold (7/11) if you climb up the next ladder it will bring you to a platform looking down into the room with the scribe and the crusher. getting the scribe with a headshot is much easier from up there than from the ground.