Dark Aurora
Thank you for printing this page from www.SuperCheats.com.
Remember to come back to check for updates to this guide and much more content for Bravely Default
Follow this guide to hear about updates
Last Updated:
1F
Follow the path and loot the chest for a Safety Ring along the way. Keep heading west past another magic circle until you find a chest with a Megalixir inside. Step on the magic circle next.
2F
There are two chests on both sides in the middle of the area containing a Life Chest and Lamia's Tiara. There's another one to the southwest containing a Black Belt. Hop in the magic circle again to the south to continue.

3F
There are two chests waiting along the path. Loot the Megalixir and Heart Ring from them and follow the path east. There are two magic circles in this floor. Enter the one on the middle to access the isolated chest in 6F containing a Blood Blade. Return to the previous floor and enter the magic circle in the middle-south.

6F
Continue all the way south to find a chest. Loot the Lordly Robes from it and enter the magic circle.
4F
Go to the right to find a chest. Get a Gold Hairpin from it then continue to the southwest. Follow the winding path going east then open the chest to the southeast containing a Ribbon. (This equipment makes the wearer immune to almost all status ailments – including instant K.O's from certain moves. Equip it to your main healer) Continue to the northeast next and enter the magic circle.
6F
There are three magic circles you can enter in this floor. The middle one leads to the story while the other both two lead to 5F. Enter any of them first.

5F
Loot the three chests in the area containing a Brave Suit, Lilith's Rod, and Aegis Shield. Return to 6F and enter the magical circle in the middle.
7F
Follow the path and save your game. Head to the next magical circle and go up the Altar of Darkness to trigger the first boss fight in this dungeon.
| Airy (3rd Form) |
| HP: 99,999, Weakness: Fire, FAM: Bug |
 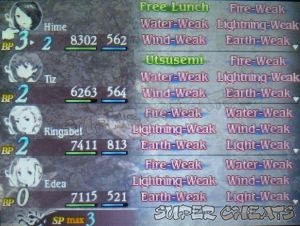 |
| She will primarily deal damage using Zeta: Flare deals massive fire damage to all party. The damage from this attack can be mitigated by having Absorb Magic Damage as one of your character's Prior to that, she may use Acedia first, which weakens the entire party's defense against all elements. This can be countered by the Spiritmaster's Greater Spirit Ward. She can also halt your team's BP use / storage by using Dark Abyss that inflicts Dread to multiple characters. She can also use Slaughter to deal damage and has high chance to poison. Make sure to remove any status ailments since she can also use Plague that instantly knocks out any character with status ailments. |
| After bringing her HP down completely, she'll be fully healed by her master. Her HP will recover to full again after depleting her HP the second time around. This is the last time that she'll get healed so pummel her with all your might until she's defeated. |
After the battle, you can heal yourselves up and save the game if you want. Once ready, head back to the Altar of Darkness to fight the real boss.
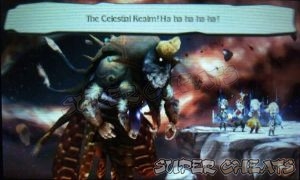
| Ouroboros (1st phase ) |
| HP:150,000, Weakness: None, FAM: Dragon |
 |
| Ouroboros will take the form of a party member and will use different skills you've learned through different jobs. You have to adjust to his attacks accordingly. Make his HP critical to end the battle and for him to assume his real form. |
| Ouroboros (2nd phase) |
| HP:100,000, Weakness: Water, FAM: Dragon |
  |
| His Zero Dimension can instantly take out a character while his Total Regeneration fully restores his HP. He will keep using it every turn so don't bother going for an all-out attack. Zero Dimension doesn't work on a character that has the Ribbon equipped so if that character is your healer, you don't have to worry about fully reviving your characters. You don't need to go on an offensive for now; just revive your fallen party members. |
| If you have a Ninja in your team, you can just use Kairai to redirect the boss' attention to the character that has the Ribbon equipped. If you also have a character with the Miscellany skill, you can use Treat to heal that character for free and to keep his/her HP up in case the boss hits him/her with a physical attack. With this, you can put the boss in a loop and set the battle in auto mode. This will take several turns and minutes so leave your 3DS and grab a coffee or snack or something. Once you've done enough, the battle will stop automatically and a scene will be triggered. |
| Ouroboros (3rd form) |
| HP:150,000, Weakness: Water, FAM: Dragon |
 |
| With the boss' regenerative powers temporarily sealed, you should be able to go on an offensive now. He will still have the same attack pattern in addition to Demonic Touch which will make your party lose 1BP. You just need to keep damaging him until he's down to 50% HP. After that, another scene will take place. |
| Ouroboros (4th) |
| HP:200,000, Weakness: Water, FAM: Dragon |
 |
| You have to do the same pattern as before. In addition to that, he can use Celestial Touch to increase his Physical and Magical stats by 50%. After losing much of his HP, the boss will use Armageddon which will deal tremendous amounts of damage to everyone. Make sure you boost your defenses and dispel his Celestial Touch boosts to ensure everybody survives this. Having Absorb Physical Damage support ability helps a lot in mitigating a good portion of this damage as well. The bad news however, is that Armageddon also fully heals the boss. If you managed to bring down his HP to 60%, assume that he's going to use Armageddon in the one or two turns. |
| After surviving the Armageddon, repeat the same pattern again. After the third Armageddon strike, another scene will trigger. The following scenes will depend on how many friends you've acquired. You'll need them in the next phase of the battle. |

| Ouroboros (5th) |
| HP:200,000, Weakness: Water, FAM: Dragon |
| Your text here... |
| If you have fallen allies or if you've been critically wounded, heal up and revive everyone as quickly as possible. Use one of your megalixirs to completely heal the party's HP and MP as well. Disaster deals heavy damage to non-default characters, with the chance of knocking them out even with full HP. There will even be times that the boss will use Disaster every turn. If you find yourself in a pinch, use the Spiritmaster's Stillness ability or the Merchant's Low Leverage skill. Remember to recover your BP using the Performer's My Hero + Mimic combo. The boss will also use Divergence which will lock up a character's command to Default, Summon Friend and Run. |
| If you haven't used any of your friends' attacks yet, this is the best time to use them. If you have a friend that can deal over the boss' maximum HP, then the battle will be over in an instant. Divergence's effects will die down in around 3 turns but that spells bad news especially if your party's in trouble. It will better if you'll stack up BP and attack multiple times in a single turn than to act individually. Keep doing this until the boss is finally defeated. |
  |
Congratulations in completing the game! Enjoy the ending scenes. You'll be able to save the clear game data, unlock New Game + and a Special Movie.
Anything missing from this guide?
ASK A QUESTION for Bravely Default
Comments for Dark Aurora
Add a comment
Please log in above or sign up for free to post commentsTable of ContentsClose
- Basics
- Asterisks / Job Classes
- Jobs Guide
- Extras
- Intro
- Chapter 1
- Chapter 2
- Chapter 3
- Chapter 4
- Chapter 5
- Chapter 6
- Chapter 7
- Chapter 8
- The End
- Sub-Scenarios (Ch1)
- Sub-Scenarios (Ch2)
- Sub-Scenarios (Ch3)
- Sub-Scenarios (Ch4)
- Sub-Scenarios (Ch5)
- Sub-Scenarios (Ch6)
- Sub-Scenarios (Ch7)
- Sub-Scenarios (Ch8)
Guide Updates
Get notified of updates to this guide
Many of our guides get updated with additional information. To get an email when this guide is updated click below.
 Join us on Discord
Click to close
I'm pretty sure that unless you have bravely second then the maximum damage your friends can deal is 9999.
If you summon a friend they can do over 9999 dmg without using bravely second.
I know this may be stupid to ask, but if a special is higher than the max damage allowed(9999) is it needed to go into Bravely Second?