Grand Mill Works
Thank you for printing this page from www.SuperCheats.com.
Remember to come back to check for updates to this guide and much more content for Bravely Default
Follow this guide to hear about updates
Last Updated:
This will become accessible only after restoring the Wind Crystal and defeating Chairman Profiteur. Sleep in the inn or roam around until evening then enter the door under the large Windmill. Enter the door to the west to reach the interior of the mill.
2F
Go up then down at the intersection. Follow the path to reach a chest to the south containing a Remedy. Head back to the intersection then take the stairs to the north.

3F
Go south then take the path to the right in the split. Follow the path and you’ll find a long corridor with a chest to the east and stairs going down to the west. Open the chest to get a Phoenix Down. Take the stairs to the left to reach the enclosed room in 2F.

2F
You’ll find three chests here. One is a blue locked chest while the others contain Thumbing Claws and Earthing Rod. Backtrack all the way to the intersection in 2F and take the central stairway.

3F
Head to the right to find an adventurer. Save your game then head to the right. Pull down the lever there to activate the gears in the nearby lift. You have to find and pull the second lever for the lift to work. Head south of the adventurer and go downstairs to the right.

2F
Follow the path then take the path to the left. This will lead you to a chest that has a X-Potion. Backtrack a bit then take the stairs on the right side of the room.

3F
Head north and go to the left again. Obtain a Hi-Potion from the chest there then go downstairs to the right.

2F
Follow the path and open the chest containing an Ether along the way. Take the stairs up to the left.

3F
Pull the lever and make your way back to the adventurer to save your game. Head to the lift and pull the lever to reach the upper level of the Grand Mill.

Head all the way to the right to reach the upper corridor of the royal palace. Once inside, go to the marked location and peek over the edge to trigger a cutscene. After the conversation, you’ll be thrown in a battle.

| Khint |
| HP: 6000, Weakness: None, FAM: Human |
| Khamer |
| HP: 6000, Weakness: None, FAM: Human |
 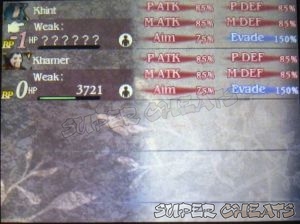 |
| Khint will stay for real this time. Khamer is a Time Mage which will cause problems to your team. He can use Stop to prevent a party member from acting for several turns, increase the evasion rate of him and Khint, deal damage to all your party members and many more. That said, you have to concentrate on taking him out first. At worst, he will stop two of your characters at the same time. Khint’s silence and fire weapon enchantments will cause some inconvenience but not as annoying as the Time Mage. |
After the battle, you’ll get the Spell Fencer and Time Mage asterisks.
Anything missing from this guide?
ASK A QUESTION for Bravely Default
Comments for Grand Mill Works
Add a comment
Please log in above or sign up for free to post commentsNo comments yet. Tell us what you think to be the first.
Table of ContentsClose
- Basics
- Asterisks / Job Classes
- Jobs Guide
- Extras
- Intro
- Chapter 1
- Chapter 2
- Chapter 3
- Chapter 4
- Chapter 5
- Chapter 6
- Chapter 7
- Chapter 8
- The End
- Sub-Scenarios (Ch1)
- Sub-Scenarios (Ch2)
- Sub-Scenarios (Ch3)
- Sub-Scenarios (Ch4)
- Sub-Scenarios (Ch5)
- Sub-Scenarios (Ch6)
- Sub-Scenarios (Ch7)
- Sub-Scenarios (Ch8)
Guide Updates
Get notified of updates to this guide
Many of our guides get updated with additional information. To get an email when this guide is updated click below.
 Join us on Discord
Click to close