Meltdown - C2
Lost Planet 2 Walkthrough and Guide
Meltdown
Chapter 2
Area 1
Objective: Activate All Data Posts in Engineering
At the start of the level, move forward and drop down the chute in front of you. There's a Rifle on the way down, just before you reach the bottom. Pick up the Rifle and use it to kill the three enemy soldiers in the corridor at the bottom of the chute.
You're tasked with activating all five Data Posts on the map to unlock the way to the cannon's control area. Engineering consists of several floors and is heavily guarded, making this mission particularly challenging.
Objective: Break Through the Defences!
Mission Accomplished: No Casualties -- Complete the stage without any deaths on your team to earn this award. AI partner deaths do count, so this is best attempted with human allies.
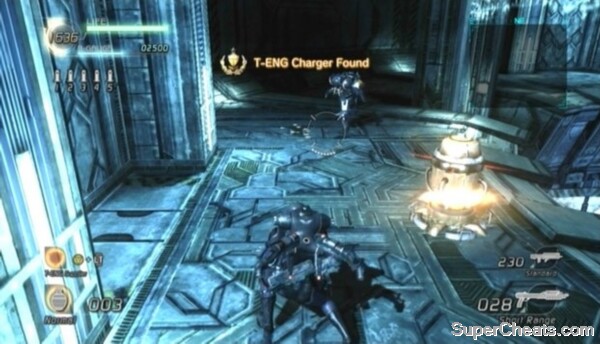 The T-ENG Charger is on the bottom floor. |
Objective: Find the T-ENG Charger
T-ENG Charger Found -- Locate the T-ENG Charger on the bottom floor of Engineering. It's right by Data Post 1. Can't miss it.
When you reach the end of the corridor, use your Rifle to snuff out the two snipers further up. Use what's left of your Rifle to damage the enemy soldiers on the underground walkway. Pick up the Shotgun where the two snipers were standing once your Rifle is spent.
Data Post 1 is on the platform on the north end of the cannon's interior. Activating this Data Post will power the cannon. So, once you've activated Data Post 1, a beam of energy will periodically pulse through the cannon for the remainder of the mission. You'll die if you're standing too close to the cannon when this energy pulses through, so get out of there when you notice the beam of energy beginning to form.
The Fastrey VSs are very handy on this map, so get on one of the Fastreys at the bottom of the cannon right after the energy dissipates and fly it up and out. There are several more Fastrey VSs on the map, so don't fret if yours is destroyed.
Head up the ramp on the north side of the cannon after activating Data Post 1. Gun down the snipers with your Machine Gun on your way up. Data Post 2 is on the second floor, surrounded by snipers and one Battle Armor-wearing, Plasma Cannon-wielding soldier. Clear out the snipers with grenades and your Shotgun. Get close to the guy with the Plasma Cannon, break his armour with your Shotgun and then finish him off. Activate Data Post 2 and then get on one of the Fastrey VSs parked on this level if you need one.
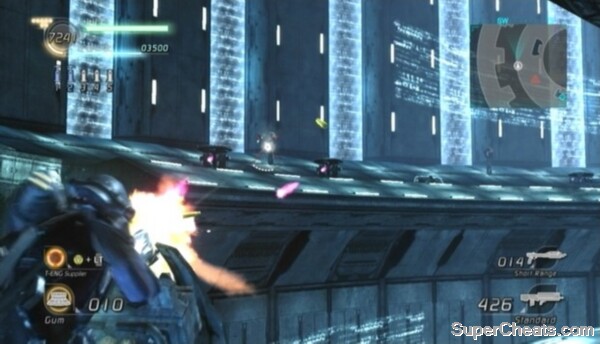 Disable the Sentry Turrets on the outer rim of each floor. |
Disable the Sentry Turrets on the outer rim of the third floor before attempting to activate Data Post 3. The sensors tied to these lines of turrets are right behind them. You can destroy the sensors from afar while on your Fastrey. Zoom in by pressing up on the D-Pad and target the sensors with your Machine Gun.
There are a couple of Cyclops hovering around the third floor as well. You've faced Cyclops before, but these ones are a bit different. This type of Cyclops has a shield that covers its weak spot, but the Cyclops is unable to fire its laser while its shield is closed. When facing one of these a Cyclops, unload into it as soon as it opens its shield to fire its laser. If you're on a Fastrey, use the Shotgun at close range to deal massive damage. Don't shoot at a Cyclops while its shield is closed, as doing so will prevent it from opening it.
Make sure all of the turrets along the rim are disabled and any Cyclops destroyed before moving in to activate Data Post 3.
Objective: Fight off Enemy VSs!
All VSs Destroyed -- Destroy the two enemy Triseed VSs and all Cyclops to earn this GJ award.
Things get tough on the fourth floor. There, you'll meet two enemy Triseeds (if you haven't already). These guys are tough to take down, especially considering the only VS you have access to is a Fastrey.
As on the previous floor, clear the Sentry Turrets on the outer rim and the Cyclops flying around as well before doing anything else. Try your best to avoid the Triseeds until then.
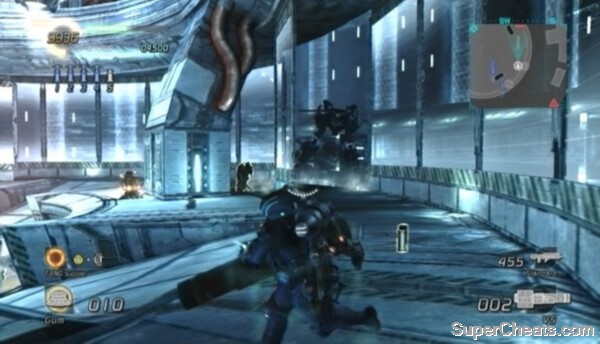 Do your best to take down the two Triseeds that appear. |
There's a VS Rocket Launcher right next to Data Post 4. You can also find a Grenade Launcher in the T-ENG chest on the rim at the north end of the fifth floor. The chest is guarded by two missile turrets. The sensor to disable these two turrets is right behind the chest; target it from your Fastrey and dodge to the side to avoid the incoming missiles.
Destroying the two Triseeds is particularly difficult if you only have AI teammates, as they will most likely congregate by Data Post 5 rather than help you take down the enemy. Once you've spent the Rocket Launcher and Grenade Launcher, your best bet is to just go at them on a Fastrey with your Shotgun. You can find more Shotgun ammo at the west end of the fourth-floor walkway where Data Post 4 is.
When the area is clear of VSs, fly to the fifth level and land by Data Post 5 at the south end. Your allies will most likely have cleared the enemies here; if not, you'll face a few enemies wielding EN Lasers.
Activate Data Post 5 and head up one of the ramps toward the control booth. Cross to the north end of the top floor and step over the red line on the ramp there to end the level.
Area 2
Objective: Protect the VSs!
No VSs Lost -- Don't lose any of the Hardballer VSs to earn this GJ award. If your VS is heavily damaged, just get out and get in one of the fresh ones parked on the sidelines to avoid blowing it.
Objective: Time Challenge: Destroy the Enemy VSs!
Super Quick -- Complete the mission in seven minutes or less.
 Collect the two VS Shotguns at the start. |
All four players start this mission off in a Hardballer VS. You must destroy all of the enemy VSs to complete the mission. At the start of the fight, seek out the two VS Shotguns in the trench and swap your Gatling Guns for these weapons. With dual VS Shotguns, you can rip through enemy VSs quickly.
While in a Hardballer VS you can dash by clicking the Left Stick and pressing the A/X button. You can also hover by pressing the A/X button while in mid-air. The Hardballer also has a melee attack (VS Saw), which you can use by clicking and holding the Left Stick and pressing RT/R2, but stick to using your VS Shotguns with dash and hover to keep out of the enemy's line of fire.
You'll first face Granseeds and Hardballers. After that, a Cakti and a Granseed will drop in and merge to form the powerful Brocakti VS. The Brocakti's life bar is visible at the bottom of the screen. The weakest spot on this heavily-armoured VS is its back. Dash to avoid the barrage of attacks it throws at you and skate around to its weak spot. Blast it with your VS Shotguns to deal massive damage.
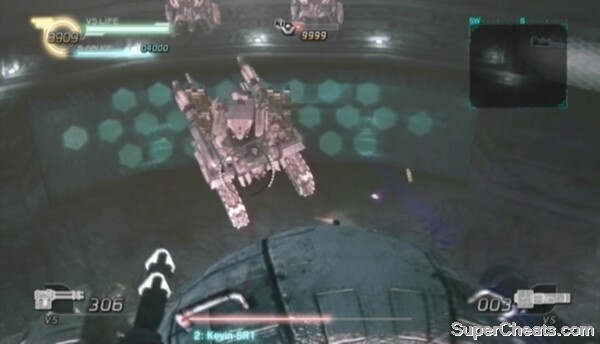 Attack the Brocakti from behind to deal the most damage. |
Destroy the Brocakti to complete the chapter.
No comments yet. Tell us what you think to be the first.