Harbingers of NEVEC - C1
Lost Planet 2 Walkthrough and Guide
Harbingers of NEVEC
Chapter 1
 |
Mission 1
Objective: Infiltrate without Casualties!
Infiltrated: No Casualties -- Complete the level without a single death on your team to earn this GJ award. AI partner deaths do count, so this is best attempted with human allies.
Objective: Stay Out of the Searchlights!
Avoided the Searchlights -- Reach the end of the level without being caught by the searchlights to earn this GJ award.
If you are caught by a searchlight, an alarm will sound. This alarm doesn't seem to do anything in particular, but it will cost you the GJ award. The searchlights only cover the outside area, so you just need to make it as far as Data Post 1 to succeed.
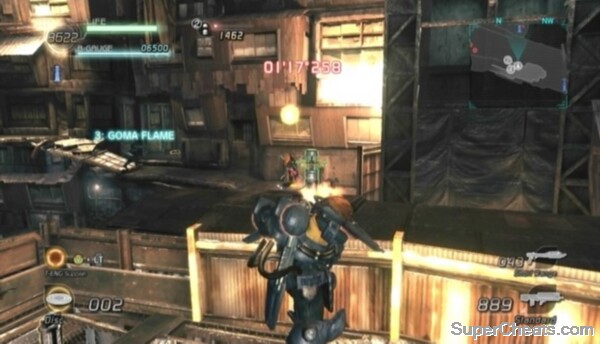
Avoiding the searchlights is easy, and fortunately AI partners are capable enough to not screw this one up for you. At the start of the level, cross the bridge and turn right at the oil drums. Sprint to the other end of the pier and open the T-ENG chest at the other end. This T-ENG chest contains a Rifle. Use this Rifle to kill the two snipers on this map. One of the snipers is on the lighthouse to the west. Shoot this sniper twice in the body to kill him.
When the first sniper is down, backtrack to the flaming barrel and anchor up to the second level. Look north to spot a sniper in a tower on the third level. Shoot this sniper in the head to kill him and then anchor up to the third level.
There are two enemy soldiers standing by Data Post 1 next to the flaming barrel below. A well-thrown grenade can take them both out. When the way is clear, hop down and activate Data Post 1.
Avoiding the Searchlights
Pick up the Machine Gun ammo next to the Data Post and proceed north up the ramp. An enemy will drop down onto the platform to your right, so toss a grenade and detonate it by shooting it when it reaches the soldier to kill him. Four more enemy soldiers will come running through the doorway up ahead, so fallback a bit, toss a grenade up and shoot it to clear them out.
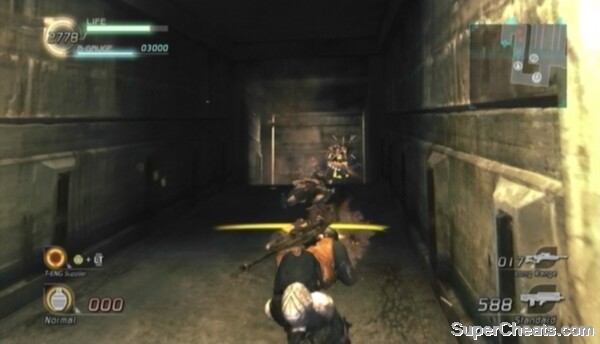
You just need to make it to the end of this hallway to complete the area. Three more soldiers will appear when you approach the doorway, so take them out with a grenade or your Machine Gun. The soldier in black around the corner is armed with a Shotgun, so take him out from afar.
The last few soldiers are by the area end marker at the end of the corridor. There are four or five Shotgun-wielding soldiers and one soldier armed with a Gatling Gun. If you have any grenades left, try bouncing a grenade off the wall and to these soldiers. If you're unable to take them out with a grenade, coax the soldiers out and gun them down with your Machine Gun, or wait for your allies to move in.
When the way is clear, cross the red line at the end of the hall to trigger the area complete countdown.
 Fight your way to the end of the corridor. |
Objective: Strike a Pose!
Emote: All Players -- To earn this award during the area complete countdown, all four players must be performing an Emote at the same time. To perform an Emote, hold the Start button and press one of the shoulder buttons or one of the buttons on the D-Pad.
Human teammates aren't required to earn this award, however AI partners aren't always reliable. You may need to perform an Emote a few times to trigger theirs.
Mission 2
Move up and turn right at the start of the level. You'll be able to see some enemies through the doorway at the end of this walkway. Toss a grenade in there or shoot the explosive barrels to clear them out.
Objective: Get Past the Security System!
S Rank -- Make it to the end of the level without tripping the security system to earn this GJ award.
The sensors are the tripods with several red lights on top of them. Get too close to one of these sensors and an alarm will sound, sending one or more Battle Armor-wearing soldiers to your location.
To avoid setting off the alarms (and ruining your chance at earning this GJ award), shoot sensors from afar until they explode. The first sensor is up the steps north of the area you just cleared of enemies. Destroy it from afar to avoid tripping the security system. Thankfully, AI partners appear incapable of tripping the security system.
 Destroy these sensors to avoid tripping the security system. |
Another of this area's GJ awards, 'VS Completely Destroyed,' requires that you trip the security system at least five times and then destroy the enemy VS that appears at the end of the level as a result. Because of this, it is impossible to earn a 100 per cent GJ Success Rate in one run through this mission. If you're playing with human allies, decide as a team which GJ you want to go for, though the choice is easy if one of you screws up and trips the security system.
Objective: Activate All the Data Posts!
All Data Posts Activated -- Activate all three Data Posts in the level to earn this award.
Data Post 1 is just north of the first sensor. Get Data Post 1 online to reveal the map on the Radar in the top-right corner of the screen, marking the locations of Data Posts 2 and 3 on the map as well.
After activating the first Data Post, pick up the Machine Gun and Shotgun ammo nearby and take the left-hand path north. There is another sensor up the steps here; destroy it before heading up. There's an enemy sniper on top of the shack at the top of the steps and a Shotgun-wielding soldier at the other end of the street. Take out these two enemies and then enter the shack to your left. Look through the window on the shack next to Data Post 2 to spot another sensor. Destroy this sensor before moving in and activating the second Data Post.
Continue north after activating Data Post 2. Once up the ramp, toss a grenade next to the enemy standing in front of the tower up ahead, then move up and shoot the grenade when two more soldiers come out from around the corner. Be careful, as there's a sniper posted on the rooftop to your left. Take him out with your Machine Gun or toss a grenade at him before moving up to Data Post 3.
A few more enemy soldiers will appear from the right, one of them armed with a deadly VS Shotgun. Kill them with a thrown grenade or your Machine Gun and then start activating Data Post 3.
When the final Data Post is online, head down the eastern street to the area end marker.
 If the security system is tripped more than five times, an enemy VS will appear at the end of the area. |
Objective: Destroy the VS!
VS Completely Destroyed -- Trip the security system at least five times and destroy the enemy Nida VS that appears at the end of the level as a result.
If you tripped the security system five or more times, down this eastern street is where you will encounter the enemy Nida VS, as well as two Battle Armor-wearing, VS weapon-wielding soldiers. Destroy the enemy VS to earn this GJ award.
Mission 3
Wait until the bombs drop at the start of the level before moving to Data Post 1 by the stairs up ahead. Ignore the Bleed VSs for now and anchor up to the platform above the T-ENG chest next to Data Post 1 to reach the sewers entrance. Drop down into the sewers and pick up the Shotgun at the start.
Objective: Exterminate the Akrid!
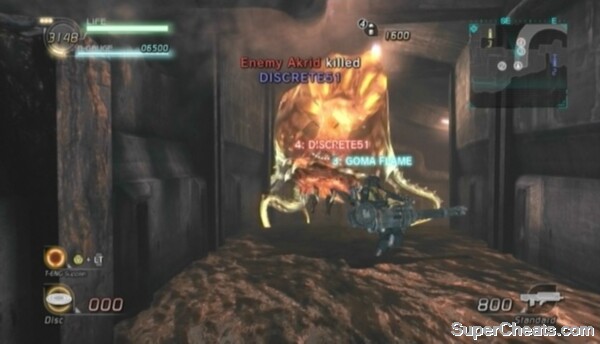
All Akrid Defeated! -- Kill the two Defolma akrid in the sewers to earn this GJ award.
Defolma are medium-sized, octopus-like akrid that have the ability to stun prey with their tentacles and then devour them. These akrid tend to occupy tight spaces, which makes them all the more deadly.
The Machine Gun and Grenades are best against Defolma. The Shotgun is very effective, but it's best to keep your distance when facing a Defolma, as it's close-range devour attack can kill its target immediately.
 The Defolma's devour is an instant kill. |
Aim your fire at the Defolma's head and mouth. This akrid can protect itself from gunfire using one of its tentacles as a shield. To get around this, toss a grenade over the Defolma and detonate the grenade by shooting it when it reaches the Defolma's head.
The first Defolma you face in the sewers will emerge from the pipe next to an oil drum. Shoot the oil drums to detonate them when the Defolma gets close to damage the creature. Use grenades and your Machine Gun to kill the Defolma from afar.
The second Defolma is deeper into the sewers, beyond the Disc Grenades on the platform. Pick up the Disc Grenades and throw them at the Defolma when it emerges from the pipe. Detonate a thrown Disc Grenade by shooting it when it reaches the Defolma's head.
Once the second Defolma has been dealt with, make your way to the end of the sewers and anchor up to street level. This area of the city is crawling with enemies, including a couple of snipers, so don't stay in one spot for too long.
Fallback southeast and activate Data Post 2 before continuing on.
Objective: Destroy the Bleed VSs!
All Bleed VSs Destroyed -- Destroy the three Bleed VSs in the level to earn this GJ award.
Bleed VSs are lightly-armoured VSs that can be destroyed easily with most weapons. The Shotgun you found in the sewers should do the trick. Enemy VS appear as red triangles on the Radar, so use your Radar to track down the three Bleed VSs and destroy them to complete this objective.
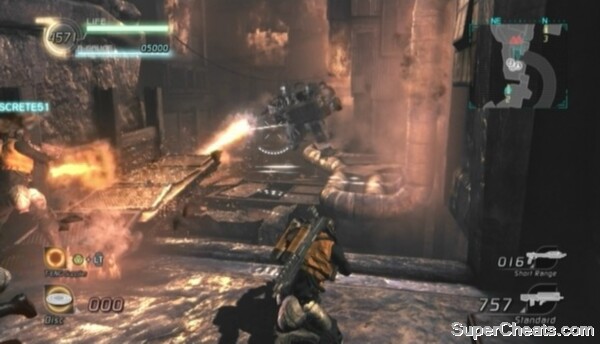 Defeat all three Bleed VSs to earn the Gold GJ award. |
Before ending the level be sure to collect the Battle Armor in the T-ENG chest near Data Post 3 and the area end marker. The T-ENG chest is in the corner of the map west of the area end marker. Once you have the Battle Armor, cross the red line to complete the level.
Mission 4
Objective: Beware the Trains!
Not a Scratch -- To earn this GJ award, you and your allies must not be killed by the train that periodically runs through the centre of this map. The team will earn this award at the end of the level as long as none of the deaths on the team (if there were any deaths) were the result of a teammate being run over by the train.
Avoiding being run over by the train is simple. When you hear the clanging of the bell, stay away from the tracks or hurry up off the tracks if you're on them.
Objective: Secure Rail Passage to Target
To complete this mission you must activate the post on the north side of the tracks and maintain control of it for two minutes. Enemy soldiers will appear once the post has been activated and attempt to deactivate it. If the enemies manage to deactivate the post, you'll have to reactivate it for the two-minute countdown to resume.
 Stand on the other side of the tracks to defend the control unit. |
Before activating the post, activate Data Post 1 in the southeast corner of the map to add 500 points to your team's Battle Gauge and reveal the map on the Radar in the top-right corner of the screen. The map is sparsely populated with enemy soldiers at the start, so clear them out before activating the control post.
Objective: Maintain Control of the Post!
Total Victory -- Do not allow the enemy to deactivate the post once the two-minute countdown starts to earn this GJ award.
The best spot to defend the post from is the platform on the opposite side of the tracks. Most of the enemies will appear on the north side of the tracks where the post is, so you should be safe on this platform.
Pick up the Disc Grenades on the platform and use them to kill Shield-carrying enemies. Aim the Disc Grenade at the wall behind one of these enemies and either wait for the grenade to detonate on its own or detonate it with bullets. There are Plasma Grenades on the platform too, which you can lob at the post to stun any enemies attempting to deactivate it to buy yourself some time.
 Don't lose control of the post to earn the Gold GJ award. |
Enemies in Battle Armor will eventually appear. It can be difficult to get these enemies away from the post since the Battle Armor prevents Machine Gun fire from staggering them. You should still be wearing Battle Armor from the previous level, and if you're still packing a Shotgun from the Defolma encounter, it might be best to hop across the tracks and clear the post if Plasma Grenades and your Machine Gun prove insufficient.
Objective: Destroy the Cyclops Sentries!
Cyclops Annihilation -- Destroy the three Cyclops Sentries that appear around the one-minute mark to earn this GJ award.
Cyclops are flying robots with machine guns. They can be easily destroyed with a Shotgun at close range or repeated fire from a Machine Gun.
Cyclops appear as red triangles on the map. Sometimes you can count on your AI partners to destroy the three sentries for you, but keep an eye on your Radar and the countdown and kill any Cyclops still intact before time is up.
Maintaining Control of the Post
No comments yet. Tell us what you think to be the first.