Libera Me - C3
Lost Planet 2 Walkthrough and Guide
Libera Me
Chapter 3
If there's one part of the game made much easier with the help of human allies, it's this one. This is entirely due to the boss fight at the end, which requires several different things be attended to at once.
It is strongly advised that you enlist the help of at least one other player for this chapter. It could be a friend, a stranger from Xbox Live or the PlayStation Network, your next door neighbour -- anyone. If you don't have access to the internet, you can make use Lost Planet 2's splitscreen mode. Though the splitscreen option isn't the best (especially if you have a small TV), go that route if it's the only option.
None of this is to suggest this chapter can't be conquered alone, but prepare for frustration if you are playing solo.
Note: If you've downloaded the latest patch from the PlayStation Network (the patch is not up on Xbox Live at the time of this writing), you won't be knocked off the train when Red Eye rams it -- you'll just stumble and lose health, making this chapter much easier if you have no choice but to play solo.
Area 1
Objective: Don't Lose Any Men!
No Casualties -- Complete the level without a single death on your team to earn this GJ award. AI partner deaths do count, so this is best attempted with human allies.
 Use a Rocket Launcher to destroy the cannon turrets on the enemy train. |
Objective: Destroy the Train's Cannon Turrets!
All Turrets Destroyed -- Destroy the two Cannon Turrets on the enemy train to earn this GJ award.
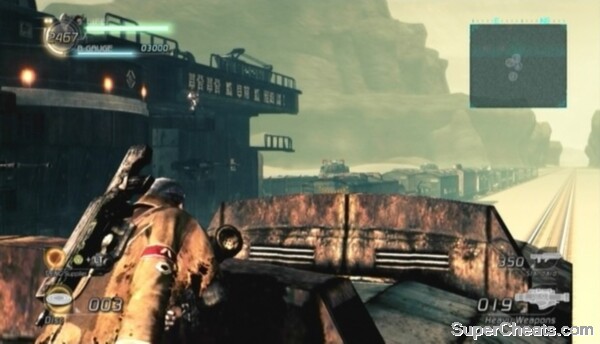
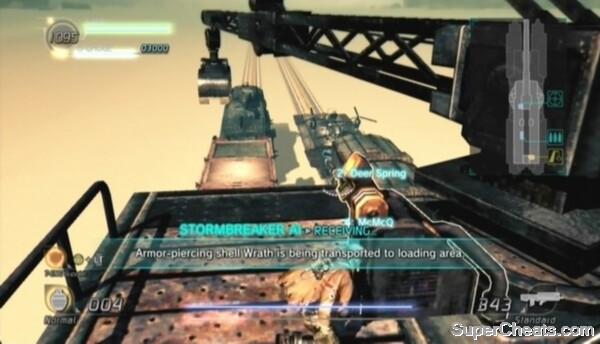
At the start of the level, enter the train car and activate the Data Post inside. Pick up the two Rocket Launchers among the scattered weapons and anchor up to the roof of the train car through one of the openings in the roof. It is best to destroy the two turrets on the enemy train before too many soldiers come into view, otherwise you'll have a tough time firing the rockets with all of the extra gunfire. If you destroy the two turrets quickly enough, neither will be able to fire a shot.
The first turret is on top of the car behind the railway gun. Fire three rockets directly at the turret to destroy it. The other turret is a couple of cars behind the first. Hit the second turret with three rockets when it is within range to knock it out.
Once both turrets are destroyed, drop back down into the train car and take cover below one of the windows.
Destroying the Two Turrets
This mission is about six minutes long. For the time remaining, all you must do is survive. There is a Shield in the train car you can use to protect yourself from the enemies on the other train. Just stand at the front of the train and hold up the Shield to block their bullets.
If you remain in the train car, be careful; an Carpetbagger wielding a Shotgun will sometimes drop in. Be on the lookout for thrown Disc Grenades as well.
When the mission comes to an end, be ready for a quick time event during the ensuing cutscene. There doesn't seem to be any tangible penalties for failing this.
Area 2
Objective: Get to the Front of the Train!
Front of Train: Under 5 Minutes -- Make it to the front of the train in less than five minutes to earn this GJ award.
Objective: Activate Data Posts to Seize the Railway Gun
Gun down the carpetbagger on the next car before jumping down. Move up to the automatic door on the next car, throw a grenade through and shoot it to clear out the enemies inside. Rather than enter the next train car, look to the train on the parallel track and anchor over to the car with the vacant Nida VS.
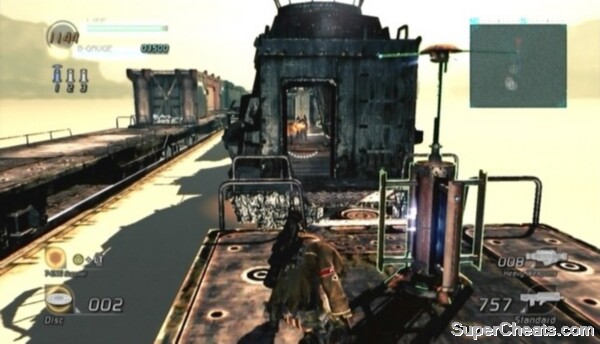 Activate the Data Posts to take control. |
Hop in the Nida Vs and jump onto the next car. Data Post 1 is on the one car up. The Nida VS has a special function that allows the pilot to activate Data Posts while still in the VS. To activate a Data Post while in a Nida VS (or a Bleed/Baylid VS), click and hold the Left Stick and tap the B/Circle button like you normally would until the Data Post is online. You can activate a Data Post more quickly while in a VS, but there is one downside: you won't gain any T-ENG this way.
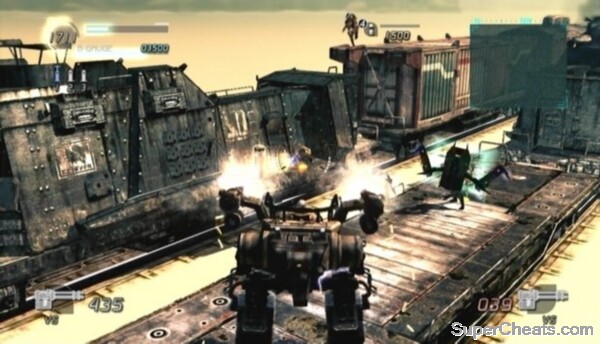
After activating the first Data Post, collect the Gatling Gun ammo on top of the next car and then move forward until you encounter an Osprey VS. Attempt to shoot down the Osprey before it unloads the soldiers its transporting. The two enemies in the Osprey are armed with Shotguns, so quickly shred them with your Gatling Guns before they take down your VS.
Keep an eye out for a Cannon Turret as you continue forward. Destroy the turret with your Gatling Guns from afar. If you don't want to risk losing your VS, you can use the Rocket Launcher near Data Post 2 instead. Hop out of the VS while out of range of the turret and anchor over to the other train. Move up to the car with the second Data Post, clear out the enemies inside and pick up the Rocket Launcher. Move back out of range of the turret and hit the turret with three rockets to destroy it.
There is a second turret a couple of cars up from the first. If you destroyed the first turret with your Gatling Guns, pick up the Rocket Launcher after activating Data Post 2 and use that instead. Move a bit further up and an Osprey will attack you from the side of the train; down it with a couple of rockets or hop back in your VS and destroy it with your Gatling Guns.
 Fight your way to the front of the train. |
Continue moving forward and you will soon come to a parked Osprey with a group of carpetbaggers on top of it. Gun down the sniper at the front of the car on the other train before moving on.
One of the three enemies at the front of the train (the one on the left) is wielding a Rocket Launcher. Another (the one in the middle) is wielding a Rifle, and the third has a Machine Gun. Because you have both a sniper and a Rocket Launcher-wielding soldier to contend with, killing these last three enemies can be difficult if you're playing solo. If you still have your VS, take out the Rocket Launcher user first. If you're on foot, kill the sniper first, but be ready to dodge if the other enemy fires a rocket.
When the sniper is down, anchor up onto the next car and drop through the hole in the roof to find Data Post 3. Activate the final Data Post to trigger a cutscene.
Area 3
This boss fight is much easier (and exponentially more fun) with human allies. Going into this with at least one human teammate is strongly recommended.
Objective: Defeat the Category G
Red Eye is back, and it's after your transport again. With the powerful railway gun now in your possession, it's time to slay this beast.
 Operating the railway gun will appear very convoluted at first. |
There is a Data Post in the open train car. Activate the Data Post to add 500 points to your team's Battle Gauge and then enter the car below the railway gun platform at the front of the train.
Operating the railway gun will appear very convoluted at first, so a great deal of explanation is in order.
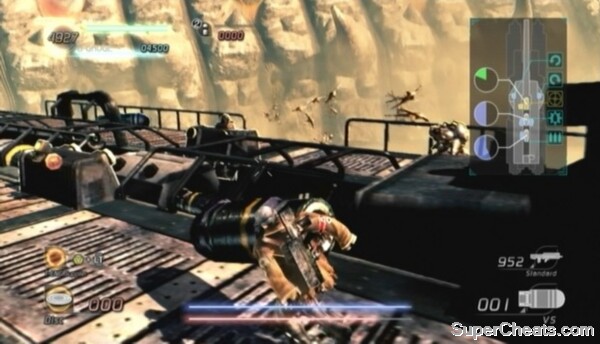
First, about those two bars at the bottom of the screen. The red bar on the bottom is the Cat-G's life bar and the blue bar on top indicates the condition of the train. You must deplete Red Eye's life bar to complete the mission, but if Red Eye damages the train enough to completely deplete the blue bar, you'll fail the mission.
To get onto the railway gun platform, exit through the doorway at the front of the car and then anchor up to the platform. You must be sitting in the seat in the top-left corner of the platform to operate the railway gun. First, you'll need to load shells to fire. To load a shell into the chamber, you must pick up a shell (there should be some on the platform, down below or in the open train car at the back of the train), carry it to the opening near the backend of the chamber and press the Y/Triangle button when prompted.
AI partners generally do a good job of keeping the gun loaded, however this is the only task they'll help with.
There are three types of shells: Cobalt, Devil Roar and Wrath. Stick with Cobalts and Wraths for the most part. Devil Roars are most effective when fired at an exposed weak spot, however.
 Use the crane at the back of the platform to load an armour-piercing Wrath shell into the chamber. |
The armour-piercing Wrath is the most powerful shell, but the AI only seem to load the chamber with Cobalts. To load a Wrath into the chamber, you must use the crane at the back of the platform. You can only operate the crane while the railway gun is turned more or less to its default position (i.e., facing the tracks). If you want a Wraith loaded into the chamber, unless you're playing with human allies, you'll have to do it yourself, because the AI never will.
To determine if the railway gun is at its 'home position' so a Wrath can be loaded into the chamber, look to the map in the top-right corner of the screen. A crane symbol in the bottom-right corner of the map indicates the crane can be operated.
Objective: Fire the Railway Gun!
Fired Powerful Combo Shot -- Fire at least one charged shell to earn this GJ award.
The chamber holds two shells at once; when a shell is at the front of the chamber, you can charge the shell with T-ENG to increase its damage and firing speed. The shell will charge automatically if it is left at the front of the chamber long enough, but this is a slow process. You can manually charge the shell by interacting with one of the stations near the front of the chamber. Rapidly press the B/Circle button to charge the shell before its loaded into the cannon. Charged shells appear green on the map in the top-right corner of the screen.
Objective: Aim for the Core!
Core Fighter -- Destroy four of the T-ENG deposits on Red Eye's sides to earn this GJ award.
 Fire the railway gun at the T-ENG deposits on Red Eye's sides. |
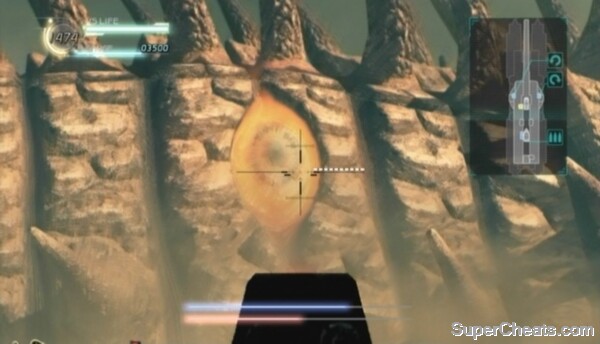
To damage Red Eye you must fire the railway gun at the red bulbs on its sides. One Cobalt shell is enough to remove the bulb, revealing a bright orange weak spot. A single Wrath shell can destroy both the bulb and the weak spot, but two Cobalts are usually required to accomplish the same.
When you've managed to destroy all of the weak spots on one side of Red Eye, you'll have to wait until it remerges on the other side of the train to get at the weak spots on its other side.
The railway gun turns very slowly, but you can speed up the process using the mechanisms on either side of the cannon. The mechanism on the left side of the cannon will turn the railway gun 90 degrees to the left, while the mechanism on the right side of the cannon will turn it 90 degrees to the right. If you're playing without human allies, it is probably best to stick to turning the railway gun manually. Though it turns slowly, it isn't slow enough to warrant hopping out of the front seat and putting yourself at risk of being knocked off the train when Red Eye rams it.
Objective: Repair the Railway Gun!
Good as New -- Bring the railway gun from critical status to 50 per cent to earn this GJ award. This objective will only appear if the railway gun's condition falls to around 30 per cent.
As mentioned at the top, if the blue bar at the bottom of the screen is completely depleted, you'll fail the mission. Each time Red Eye rams the train, the blue bar will fall. You can repair the railway gun using the cooling units in the room below the platform.
If you're controlling the railway gun and notice Red Eye coming toward the train with its mouth open, shot it in the mouth to stop it from ramming the train.
There are two cooling units down below. Approach one of the cooling units and rapidly press the B/Circle button to restore the train by about 20 per cent. You won't be able to use the same cooling unit twice in a row, so run over to the unit on the opposite wall and use it to repair the train further.
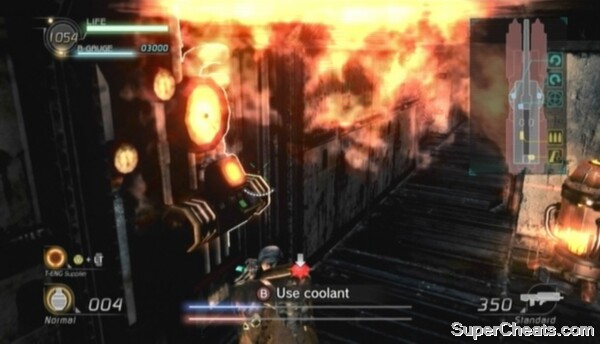 Activate the coolants under the platform to repair the train. |
The AI won't attend to this, so you'll have no choice but to repair the train yourself if you're playing solo. This is why having a human on your team can make this boss fight much easier. You're safest while operating the railway gun because you can't be knocked off when Red Eye rams the train. Having to run down to use the coolants puts you at some risk, so it's best to have one player dedicated to repairing the train. This player can operate one of the turrets on either side of the train until repairs aren't needed.
Note: If you've downloaded the latest patch from the PlayStation Network (the patch is not up on Xbox Live at the time of this writing), you won't be knocked off the train if Red Eye rams it -- you'll just stumble and lose health, making this chapter much easier if you're playing solo.
Objective: Shoot Down the Akrid Projectiles!
Anti-air Expert -- Destroy at least three of Red Eye's projectiles to earn this GJ award.
At some point, Red Eye will begin launching large, slow-moving explosive projectiles at the train. It will also send Trilid and Bolsepia onto the platform. It's easy enough to ignore these akrid, but if one of the explosive projectiles is coming toward you and you aren't sitting at the railway gun controls, pop it with your Machine Gun before it hits.
Objective: One More Hit!
Bullseye -- Hit the weak spot in Red Eye's mouth when its life bar is down to about 25 per cent to slay the beast and earn this GJ award.
As soon as the 'One More Hit!' objective appears at the top of the screen, immediately start turning the railway gun toward the back of the train. Shortly after this objective appears, Red Eye will emerge behind the train and begin closing in with its mouth open. You must deliver one last shell to the weak spot in Red Eye's mouth to avoid failing the mission.
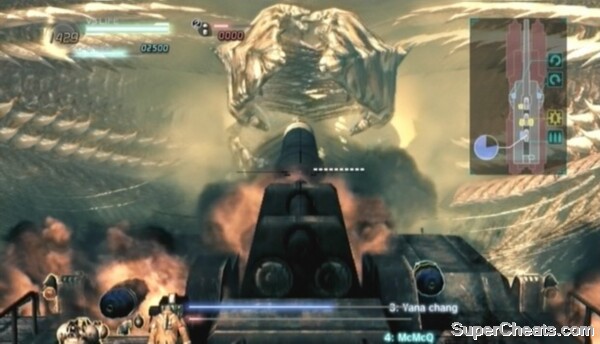 Shoot Red Eye in the maw to finish the job. |
Though the cannon turns very slowly, you should still have enough time to turn it fully around to blast Red Eye before it destroys the train. You must be attentive. When Red Eye's life bar is down to about 25 per cent, be ready for this objective to appear. Never leave the railway gun facing the tracks while Red Eye's health is this low; always have it pointed to the side to avoid having to turn it all the way around when this objective appears.
If you're playing with friends, one of the players not on the controls can use the mechanisms on either side of the platform a couple of times to quickly turn the railway gun around. If you're playing solo, you can hop out, use one of the mechanism to turn the gun around, then get back in and deliver the final blow. Don't bother doing this if the railway gun is already pointed to the side when this objective appears.
Fire a shell into the center of Red Eye's open mouth to finish the job and avoid certain death.
Objective: Team Cheer
We Did It! -- To earn this GJ award during the 'chapter complete' countdown, all four players must be performing an Emote at the same time. To perform an Emote, hold the Start button and press one of the shoulder buttons or one of the buttons on the D-Pad.
Human teammates aren't required to earn this award, however AI partners aren't always reliable. You may need to perform an Emote a few times to trigger theirs.
Defeating Red Eye
I found thoat the railway gun's AI system, STORMBREAKER, will help you with a lot of the activated functions--rotation, coolant, and shell charging mostly: if you just tap the activation button long enough for the device's console to turn from green to red, and extend the white-ringed cylinders from the side of the now-red console, you can leave and work on something else instead of continuing to tap the button. It still SAYS to tap the button, but will continue automatically even if you stop. I have only played single player, so I don't know if that's...normal, but it helps me save a lot of time in the engine room.
I don't know if this will help... by the way, if u have a PS3, invite me to this chapter
PSN name: Browndeer
THANK YOU SO MUCH! I WAS STUCK ON THAT BOSS BECAUSE I DIDN'T KNOW HOW TO USE THE RAILWAY GUN.