Desperation
Gears of War 2 Walkthrough and Guide
Gears of War 2 Guide - Act 1: Tip of the Spear
Chapter 2: Desperation
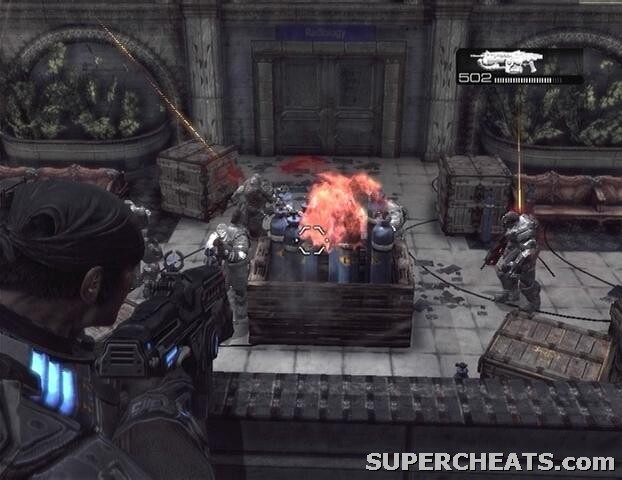
Pass through the blue double door to trigger a brief cutscene. Afterwards, follow Tai up the stairs to reach another double door. Upon entering the next room, proceed through the double door in the northwest corner. Grab the ammo box along the walkway and then take cover along the railing so that you have a clear view of the fuel tanks at the center of the lobby below.
You'll want to keep your head down to avoid being spotted by the Drones entering the lobby. Stay down until you hear the order to detonate the fuel tanks, at which point take aim and fire at them until fire begins to shoot out. Once you've punctured a hole in one of tanks, just sit back behind cover and wait for the tanks to explode, ideally killing each and every enemy in the room below.
 |
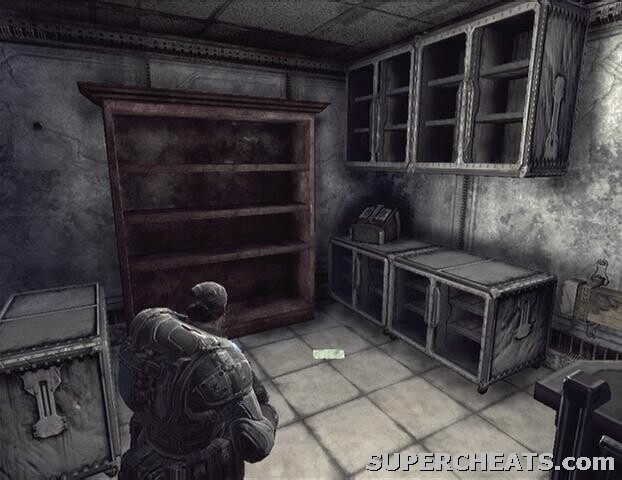
There's a collectible in one of the rooms along the walkway, so don't pass through the double door with the ammo box in front of it just yet.
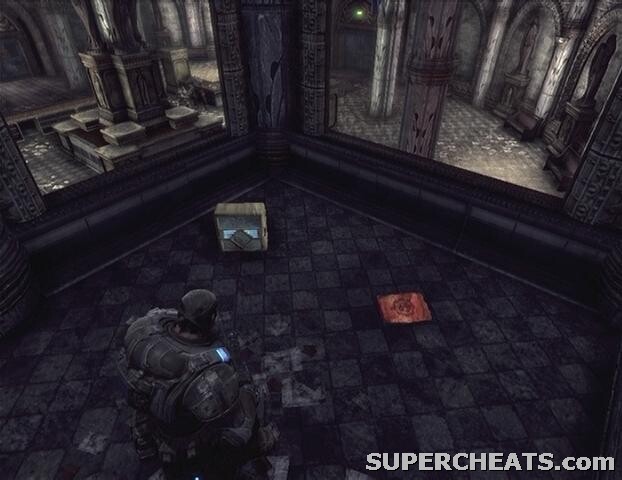
Collectible (1/5): This collectible is in one of the rooms along the long walkway overlooking the lobby where the Drones swarm in. If the one open room along the side of the walkway you are on does not hold the collectible (if you see Frag Grenades, you're in the wrong room), go to the parallel walkway and look in the open room there. The collectible (Doctor's Journal) will be on the floor by some cabinets.
 Collectible 1/5 |
 Doctor's Journal |
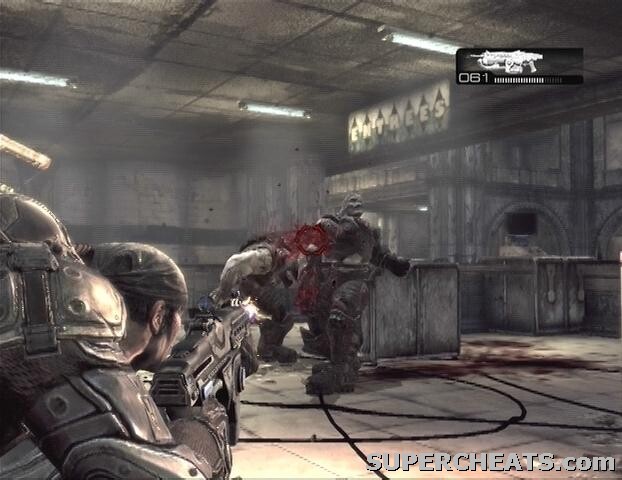
Once you're ready to move on, follow your squad through another double door. You'll meet some resistance along this walkway in the form of two Drones. Let your comrades deal with the enemies in the area below the walkway, and take cover behind one of the white chests to avoid taking fire.. Pick off the two Drones and continue through the double door up ahead. You'll meet a pair of Drones in this hallway as well; just get behind cover and allied helicopter fire will soon take care of them.
A couple of Drones occupy the room at the end of the hallway. Dart towards the standing table in the middle of the room, take cover against it, and then press the A button to have Marcus flip it on its side for use as cover. Take care of the Drones in this room from behind this cover. There are some Frag Grenades in the small room to the left of the table, so head in there and pick them up if you have space in your inventory. When you're ready, continue through the door at the opposite end of the room and head down the stairs.
 |
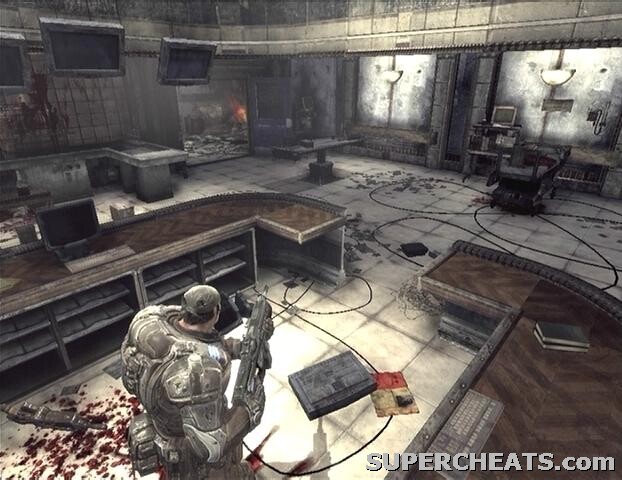
Take cover by the side of one of the doorways at the bottom of the stairs and clear out the locusts in the room beyond it.
Collectible (2/5): The collectible (Jacinto Medical Center File) is on the floor between the two circular desks at the center of this large room.
 Collectible 2/5 |
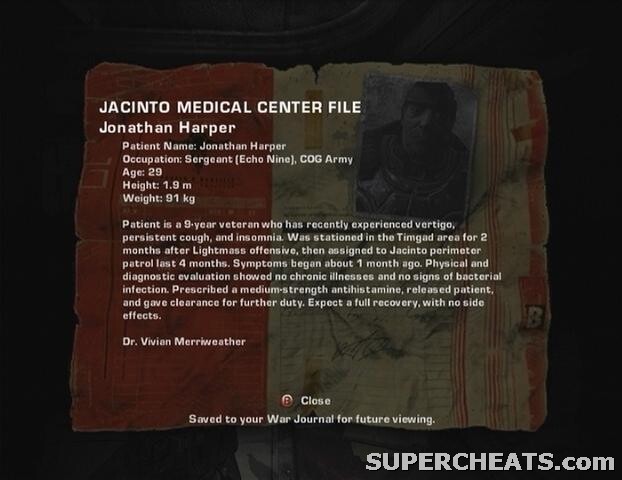 Jacinto Medical Center File |
Head through the single door on the wall adjacent to the door you used to enter and go through the double door at the end of the hallway you come to. Take cover behind one of the benches at the bottom of the steps and help your allies pick off the enemies in the courtyard. After the skirmish, walk across the courtyard, climb up the steps, and step through the double door there. Move along the hallway here and clear out the two Drones in the large room before stepping in. Follow your squad through the next door and turn right at the split.
There are a few more enemies to deal with in the cafeteria. Luckily there is plenty of cover to choose from. There's an ammo box in the kitchen freezer that you can pick up if your ammo's low. Be sure not to miss the nearby collectible before moving on.
 |
Collectible (3/5): Enter the small room with the broken double door by the doors to the cafeteria and kitchen. The collectible (COG Letterhead) is on the floor here in front of the desk.
 Collectible 3/5 |
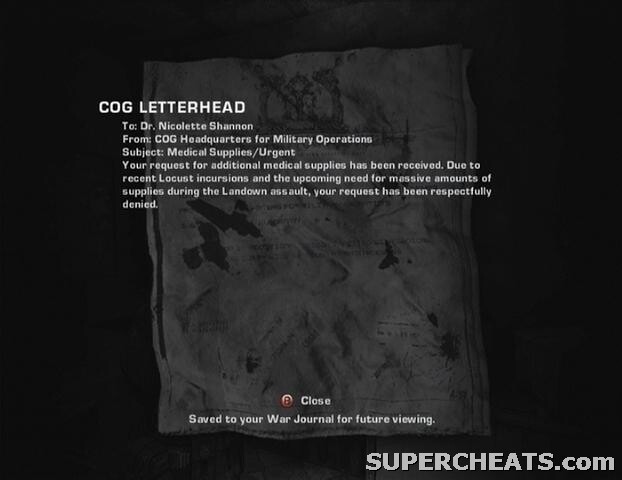 COG Letterhead |
Move past the serving counter at the far end of the cafeteria to enter another large room. After a King Raven helicopter crashes through the skylight, a few Drones will appear and fire down at you from an overlooking walkway. Take cover behind one of the shelves and either shoot back at them or lob a Frag Grenade onto the walkway to hopefully take them out. Climb up the stairs at either end of the walkway and head through the double door up top. Some Frag Grenades can be found to your left as you enter the main lobby. Be sure to pick up the collectible here before heading down the stairs.
Collectible (4/5): Upon entering the main lobby, turn right and move to the very end of the walkway. The collectible (COG Proclamation) is there, next to an ammo box.
 Collectible 4/5 |
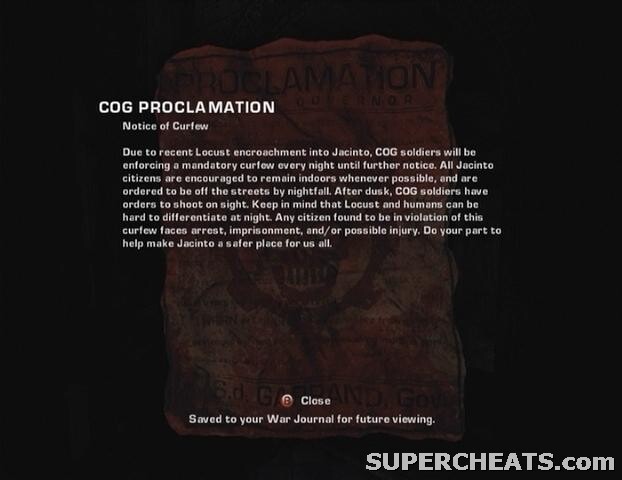 COG Proclamation |
After you've picked up the collectible, take the stairs down to the main lobby and enter the formation of reception desks at its center. Drones will soon appear and attack from all sides, so you'll have to move from cover to cover to avoid taking fire. When the enemies have all been dealt with, head through the recently opened double door to meet up with Carmine. There is yet another collectible nearby, but be sure to kill the enemies up ahead before going for it.
Collectible (5/5): Upon exiting the hospital through its main lobby, turn right and pass under the archway. Turn around and look by the column on the left to spot the collectible (COG Tag).
 Collectible 5/5 |
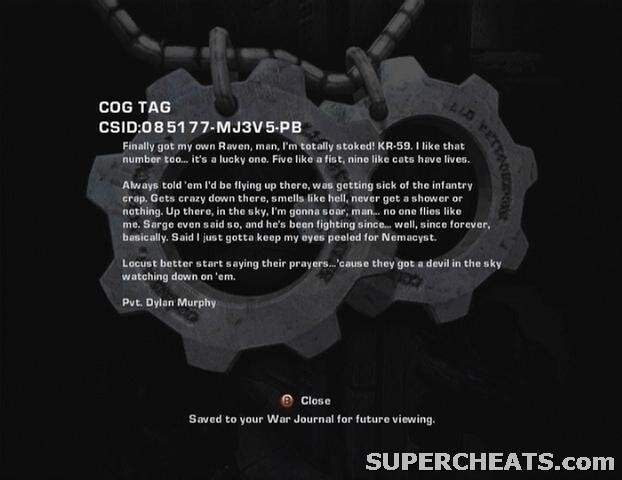 COG Tag |
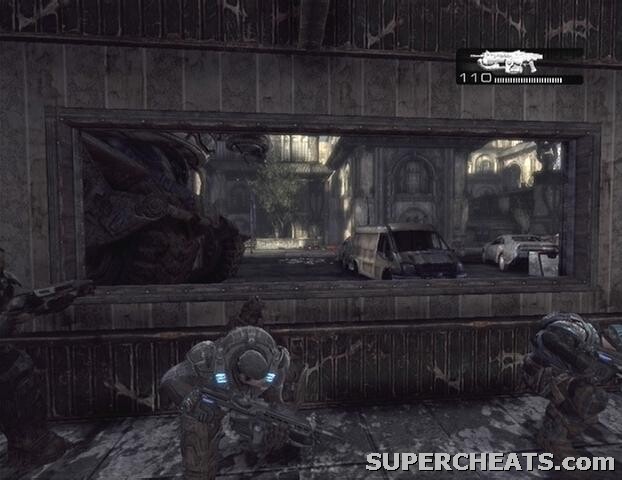
When a good number of the enemies in the street have been cleared out and the collectible has been picked up, climb down the steps and grab cover behind the cement block there. A couple of Reavers will appear, but remain behind cover and let the allied helicopters deal with them. Once the way is clear, cross the street and hop through one of the store's rectangular windows. If you move to the other end of this room, you can take cover below the window there, likely giving you a clear view of the remaining enemies.
 |
Grab the ammo box across from the window and leave the store when all visible foes have been taken care of. Continue down the street and take cover behind the cars scattered about if need be. You'll clear the chapter and unlock an achievement once the Locust attack force in the street has been eliminated.
GoW 2 Cheats, Hints and Walkthroughs
No comments yet. Tell us what you think to be the first.