Achievements Guide
Darksiders 2 Walkthrough and Guide
by vhayste
Achievements Guide
BFA (10G)
Unlock Everything
This is the last achievement you'll unlock, after unlocking the 49th achievement whatever it may be.
Full Potential 30 (G)
Unlock All Combat Moves & Upgrades
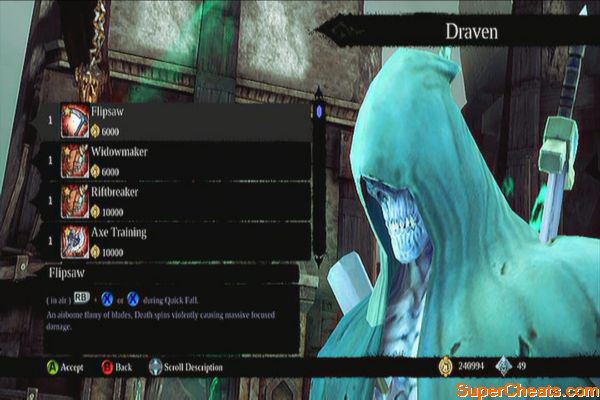
There are two trainers in the game: Thane in Tri-Stone and Draven in the Eternal Throne. In case you weren't able to purchase all skills from Thane, you'll be able to purchase them from Thane as well. Simply buy all the skills to unlock this achievement.
 |
Pay It Forward (10 )
Gift An Item To A Friend
This achievement can only be unlocked online. You can do this from any Tome locations in the game. Choose any friend that has played/ is playing the game and send him/her any gift you want. You can also use your secondary / alternate Xbox accounts for this as well.
Feeding Time (20 )
Level Up Your 1st Possessed Weapon
Possessed weapons are very rare drops from enemies or loots from chests. You can level them up to five times by “feeding” or sacrificing various equipment to them. Apparently, scythes and high level equipment give the most experience. The possessed weapon can inherit some of the abilities of the sacrificed items so carefully look at the green properties of the weapon you're going to sacrifice; if it took several equipment, you'll only be able to select one of those properties to inherit or opt to upgrade an existing trait.
Epic! (10)
Death Reaches Level 30
This is the maximum level death can go. This can only be attained by playing in New Game .
Is There Anyone Else? (30)
Complete The Crucible
This is an optional arena where you can train and win some unique equipment as well. This place is available in your map however you can only access it by redeeming the Crucible Pass online that came along with the game. Consult the back of manual for this.
It's setup is similar to the Arbiter's Maze where you need to fight waves of enemies which get stronger as you progress. To access higher waves, you need to meet some requirements or milestones in the game. You'll be notified when you unlocked a milestone in the form of Tarot cards that will be sent to your mailbox. Access any Tome to retrieve this “access cards”.
The Fool
Wave 1-25
Defeat the Guardian
The Emperor
Wave 26-50
Defeat the Wailing Host
Strength
Wave 51-75
Defeat Samael
The Devil
Wave 76-100
Reach LV25
Death
Wave 101 (Wicked Killington)
Beat all waves in a single visit
The World
Defeat Wicked K.
Bravo Old Chap (20)
Defeat Wicked K
Wicked K appears as the final boss in the Crucible
Grim Reaping (30)
Unlock Reaper Form
This is unlocked automatically after reaching LV6.
The Secondary Adventure (50)
Complete all Secondary Quests
For the list of all Secondary or Side Quests, refer to the related section in the guide for more information.
A True Horseman (90)
Complete the game on APOCALYPTIC
The game's difficulty achievements stack so completing the game in Apocalyptic mode unlocks the lower difficulty setting. It is recommended that you complete the game in Normal Mode then start New Game , so you can also reach max level (LV30) that unlocks yet another achievement.
Four My Brother (90)
Complete the game on NORMAL
A Stroll In The Demonic Park (30)
Complete the game on any difficulty setting
All You Can Eat Buffet 30
Complete Sticks and Stones
See the side quest “Sticks and Stones”. There are a total of 69 stonebites to be found.
I've Brought You A Gift (30)
Defeat the Soul Arbiter
See the side quest “The Chancellor's Quarry”. This is the boss in the optional dungeon called the Soul Arbiter's Maze.
Antiquing ( 30 )
Complete Lost Relics
See the “Lost Relics” side quest. There are a total of 30 relics you must collect.
Like a Noss (30)
Defeat the four creatures named by Thane.
After defeating Thane and completing the sidequest “The Maker Warrior”, he'll ask you to defeat four major bosses.
1. Bheithir – Flying around in the fiery basement of The Nook. Deathgrip required.
2. Gorewood - Located in The Weeping Crag.
3. Achidna – She is fought alongside a main storyline boss. Cannot be missed.
4. Argul, the Deposed King - Located in the lowest level ofThe Lair of the Deposed King. Recommended level should be around 18.
Mass Ruckus (10)
Equip elite items to all slots
Elite items are those purple colored equipment. There are seven categories you need to fill in. Just keep at least one purple item for each category should you encounter one; otherwise, you have to purchase them from merchants, or trade some Boatman Coins for some Ornate Boxes to Vulgrim.
Diamond Geezertron (10)
Unlock the final skill in either skill tree
There are two skill trees with a “final skill” that will be available once you've reached LV20. Purchase one of either skill tree to get this achivement.
The Book of the Dead (10)
Complete The Book of the Dead
You'll encounter Vulgrim the first time around in his shop in the Weeping Crag. The are 40 pages scattered across the realm. Collecting 10 pages will automatically convert them into a chapter. Sell this chapter to Vulgrim to get a key that can be used to open Death Tombs. These tombs hold a lot of loot, some collectables and unique equipment. Refer to the Collectibles section to know the location of each page.
Gnomad (40)
Complete GnoMAD Gnomes
The “GnoMAD Gnomes” quest in the Side Quests section for more details. There are four secret gnomes that can be found in the game.
The Triple Lindy ( 10 )
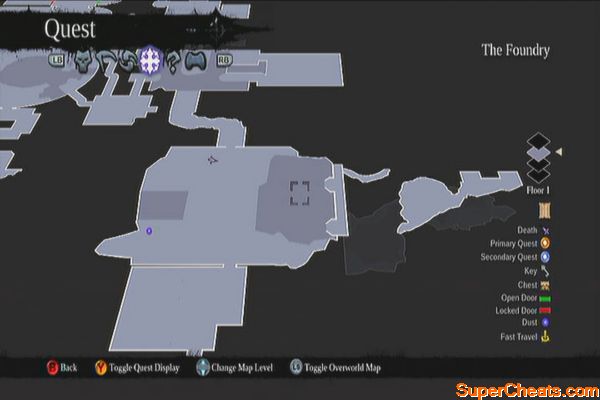
Complete 3 different high dives in the Foundry
There are three highest points in The Foundry, in the area where the second Heart Stone is located. You just need to dive off from all of them to get the achievement.
 |
 |
Triple Lindy
Pathfinder (10)
First use of Fast Travel
Simply fast-travel to unlock this achievement. To do this, pull up the map and toggle the overworld map. Select any main location there and press X.
The achievements below are story-related and therefore cannot be missed:
Lord of the Black Stone (10)
Complete Lord of the Black Stone
The Mad Queen (10)
Complete The Mad Queen
Stains of Heresy (10)
Complete Stains of Heresy
The Rod of Arafel (10)
Complete The Rod of Arafel
The Root Of Corruption (10)
Open The Well Of Souls
City of the Dead (10 )
Complete City of the Dead
The Court of Bones (10)
Defeat Basileus
The Toll of Kings (10)
Complete The Toll of Kings
The Lord of Bones (10)
Complete The Lord of Bones
Tree of Life (10)
Complete Tree of Life
Heart of the Mountain (10)
Complete Heart of the Mountain
To Move a Mountain (10)
Complete To Move a Mountain
Tears of the Mountain (10)
Complete Tears of the Mountain
Fire of the Mountain (10)
Complete Fire of the Mountain
By Your Command (10)
Collect the Interdiction Stone
The Lord of Bones will give you this temporary ability to find and summon his Dead Lords.
Death Will Tear Us Apart (10)
Collect the Soul Splitter
This is the replacement ability for Interdiction after completing the Court of Bones main quest.
Looks Familiar (10)
Collect Redemption
This gun will be given by Alya after completing the main quest “Fire of the Mountain”
Tearing Time A New One (10)
Collect the Phasewalker
This is acquired from Lilith as part of the main quest “The Mad Queen”
I Can Has Cake? (10)
Collect the Voidwalker
This is found in the Ivory Citadel during the main quest “Stains of Heresy”
The Spectral Touch (10)
Collect Deathgrip
This is acquired while you're exploring the Foundry. It is a required ability to complete the dungeon so this can't be missed.
The Big Boss (20)
Defeat Absalom
Soul Crushing (20)
Defeat The Wailing Host
It's Not Over ( 20 )
Defeat Samael
Clipped Wings (20)
Defeat Archon
Dust to Dust (20)
Defeat the Guardian
This is the final boss fight in the main quest “Heart of the Mountain”. Refer to the strategies below:
For the first part of the battle, you'll be riding Despair. Run around and wait for the guardian to smash its hammer down. Before it hits you, charge away to avoid getting damaged. Use this chance to manually aim with Redemption and shoot at the shadowbombs stuck on the Guardian's arm. The explosion will temporarily weaken the guardian and bring one of its heartstones within reach. Switch to Deathgrip and grab the heartstone to pull yourself towards it; attack it like crazy afterward.
Against the towering stone
Once that arm is severed, the Guardian will now shoot a large, homing spike ball. Shoot it with Redemption until its energy bar is down. Once it stops and floats in the air, quickly run towards the Guardian and lure the ball towards the Guardian's legs to weaken him. Look for the reachable heartstone then pull yourself towards it using deathgrip. Repeat the process until the Guardian is weakened. Watch the following scenes, and the mission will be completed after this battle.
Taking down the mountain
Crow Carrion (20)
Defeat the Crowfather
No comments yet. Tell us what you think to be the first.