Constructing an Obsidian Generator and Some Obsidian Blocks
Thank you for printing this page from www.SuperCheats.com.
Remember to come back to check for updates to this guide and much more content for Minecraft
Next Page
Day 2 in the World of Minecraft - Adding ComfortsPrevious Page
Day 2 in the World of Minecraft - Seeking Parity
Day 2 in the World of Minecraft - Adding ComfortsPrevious Page
Day 2 in the World of Minecraft - Seeking Parity
Follow this guide to hear about updates
Last Updated:
Over the course of the many hours of work and effort that you have dedicated to the world of Minecraft you have been slowly but steadily improving your lot in life, adding to your capabilities and expanding your power over this amazing world. You have now reached a point in which you must extend your reach to other realms, but to do that you must ensure a supply of that elusive and rare resource, Obsidian.
Normally this rarest of the Overworld resources is found haphazardly, in very small quantities, in locations deep below the surface where Lava and Water naturally come together. While there are sure to be natural deposits of Obsidian to be found in your world, you will require two or three full stacks of them -- and obtaining just your first dozen blocks under normal circumstances is a task that can eat up a hundred hours of play, hundreds of tools, and lead to considerable frustration -- so we are going to avoid all that by building a construct that will allow us to create Obsidian as we need it.
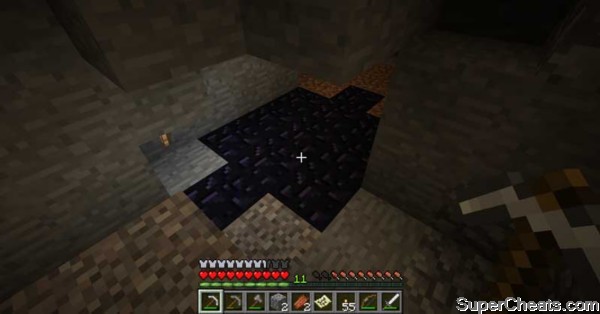
A nice find indeed! Obsidian in its natural state.
Bear in mind that there are rules that we must follow -- for example nothing in the world of Minecraft is created out of thin air -- to obtain any resource no matter what it is, something must be exchanged, as that is the poetic nature of the game and the world. For instance when you seek to acquire a Blaze Rod you must exchange your effort and perhaps a little blood in order to learn how to effectively do battle with the Blaze so that you can obtain their loot. Obtaining Sugar Cane to make Paper requires both effort and that most valuable commodity of all -- time -- both of which are exchanged in equal measure in order to ensure a steady and reliable supply of the plant so that you can convert it on the Crafting Table into the Paper you require.
The process of creating Obsidian requires not simply the exchange of Redstone Dust, but a very specific set of physical circumstances that you must build in order to create an effective device to accomplish this alchemical feat! To begin that process here is a list of the items you will require:
(1) An Iron Shovel;
(2) A Diamond Pickaxe;
(3) Three Metal Buckets filled with Lava;
(4) An empty Metal Bucket for carrying Water;
(5) A nearby Water source;
(6) As many stacks of Stone Blocks, Stone Brick Blocks, or Brick Blocks as you will need;
(7) Several Stacks of Redstone Dust;
(8) Sufficient Torches to properly light your work area so that you can see;
(9) A building that you have constructed to contain your Obsidian Generator;
As you study the list above, please allow me to reflect upon some of the items, starting with the task of building your Obsidian Generator Plant (building) -- an aspect of the process that may not have occurred to you but that makes perfect sense...
The process of creating Obsidian -- even using a plant like that which we are about to construct -- is a time-consuming one -- and as the days are short and the nights, while no longer truly dangerous nonetheless contain the potential of irritating and inconvenient encounters with that arch nemesis the Creeper -- who can in the wink of an eye bring massive destruction to our constructing project.
Then there is the matter of symmetry and elegance to be considered. While we can easily build this device out in the open, by taking the time and effort to construct a building in which to house it we not only make it convenient to use at any time of day or night, we project to the world our high standards for quality and the perfect projection of the Joie de Vivre with which we assail life!
Time is the only thing that stand in the way of your completing this project and moving on to the next phase of play -- but then you have all the time in the world, don't you? So taking the time to first construct the building and then the machine, and then perhaps connecting the building to your Den by way of a tunnel below ground with ladders and shafts and even a Minecart transportation system (depending upon the distances) strikes us as an excellent baseline for your goal in building your Obsidian Generator. I am just saying...
--The Construction of Your Device
--
At this point we presume that you have acquired all of the items on the list above, and you have built the infrastructure to support the device. You have connected it all and you are now ready to begin the actual construction of the Generator itself!
So your true first step will be to mine all of the resources you will need for the building and the plant, then when you have those resources you will need to mine the fuel you need to craft them into the finished building materials, and then there are any embellishments that you may want to add... The point is for you to take the time and make the effort to have everything that you will need ready to go so you do not have to break-up the building construction project with pauses to resupply!
Please note that for the purposes of illustrating the process of constructing the device I have not enclosed it in its building at the time that the images were captured -- this is largely due to the fact that it is easier to position myself for the image captures -- so in your mind's eye try to imagine that the grand industrial building that now houses the device (and that is shown later in this section) actually exists, right? So logically you should start out with the building (though I ended with it) -- and since you are going to the trouble of constructing your first commercial manufacturing structure anyway, why not make it as fancy as you can manage? I know I did!
Part 1: Acme Obsidian Manufacturing Plant #1
As we set out to design the building that will contain the actual Obsidian Plant we have to decide upon the structural design -- as I just finished listening to Neal Stephenson's super-future-fantasy hacker-teck magnum opus, The Diamond Age (I listen to books on my iPhone using the Audible audio book app when I am doing complicated game play as it helps me relax) I initially had a nice Victorian style of building in mind...
But then as I thought about the fact that this plant is basically a building in which raw burning Lava will be mated with Redstone along a knife-edge of Water I realized that what it really calls for is a massive square industrial building with lots of iron and glass and Stone Blocks, using Brick for the actual plant so that it nicely contrasts with the building... The basic structure will be improved by tiling the floor with Stone Tiles, along with broad expanses of Glass Windows and a HUGE array of Glass Skylights...
I can picture it in my mind -- but you get to SEE it soon, thanks to the magic of Screen Shots...
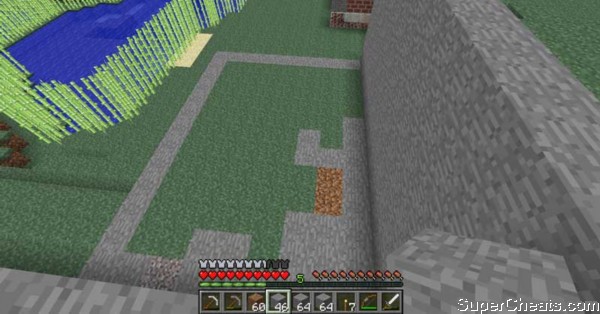
Determining the Floor Size for your Plant Building
So to start this project we need to decide upon the floor size of the building -- and after working out how much room will be needed for the plant (which is really a sort of covered pit with the bulk of the device built above ground) itself as well as any additional floor space you might want for adding other aspects of the plant.
Originally I had planned to have a main work area which contained the Plant, and then in the front of the building an office and engineering design studio on one side, with a crafting workshop on the other side, but this would have required a much larger building than I actually had room for due to the limits that the terrain imposed upon me. I wanted the convenience of placing the Obsidian Plant Building nearby my Den but that meant going with a much smaller building than my desires would enclose -- so I had to compromise.
A frontal view of the Plant as the Building takes form...
In the image above you can see the basic layout of the building floor and without too much effort imagine the floor plan once the Plant is constructed inside of it. The rectangle-shape of the floor is marked here by the foundation stones that I have already laid -- with the wall that I am standing on and the wall on the right side having been constructed on the foundations for those sides already, and the right and front wall foundations laying bare in the image.
What you cannot see is that the foundation lines represent solid stone blocks stacked three-deep all the way around. The Stone Blocks that are in the inside of the foundation box were naturally occurring (and were excavated in the later steps of construction, and should be ignored).
The building is tucked between my Den and two large hills that border it to the right and to the rear of the PoV shown above, and so what I ended up with is a building floor layout of just 12-blocks by 8-blocks (not including the blocks occupied by the outer walls, which would make the building footprint an actual 14-blocks by 10-blocks total).
Part 2: The Plant Foundation
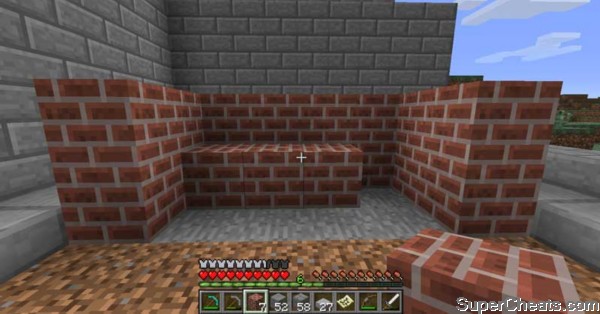
While you do not actually have to use Stone Blocks or Brick in the construction of the foundation for the device, using one or the other does create a rather elegant appearing base for your device, and if you choose one for the building foundation and the other for the device foundation this nicely creates the appearance of contrast -- which has an esthetic of its own that you can surely appreciate.
With that in mind, please review the following images and note their instructions:
Constructing the Plant Body
The bulk of the Obsidian Plant will actually be built above ground level, and in fact you only need to make a single-block deep Water Line Trench that is four-blocks wide -- whether you choose to do that with earth or a more elegant material you will want duplicate the layout in the images that follow -- note that each of the continuing Steps includes both the description and an illustration to make this as easy and convenient for you as we can...

Constructing the rear wall and Sluice Receiver Retainers
Step 1: Build the back-wall of the Plant -- this consists of a row of six blocks of your chosen type in a line, two blocks high (for a total of 12-blocks) and comprises the rear wall of the Obsidian Plant.
Constructing the Sluice Receiver
Step 2: Lay the Water Sluice -- this is the basic form that will cause the Water to flow in the direction and manner that we require it to, bearing in mind that for this Plant to function it must be build with flowing Water. As illustrated you want to place the two side wall sections (two stacked blocks) on either side, with the base of the sluice consisting of the first three inside blocks form left to right, leaving the fourth block space open.
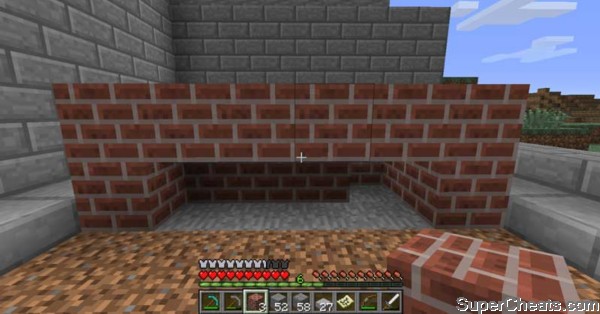
Constructing and covering the Sluice Chamber
Step 3: Build the Middle-Body of the Plant -- next we want to construct the middle-section, or Middle-Body, which is two stack blocks on either side and a roof of blocks all the way across (the access for the Sluice Section is open on top) with the bottom of this section open to create the Sluice itself.
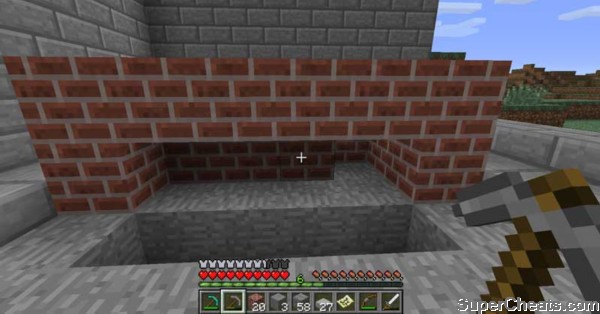
Constructing the Water Trench
Step 4: The Water Line Trench -- Now we excavate the four-block-wide Waterline Trench from the center to complete the Sluice proper, and this completes the Water-side of the Plant. An important element of the construction process is the act of covering the Trench section of the Plant, which is required for the Plant to operate properly because the enclosure adds to the force that is created when the Water is channeled through the central chamber.
The Water Trench with the covering in place...
Step 5: The Water Line Trench Body -- With the Water Line Trench in place, we now want to construct the Water Line Trench Body, which consists of two stacked blocks on their side and the roof section, leaving the bottom open.

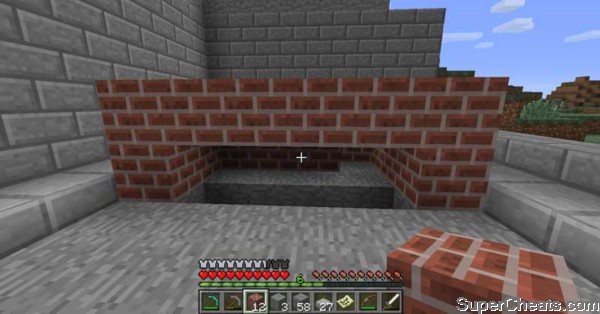
Constructing the Obsidian Chute
Step 6: The Obsidian Chute -- the blocks in front of the Water Line Trench are the base of the Obsidian Chute, and our next step is to construct the sides for this section of the body, with the right-hand-side being similar to the previous section's side -- two blocks stacked. The left-hand-side is a bit different however, because it extends to the left of the Chute in and makes up the Lave Induction Slot.
This is a critical part of the Plant, as without the Lava Chute (of we simply built the side wall similar to the previous one) when the Lava is poured into the Plant it will instantly be converted into Obsidian at the cost of the Lava itself -- which is an exchange of states that we do NOT desire, since building the Plant in that fashion simply converts the Lave into Obsidian, whereas what we want to do is use the Lava to convert the Redstone into Obsidian with the ability to re-use the same Lave supply over and over.
So we extend the Lava Chute to the left and a block above so that when the Lava is poured into it, it flows over the top of the Redstone, which instantly succumbs to the process for this alchemy reaction, swelling to push the Lava up keeping it level with the base of the Chute.
The Lava will flow across all four Redstone deposits converting each to Obsidian in one fluid process, and then we are able to recover the Lava in a Bucket for the use in the next run.

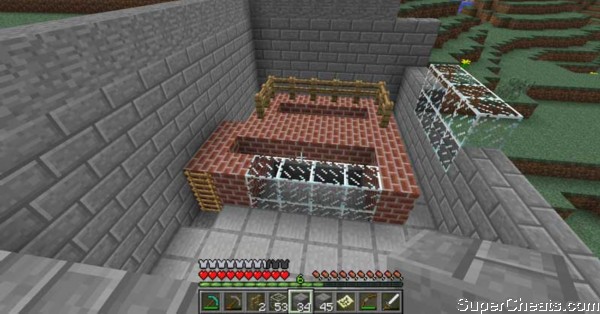
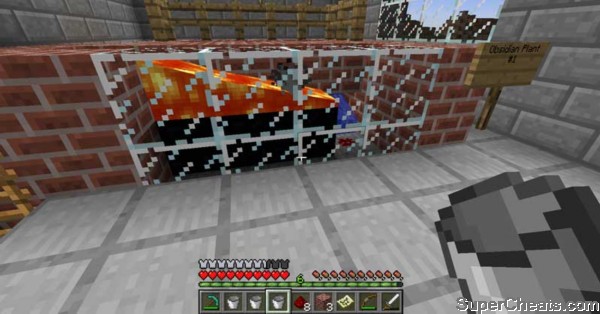
The Glass Wall of the front of the Plant Body
Step 7: The Front Body Enclosure -- This section of the Plant essentially serves to contain the Lava and the Obsidian, and is constructed from the body blocks for the sides, and Glass Blocks for the front, which allows us to monitor the alchemical changes as they take place.
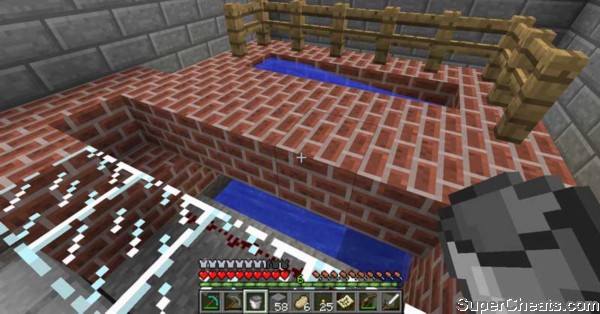
The Plant with the Water installed...
Step 8: Adding Water to the Sluice -- Climbing onto the Plant via the access ladder on the left side gives us access to the Water Sluice Receiver in the rear, where we add the water on the left-hand-side so that it flows down the Sluice to the Water Line Trench, which contains it.
When it is viewed from the front the Water should be flowing evenly, providing a sort of barrier along the inside line of the Trench so that the Lava flowing through the Chutes will be forced to the right rather than towards the back of the inside of the Plant Chamber.
SPECIAL NOTE: Depending upon the version of Minecraft you are using, this design may not function properly due to slight changes in the way that Water Physics are applied in the game. The design of this device was created to be both functional and elegant, but if it does not initially function for its intended purpose, fear not, as it will only require slight tweaking to get it to work!
If on the first use of the Plant after you pour the Lava into the Lava Chute you find that rather than flowing to the right and creating Obsidian Blocks the Lava ends up flowing into the Water Chamber, displacing the Water and creating Stone Blocks that fill the trench, that means that the version of the game you are using has the altered physics.
What is happening is that the flow of the water in the Trench lacks sufficient force to hold back the Lava and guide its flow in the direction that we want it to take. The easy fix for this is to recover the Lava in your bucket, then access the Water Chute in the back and recover the Water in another empty Bucket. Using your Pickaxe remove the Stone Blocks that the Lava created (and that now partially fill the Trench).
With that accomplished, climb down into the Water Sluice in the back of the unit (bring with you two Ladder Blocks) and, using your Pickaxe, remove the Sluice blocks inside the Sluice so that the rear chamber of the Plant now matches the level of the middle chamber. Place the ladders on the back left side so you can climb out of the Sluice Chamber (they can be left in place as you may need them if you need to service the Plant from the Sluice area in the future).
The original Sluice design used a single Bucket of Water for this part of the mechanism, relying upon the channeling of the Sluice to generate the force required to guide the Lava over the Obsidian Chute, but removing the Sluice Channel effectively alters the physics of the design. Instead of using the channel we will be creating four individual Water Flows that move from the rear of the Plant towards the front and enter the Trench as individual Water courses.
To accomplish this you will need a total of four full Buckets of Water -- so obtain those and then, standing on the back of the Plant and facing the front, stand directly behind each of the dour blocks and pour the Water from a Bucket into each. If you then examine the Plant from the front you will see that each of the four individual Water Flows now terminates independently at the Tench Line in the front where it borders the Obsidian Chute. Each of the four flows when combined generates the level of hydraulic force that is required to guide the Lava along the channel in the direction that we want it to flow -- so the flaw in the Plant has now been corrected.
To test it place a line of Redstone Dust into the Obsidian Chute base, then pour a single Bucket of Lava into the Lava Chute, and you will see that the Lava now properly flows in the direction that we need it to, and the Redstone Dust is now being converted to Obsidian without the Water in the Trench also being converted to Stone.
The Manufacturing Process - Creating Obsidian Blocks
Step 9: Plant Operation -- The process of running a batch of Obsidian through the Plant is a simple one -- insert a line of four Redstone Dust onto the bottom of the Chute Base. Once the Redstone Dust is in place, simply pour the Obsidian into the Lava Chute on the left-hand-side of the Plant; the Lava will then flow down on top of the Redstone Dust in the Obsidian Chute, converting it to Obsidian.
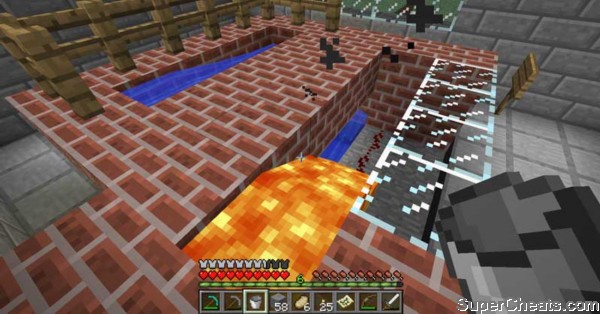
The Lava is placed in the Lava Chute and begins to flow...
When the fourth block is generated, use your Bucket to remove the Lava from the Lava Chute for later use, and then, using a Diamond Pick, mine the Obsidian Blocks you have created!
As you can see from the illustration above the use of Glass Blocks in the construction of the center part of the front wall of the Plant body allows the player (or guests) to observe the Obsidian manufacturing process safely, and without the danger of being injured by the very hot and volatile process. The design of the Obsidian Plant includes access and safety considerations -- for instance gaining access to the Lava Chute and to place Redstone in the base of the Obsidian Shoot is accomplished via the ladder that is permanently installed on the left-hand-side of the Plant.
This Manual Obsidian Plant is designed to use Redstone Dust as the Alchemy Base, with the heat of the Lava changing it to Obsidian form -- true Alchemy! Well done mates!
Next Page
Day 2 in the World of Minecraft - Adding ComfortsPrevious Page
Day 2 in the World of Minecraft - Seeking Parity
Day 2 in the World of Minecraft - Adding ComfortsPrevious Page
Day 2 in the World of Minecraft - Seeking Parity
Guide Menu
Anything missing from this guide?
ASK A QUESTION for Minecraft
Comments for Constructing an Obsidian Generator and Some Obsidian Blocks
Add a comment
Please log in above or sign up for free to post commentsTable of ContentsClose
- Walkthrouhs
Guide Updates
Get notified of updates to this guide
Many of our guides get updated with additional information. To get an email when this guide is updated click below.
 Join us on Discord
Click to close
Cool it's just too many steps for me.
nice! but it could be open plan and simpler
Very smart and now I can have epic house
All you need is a basic cobble generator, destroy the cobble, then quickly place the redstone. It does destroy the redstone though.