Virmire
Mass Effect Walkthrough and Guide
Virmire
A salarian reconnaissance team on Virmire has information on Saren. Travel to Virmire to meet with the team.
Virmire
Objective: Go to Virmire
Travel to the Hoc system in the Sentry Omega cluster and land on Virmire.
Objective: Disable the AA Tower
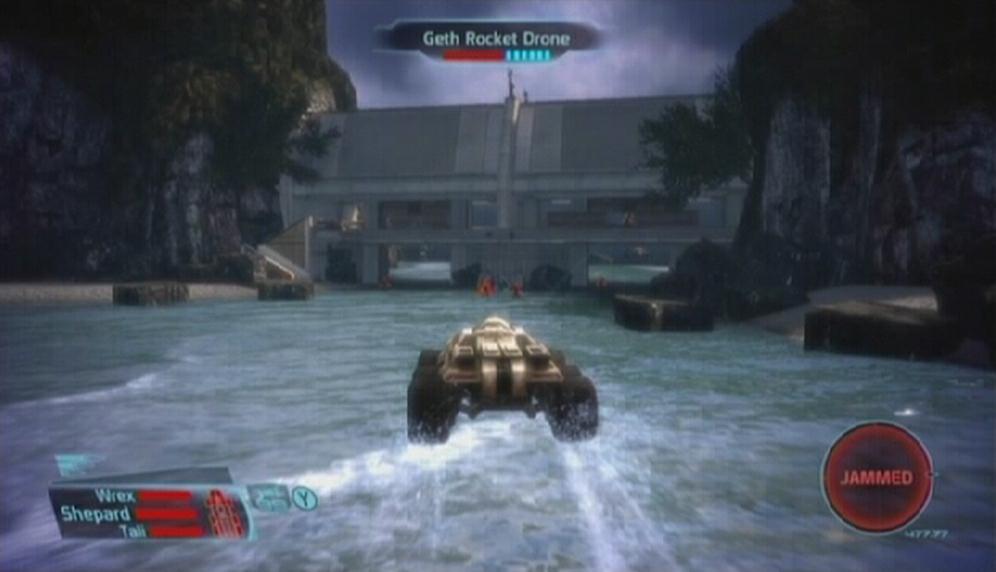
Enter the Mako and start down the trail. The path to the first gatehouse is very straightforward, just be sure not to drive off course as the Mako will sink, and that's game over. You'll encounter geth drones and troopers along the way, but luckily the Mako's weaponry can make short work of them. Look to your radar to locate hostiles and take them out as you move towards the gatehouse. Unfortunately your radar jams as you near the first barricade, so slow down at this point and scan the area up ahead for drones and troopers.
The first gatehouse is heavily occupied by geth troops. Without your radar it can be hard to spot the smaller drones, so use the Mako's zoom and visually scan the area up ahead. There are additional geth on the gatehouse's second floor. The second floor can be reached by heading up the stairs on the left side of the gatehouse. There is no need to go up there, but there are storage lockers to open, as well as XP to be had by killing the geth. Geth armatures and colossi are positioned beyond the gatehouse, so proceed with caution. Keep your distance and use the Mako's cannon to destroy them.
 First Gatehouse | 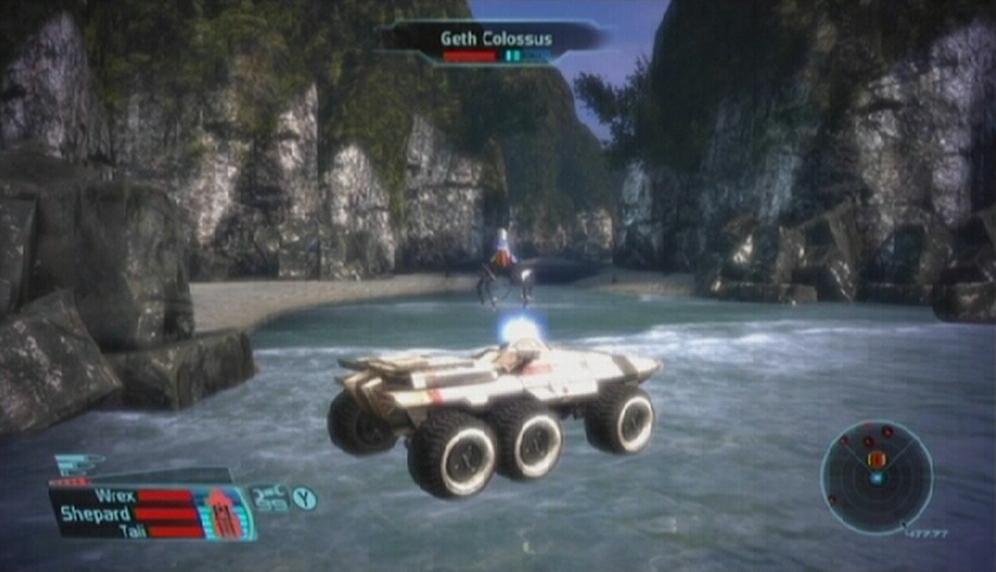 Geth Colossus |
Continue down the path until you reach the second gatehouse. This gatehouse houses the AA tower must be disabled. You'll have step out of the Mako this time around, so use its weaponry to destroy any geth visible on the gatehouse walkway before exiting. Once the area is clear, head up the stairs on the right. Enter the room at the other end of the walkway and shut down the AA gun using the power controls. Afterwards, use the gate controls found in the same room to open the vehicle gates. With that done, return to the Mako and drive through.
 Second Gatehouse | 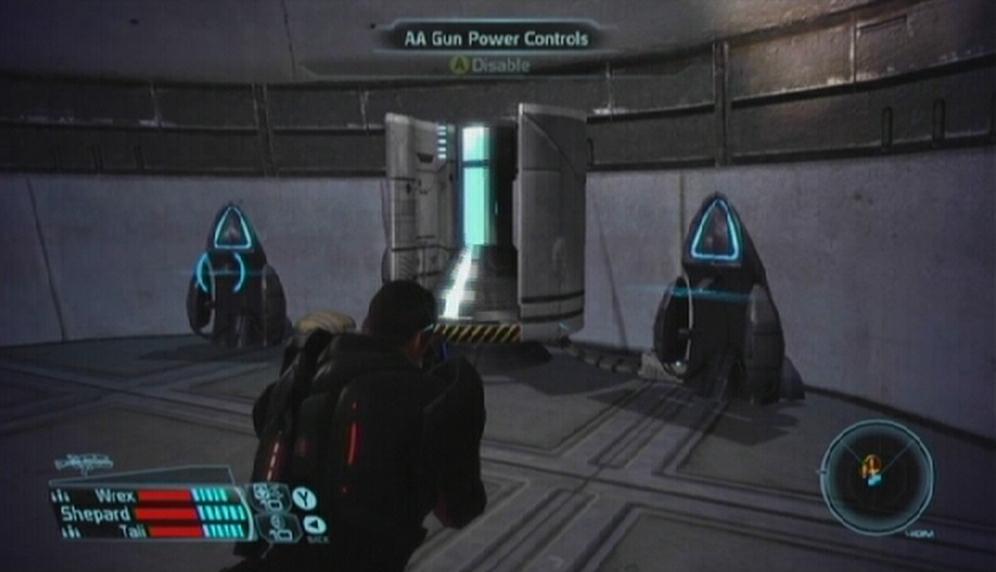 AA Gun Controls |
Objective: Head to the Salarian Camp
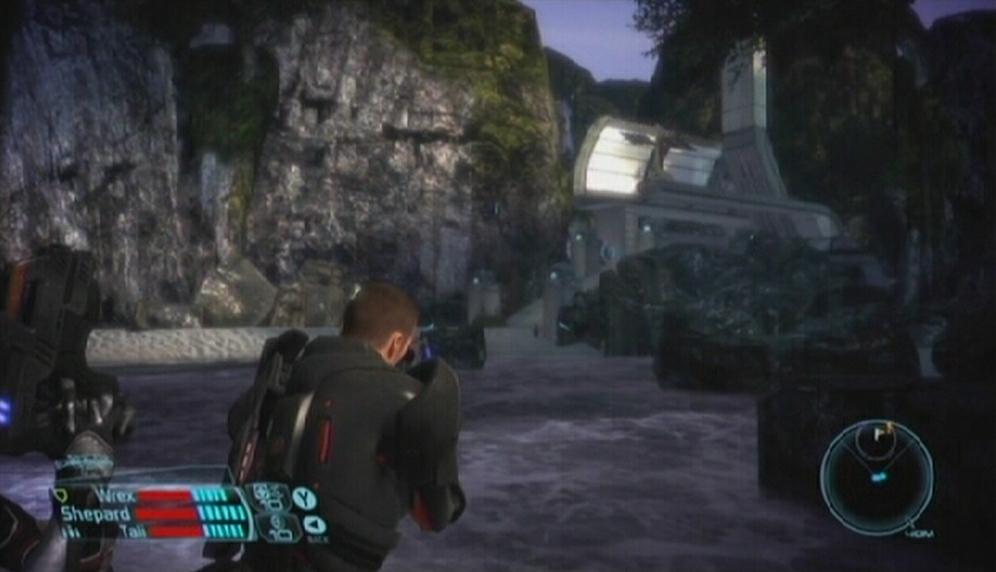
The third and final gatehouse is located a short ways from the second. The vehicle gates are also closed here, so you'll have to clear out the geth on the second floor and use the gate controls in the room at the other end of the walkway to open them. Once you've managed to lower the gate, move past the gate and continue down the trail to reach the salarian camp.
 Salarian Camp |
Captain Kirrahe, the salarian in charge of the reconnaissance team, informs you that Saren's research facility has been found. It was discovered that Saren has found a cure for the genophage and is now breeding an army of krogan. With an army of krogan warriors on his side, Saren would be nearly unstoppable. If you have Wrex with you, the 'Virmire: Wrex and the Genophage' assignment is added to your journal.
Virmire: Wrex and the Genophage
Saren has discovered a cure for the krogan genophage (the hereditary virus which causes only one in a thousand krogan offspring to survive) and is currently breeding an army of krogan warriors. Your mission on Virmire turns to destroying Saren's research facility to put a stop to his plans, as the prospect of a dispensable krogan army is not a favorable one. This puts your krogan ally in a difficult position. A cure for the genophage could result in the repopulation of his race, but the task at hand is to defeat Saren. Destroying Saren's research facility would hinder his plans, but the genophage cure would be lost.
Objective: Talk to Wrex
Save your game before speaking to Wrex because plenty can go wrong here. If you've completed the 'Wrex: Family Armor' assignment, keeping Wrex alive during this tense moment is simple. Work your way through the dialogue tree until the 'We are' and 'I wouldn't do this otherwise' options appear. Select either one to set Wrex straight by reminding him that these particular krogan are not his people, and that destroying the genophage would be best for everyone. Convincing Wrex in this fashion yields a large amount of Paragon points and nets you the 'Charismatic' achievement.
 Wrex |
If you have not completed Wrex's assignment you'll have to use Charm or Intimidate to convince him. Unfortunately if you haven't invested enough talent points in Shepard's Charm or Intimidate talents, there is no way to keep Wrex alive if you also haven't completed the Family Armor assignment. With an adequate number of talent points invested in either Charm or Intimidate, the blue 'These aren't your people' or the red 'Don't be so naïve' options are selectable. Convincing Wrex to back down using Charm yields Paragon points while convincing him with Intimidate yields Renegade points.
 Conversation Wheel |
Selecting any of the options on the right side of the conversation wheel leads to Wrex's death, either by Ashley Williams or by your own hands. The 'Shoot Wrex' option yields a large amount of Renegade points and is just downright brutal. The other two cause Ashley to step in a kill Wrex; your response afterwards determines the morality points you receive. Wrex is definitely a valuable ally, so keeping him alive would be best. You'll definitely want to keep him alive if you're working towards the 'Krogan Ally' achievement.
Virmire: Saren's Plan
Objective: Prepare for Assault
Talk to Captain Kirrahe once the issue with Wrex has been settled. Kirrahe tells you of his plan to use his ship's drive core as a nuke to destroy Saren's research facility. The drive core must be placed at the heart of a facility to level it completely. Unfortunately the bomb cannot be airlifted in because of the defensive AA guns that surround the facility. For this reason the salarian captain proposes two teams: salarian assault teams to attack the base head on, and a shadow team to infiltrate the base unseen and disable the AA guns. The bomb can only be airlifted in while the AA guns are disabled.
Due to the utter lack of ground troops at the salarian camp, Kirrahe will need one of Shepard's crew members-either Kaiden Alenko or Ashley Williams-to accompany the assault team. It does not matter who you give to Kirrahe, but keep in mind that you won't be able to take that crew member with you to infiltrate the research facility. If Ashley or Kaiden have been consistent members of your squad, give the other to Kirrahe.
 Captain Kirrahe |
Virmire: Assisting Kirrahe's Team
This assignment is added after Captain Kirrahe's speech at the salarian camp. There are several ways to assist Kirrahe's team on the Base Approach map. Passing these opportunities by leads to Kirrahe's death.
Objective: Disrupt Communications
From the Base Approach start point, make your way to the Communications Tower to the north. Destroy the geth surrounding the tower and head up the ramp to reach the walkway. Look for the 'Triangulation Tower' terminal and activate it. You are given a small amount of Paragon points for assisting Kirrahe's team.
Communications Tower |
Objective: Destroy Satellite Uplink
The Satellite Uplink Tower to the west is next. When you reach the tower, destroy the geth in the area and head up the ramp. At the top of the ramp, look up to see the destructible satellite uplink. Blast the satellite uplink to destroy it. You are given a small amount of Paragon points for assisting Kirrahe's team.
 Satellite Uplink Tower | Satellite Uplink |
Objective: Destroy Geth Flyers
Head to the opposite end of the tower and step onto the walkway. Start moving north towards the Refueling Platform. Proceed with caution as there are two geth destroyers along the way. There are a number of geth rocket drones on the Refueling Platform. Destroy all of the drones to earn Paragon points for assisting Kirrahe's team. That's all you can do for now, so make your way to the Research Facility entrance at the west end of the map.
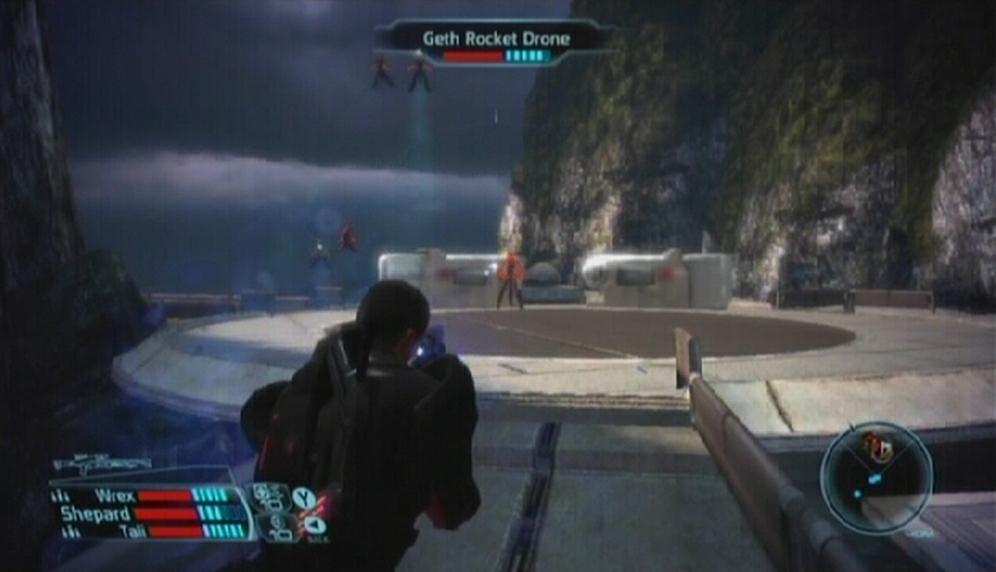 Geth Recon Drones |
Objective: Disable Alarms
The facility entrance is guarded by a couple of krogan warriors and some geth. The krogan, particularly, are quite deadly, as they tend to charge. If you have a biotic-using ally, use Lift or a similar ability to stop a charging krogan in his tracks. Eliminate the krogan before he can get close enough to melee. When the walkway is clear, proceed through the door at the northern end of the walkway. In the Base Entry area, look for a security console on the left side of the walkway and examine it. Disabling the alarms will make things easier for the salarian teams. You are given Paragon points if you choose to help Kirrahe's team.
 Disable Alarms |  Security Console |
This assignment is complete when the Virmire mission ends.
Virmire: Assault
Objective: Disable AA Guns
Head through one of the three doors on the west side of the walkway to reach the Warehouse area. There are geth destroyers, shock troopers, a juggernaut and indoctrinated salarians in the warehouse. Immediately take cover behind one of the large crates to avoid taking fire from the group of indoctrinated salarians. The indoctrinated won't seek cover, making them easy targets.
Similar to the krogans, geth destroyers are also prone to charge and melee, so keep an eye on your radar to spot a rushing destroyer and eliminate it before any damage is done. When both the Warehouse and Maintenance areas are clear, proceed through the door in the southwestern corner of the Maintenance half and head to the end of the walkway to reach the Security Office.
You can take the elevator in this room down to the Labs area, or you can go through the door to your right when first entering the room to reach the Detention Cells. If you choose to visit the Detainment Level, examine the first cell to speak to the salarian commando being held within. He tells you that his team became indoctrinated during research, though he himself is still sound of mind. It is safe to free this salarian, and doing so nets you a couple of Paragon points. Freeing the indoctrinated salarians in the second cell yields Paragon points, while simply killing them gives Renegade points.
 Salarian Commando |  Indoctrinated |
Return to the Security Office area and either take the elevator to the Labs or go through the door to the left of the elevator to reach Cell Block B. Investigate the second cell to speak with another imprisoned salarian. Work your way through the dialogue tree until the option to free him or leave him there appears. This one definitely doesn't come off as cool as the salarian commando you spoke to in the first cell block, but leaving him in the cell by selecting the middle-right or bottom-right options yields a small amount of Renegade points, while freeing him gives Paragon points. Free this salarian and he will attacks, so you are forced to kill him anyway.
Return to the Security Office and take the elevator to the Genophage Labs. A krogan doctor named Doyas will attack as soon as he sees you. Doyas is similar to the krogan warriors and battlemasters that you have faced thus far in that he would rather charge and melee you than use his gun. The husks in the lab are also let loose, but you're likely used to dealing with them by now. Back away from the husks to avoid their close range attack or bat them down with a melee attack if necessary. When the room is clear, proceed through the large door. Follow the walkway to its end, take out the two geth troopers there, and enter the Security Office.
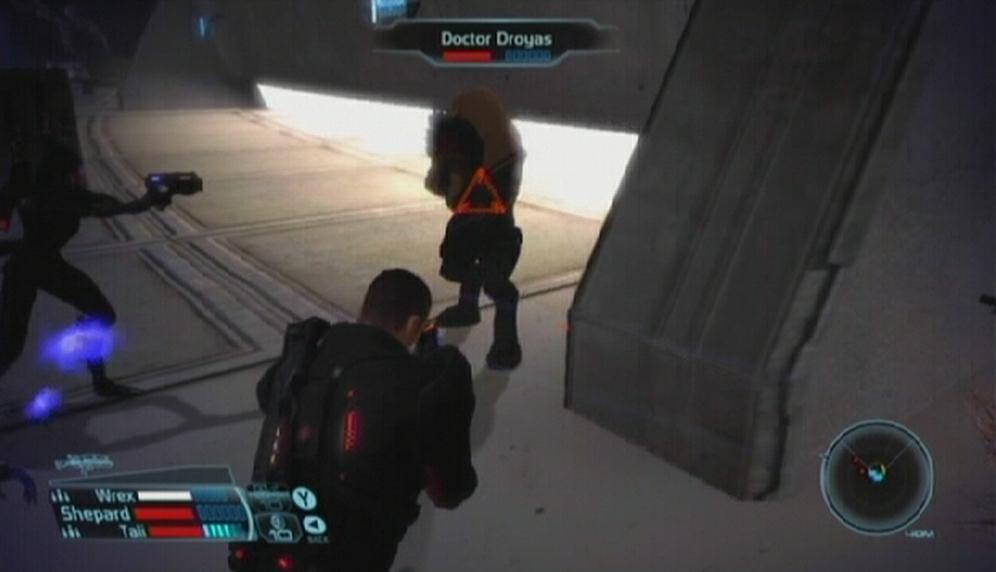 Doctor Doyas |
An asari named Rana Thanoptis can be found cowering behind the desk at the other end of the office. She tells you a bit about the indoctrination process and then opens the door for you. After the initial conversation, you can either let Rana leave or have her killed. Killing her yields Renegade points. Afterwards, head through the door and take the elevator at the end of the corridor down to the Communication Tower. In the tower, move down the ramp to reach the lower walkway and examine the Communications Panel. After the cutscene, return to the upper walkway.
 Rana Thanoptis |  Communications Panel |
What follows is a lengthy conversation with Sovereign. When you regain control over Shepard, return to the Security Office and then to the walkway outside. The previously raised bridge here has been lowered, allowing you to cross the stretch that leads to the Breeding Facility. Three krogan warriors stand in your path; use every ability available to you (useful ones include Overload, biotic Lift, Sabotage, and weapon abilities) and take them out as quickly as possible. There are geth troopers, ghosts, drones and krogan in the proceeding area, so you'll have to fight your way to the Turret Control room. In the Turret Control room, use the Turret Control terminal to disable the AA guns.
 Sovereign | Turret Control |
Objective: Destroy Final AA Gun
A couple of geth arrive in the elevator across from the terminal, so immediately whip around and take them out. Afterwards, take the elevator down to the Breeding Grounds. Geth stalkers and sappers occupy the Breeding Trench; take cover and destroy the geth before moving to the opposite end. Make your way to the next area, the heart of the research facility, and wait for the Normandy to arrive.
The nuke is set into place, but all is not well up at the AA tower. You receive word from the crew member you sent with Kirrahe that, in their current situation, they won't be able to make it to the rendezvous point in time.
Objective: Provide Backup for Ashley/Kaiden
Select two allies (though neither Ashley nor Kaiden are selectable as squad members at this point) and head through the large door at the south end of the area to reach the second Breeding Trench. This trench is occupied by geth stalkers and krogan warriors, so immediately take cover behind one of the pods to avoid taking sniper fire from the stalkers. The krogans will likely come after you, but you can send your allies up ahead to take out the geth. When the trench is clear, ride the elevator at its end to reach the upper walkway.
A geth ship holding a large number of reinforcements drops troops off at the bombsite, jeopardizing the safety of the team there. Your crew member up at the AA tower still needs backup and will fall without it, but leaving the crew member at the bomb site means losing him or her. You're up for a tough decision at this point. The ally you choose to leave behind will be permanently unavailable after this mission, so make your decision carefully. There's no way around this, one of them will have to remain on Virmire.
Consider whether one of the two characters in peril are linked to any of the achievements you are trying to unlock, such as Ashley for the 'Paramour' achievement for male Shepard, or Kaiden for female Shepard. If Ashley or Kaiden have been a static member of your squad, you would want to keep that person alive for the 'Soldier Ally' (Ashley) or 'Sentinel Ally' (Kaiden) achievements.
 Geth Dropship |  Decision |
Objective: Keep Going to the AA Tower/Return to the Bombsite
When you've made the decision, either keep going to the AA tower to assist the ally there, or return to the bombsite. Both areas are densely populated with geth shock troopers and destroyers, so be ready for a fight. Once the geth in the area have been dealt with, Saren, the rouge Spectre, makes an appearance. He steps off of his glider and a conversation between Shepard and the crooked turian ensues. Saren believes that following the Reapers is the only way to save the organics from the synthetics; in essence he believes that what he is doing is right. No amount of reasoning can get through to Saren now, so work your way through the dialogue tree and prepare for a fight.
 Saren | 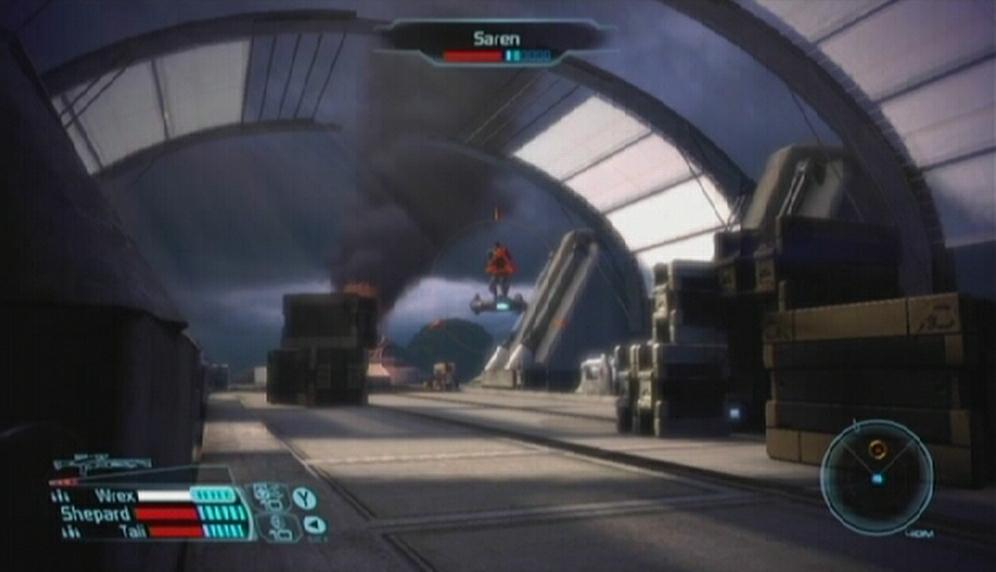 Saren Battle |
The battle plan is the same in whichever area-either on the AA tower or at the bombsite-you are. Saren remains on his glider and is stationary for the duration of the fight. Immediately get behind cover to avoid his fire and from there, pop out every once in awhile to damage him. Saren has a powerful shield (as well as the Shield Boost ability) and plenty of health, so bringing him down is no easy task.
The Overload tech ability can help bring Saren's shield down, but it will have to be used several times in quick succession to take it down completely. You'll just have to shoot your way through his shield to get at his health bar. Saren is an organic, so equipping Shepard and allies with weapon upgrades that increase damage to organics would cut down the length of this battle.
Continue to hit Saren with abilities and gunfire until the mission end cutscene is triggered.
Mass Effect Xbox 360
So I've been playing ME1 and didn't collect all the clues for finding the conduit before going to virmire. Does this affect the story at all?
Anyone having trouble fighting Saren, I didnt have to shoot him once. I chose Ashley, and I saw her standing during the battle. When I clicked to talk to her, it triggered the cutscene and finished the mission. Didn't have to fight him at all.
if you save wrex on virmire mission you can,t save mordin on me3 you have to kill him on virmire mission
You save whoever you want to save, whoever you like most. I never pick Ashly personally because the first time I went through Virmire, she shot Wrex. There's only room for one Alpha-female on the Normandy and that was me, so I let her die even though-she is super valuable in ME1. Kaiden on the other hand becomes an excellent squad memember in ME3.
Who should be saved? is there lots of story change in Mass effect 2 or 3 depending on who you choose? that's what I want to know
I know this is an old walk through but i was going back through the series before Mass Effect 3 came out and the part about needing to do the armor mission for Wrex is off. I had forgotten all about personal inquiries with the team and went trough with my persuasion and paragon at its max and was able to convince him otherwise. I don't know how much of an effect the armor mission on Wrex but I would hate for some who wanted to save him to not do it properly...if that makes any sense.
In one of the youtube videos I saw both Ashley and Kaidan were at the end of the game, so it must be possible to save them both. I think the Communications relay at the salarian camp is the key, because if you have enough decryption you could get the relay up and running maybe. Then contact the citadel. I'm not sure if it will work, but I'm trying it anyway.
As said, there is no way to get around it. You will lose one character, one of the "choices" referred to in ME2.
is there any way to save both ashley and kadien?
What you need to do is restart the mission from a previous save
hey dude i got stuck at the bit where fighting Saren... He never showed up and i cant do anything, what now?