General Tips
Thank you for printing this page from www.SuperCheats.com.
Remember to come back to check for updates to this guide and much more content for Fallout Shelter
Follow this guide to hear about updates
Last Updated:
Plan Ahead
When starting your vault, it's quite easy to misplace rooms. Take note that merging three rooms gives you the most out of your production and storage but will require more dwellers working in them in order to make them efficient. That said, build your rooms according to your Vault's current population. Having several production rooms means nothing if you don't have enough workers to fill them.

Monitor your dwellers and explorers
Tap on the gear icon on the top left corner to bring the dweller list. Here you can sort them according to level, SPECIAL stat, status, and job. You'll need to do this often to monitor your explorers so you can recall them if they run low in Stimpaks or see if there are idle dwellers on "Coffee Break". Dwellers who just came back from Exploration will wander around the vault in "Coffee Break" unless you assign them to a room or send them back out again. Also, dwellers who died inside the vault and revived will be automatically in idle mode. Children who matured to adults will also be in this default mode.

Population Control
While mating your dwellers to one another is the fastest way to get new dwellers early in the game, avoid overdoing it. Pregnant dwellers can't help during incidents, and children consume resources without doing anything. Watch the number of pregnant women and children in your vault since it may lead to sudden food/water shortages or minor incidents wiping out your population. If you feel that your Vault is overpopulated, consider killing off non-essential personnel (cruel, yes) to the wasteland without equipment or stimpaks, or let them die from incidents and remove them from the Vault.

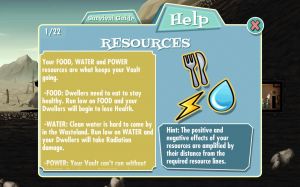
Managing your resources
Check which resource your vault is consuming rapidly. You can address that by adding/merging another room that produces that resource or you can temporarily move workers from one production room to the room that's suffering the shortage. Take note that this is temporary only. It's ideal to have a dedicated number of workers staffed in their respective production rooms in the long run
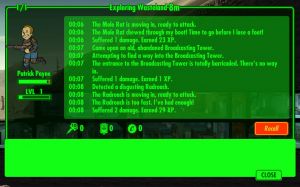
Send explorers as early as possible
The only way to earn extra caps, Outfits, and Weapons is by sending explorers to the wasteland. To ensure their survival, make sure to give them a good amount of Stimpaks and Radaways. You may want to monitor their progress as well regularly to ensure that you can recall them back to the Vault before they die in the wasteland. As you send out higher level explorers with excellent equipment, they'll be able to stay longer in the wasteland and give you better weapons and outfits.
Inventory First
As it is enticing to expand your vault quickly, avoid doing that unless you have several Weapons in your inventory. An uncontrolled radroach or molerat infestation can wreck havoc in your vault. Also, make sure you have several stimpaks available for use. Low level dwellers tend to die quickly and you'll be forced to use several stimpaks in almost every incident. As you get more reliable and powerful weapons, make sure to equip every single one of your dwellers and replace their old, weaker guns (BB Guns, 10mm Pistols, etc) with common weapons with higher firepower (Sawed-off Shotguns, laser pistols, etc). Keeping at least 25 stimpaks available at all times is a safe margin as well.

Radio Room
The radio tower allows you to call in a random common dweller from outside the wasteland and helps increase the happiness of your vault. However, something sinister may answer your broadcast and come knocking on your vault's door. Deathclaws - these deadly beasts can easily wipe out your vault if you're not ready or well-equipped. That said, avoid building the radio room as early as possible. Later in the game, you'll come to the point that you'll stop breeding your dwellers and just rely on radio rooms to keep the population in check.

Rush Sparingly
Rush Mode allows players to get a production room's resources instantly and reset its production cycle. However, there's a risk percentage when doing this. Rushing when the risk is above 30% is not recommended.

Vault Guards
If you have at least two high-leveled, properly equipped dwellers to spare, place them on guard duty in the Vault Door. They'll be your first line of defense against Raiders and Deathclaws. If ever they're unable to kill the invaders, consider moving them to the rooms along the invaders' path. Don't worry about relocating them after the incident since any moved dwellers during the incident will return to their posts once the incident is over.

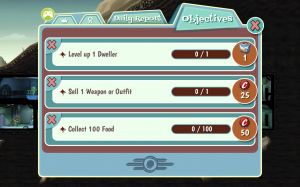
Daily Objectives
Completing objectives is the only other way to earn Lunchboxes without buying them. Once per day, you're allowed to skip one objective. Consider skipping objectives that you won't be able to complete immediately to have a chance to get an easier objective. You'll also earn much needed CAPS from these objectives so make sure to keep track of them and complete them whenever you can.
Mind your Vault's overall happiness
Happy dwellers affect the overall happiness of your vault. A happier population makes them work harder, giving you a production bonus up to 10%.

Check your vault at least daily
You need to attend to your vault quite regularly when it's still fairly new since you need resources and you need to make sure that you have enough CAPS and resources. Once your vault is large enough to support its entire population without suffering from shortages and when your explorers and populace is properly equipped, you can just check your vault at least once a day. This will allow you to collect the daily evaluation rewards, which includes a lunchbox on the seventh day of playing.
Training
Once you've addressed the resource needs of your vault, you can now start training some of your personnel. Training Rooms can only increase specific SPECIAL Stats they specialize in. For starters, Weight Room (S), Fitness Room (E), and Game Room (L) should be prioritized. High Strength dwellers allows you to faster production cycles in your power plants, High Endurance characters give them higher survival chances out in the wasteland, and finally, high Luck dwellers increase the probability of getting bonus caps when collecting resources. As your vault grows, you'll need to get the other training rooms and even get several copies of those rooms to speed up the training. This is the only way for your common dwellers to catch up thier stats to the Rare or Legendary Dwellers. Furthermore, you can increase the already high stats of your Rare and Legendary dwellers to make them more potent, especially in defending the Vault or exploring the wasteland for prolonged hours or days.

Anything missing from this guide?
ASK A QUESTION for Fallout Shelter
Comments for General Tips
Add a comment
Please log in above or sign up for free to post commentsNo comments yet. Tell us what you think to be the first.
Table of ContentsClose
Guide Updates
Get notified of updates to this guide
Many of our guides get updated with additional information. To get an email when this guide is updated click below.
 Join us on Discord
Click to close