Part 05B:
Words of Power
The Elder Scrolls V: Skyrim Walkthrough and Guide
Part 05B: Words of Power
At High Hrothgar speak with Arngeir and he will tell you that they have never really concerned themselves with the Elder Scroll, saying that the Mages at Winterhold would be the place to start...
As you talk to him he reveals that the other words of power are out there for you to find -- we already know about some of them, but he can show you others starting with the Word of Power at Skyborn Altar. Knowing these words is going to be important, so making the effort now is not a bad idea -- so let's head there and learn that one now!
As there are twenty Shouts and each has three words, minus the ones you learned by being given them you are going to need a Dragon Soul for each word, so I would not avoid battling Dragons if I were you, I am just saying...
It is very close to Stonehills, so head there and then follow the compass and marker to the Alter, where you will take on an Elder Dragon and then learn the Word of Power for Frost Breath!
When you return to Arngeir and ask him if he knows of another word, he will tell you the location of the next word -- at Autumnwatch Tower, which is not that far away to the south! Heading there gets you a battle with an Elder Dragon of the Frost persuasion. Taking him out should be cake to you by now!
With the Dragon dispatched head over to the wall to learn the Shout Kill, Marked for Death! You have to go on top of the tower to get to it so do not forget to loot that chest, right?
Back to Arngeir again, and this time he sends you to Silverdrift Lair. The Nightgate in is probably the closest fast travel point to the location, so head there and then to the Lair where you will find some bandits and some undead. Be sure to read the book on the alter -- Words of Philosophy -- for a skill point, and then when you get past the swinging gate traps use pull the ring in the stone to raise the bars and follow this winding path to the Dragon Wall, where you will face the Deathlord and his minion who are guarding it. Kill them both, and then learn the Word of Power Hand for the Shout Disarm -- your second word for that one!
Back to Arngeir again and we learn that the next Word of Power is located at Greywater Gorge -- you gotta love this guy! He is just full of information!
Our destination is near Sunderstone Gorge, which you should already have found, so just fast travel there and then a short trip to the marker and you learn the Word of Power for Inferno, Fire Breath! That is the second word for this one, which should add to its strength!
Back to Arngeir again to learn that our next destination is High Gate Ruins, which if you have been exploring should be on your map -- if not it is near to Ustengrav (north of it) so head there and then north!
Giving Anska a Hand
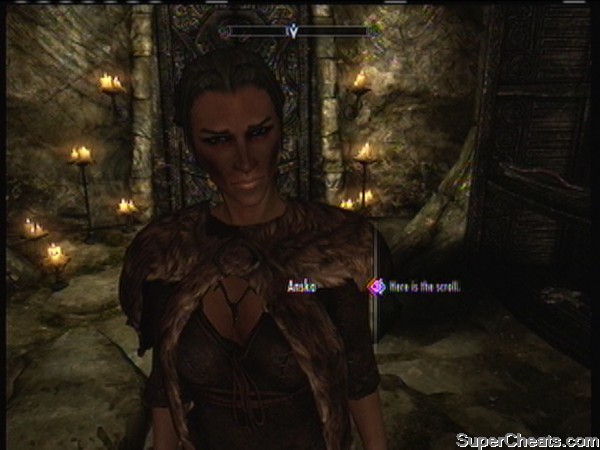 Giving Anska a Hand |
Here you will encounter Anska, an explorer who can use your help finding the Scroll of Vokun -- This starts the Side Mission A Scroll for Anska -- so why not complete that now?
When you reach the Level Puzzle what you want to do is activate them in this order: Eagle, Fish, Fox, Snake. That opens the gate in the floor, leading to the entrance to the Crypt -- follow that to the Throne Room and you will face Vokun himself -- and loot a mask that boosts Conjuration, Alteration, and Illusion as well as a nice staff!
Both the scroll and the Wall are behind the Throne Room -- you get the scroll to give to Anska and you learn the Shout Storm Call!
Head back to Arngeir and he will tell you that the next Word is located in the Lost Tongue Overlook, which is located near the Crystaldrift Cave south of Riften. Heading there means finding the path up the mountain, and once you do, mind the bloody traps on the path -- at the top of the second flight is a trap powered by a soul gem - you have to destroy the gem to disable it.
At the top you battle an Elder Dragon of the Fire Type, then learn the words to the Shout Fear, Dismay -- that is a new one for us! Be sure to loot the chest before heading back to get the next location.
Arngeir tells us that the next Word is located in the Ancients Ascent -- which is near Helgen -- so head there and make your way to the marker to find an Elder Dragon guarding the Word Wall -- after you dispatch this fire-breather you learn the Word of Power Animal, Animal Allegiance.
Back to Arngeir and the next location is the Forsaken Cave -- working your way past Frost Trolls and some Wights to the Crypt below, where you will discover that the Word is Leech, Marked for Death, and it is protected by a master Wight Mage!
In the rear beneath there is a special chamber with the White Phial in it for the Side Quest The White Phial -- you can grab that now as well as some ingredients and a Skill Book. Once you have dealt with him, gotten the word, you know what to do -- head back for the next location!
Our next destination is Dragontooth Crater, which is near Karthwasten. When we arrive we do battle with a Frost Dragon who is guarding the Wall -- any flame or shock weapon will work nicely -- and after dispatching him we learn the Word of Power Air, Elemental Fury -- another new word! That should make 14 words, leaving just 6 to go!
Arngeir tells us that the next location is Volkskygge -- well actually near it, not at it, but still -- the Wall is protected by the Undead Wizard Volsung -- who we quickly make Totally Dead, and then we learn the Word Fury, the second word from Whirlwind Sprint!
Obtaining the Amulet Fragment
 The Amulet Fragment |
The next location is in Folgunthur, another dungeon location. Inside we find the body of Daynos Valen on the platform above which has the Ivory Claw and his journal on it. This is part of the Side Quest Forbidden Legend and we may as well complete it while we are about this!
Use the Claw to open the lock and head across the bridge now. In the room behind the thrones set the stones to Snake, Fish, Eagle. Note that there is a known bug in the game that causes the pillars not to turn even though you get the prompt to turn them... If you experience this you must leave the dungeon completely and then go back in to fix it.
Also note that while the first key slot for the claw near the start of the dungeon is not required to complete either of the quests, it does get you some nice loot - I am just saying...
After you open the gate and go down use the combination Eagle, Eagle, Dragon on the lock to open the door and enter the Crypt, where you will battle Mikrul Gauldurson and obtain the Amulet Fragment from his body.
Use the right-side lock with the claw to access the Wall and learn the Word Cold, Frost Breath, which is the second word for Frost Breath. Now make your way out of the dungeon. Since we will eventually be visiting the places in the Side Quest Forbidden Legend anyway go ahead and continue getting words instead of pursuing that quest for now!
Arngeir sends us to the Lost Valley Redoubt this time, where we find the Forsworn guarding the area, including a fairly dangerous mage! Once you clear the lower area head up and to the left to take out a few Conjurers and then score the Word Spirit, Become Ethereal, which is the second word in the Shout.
The next location is Valthume, where we find yet another dungeon! Inside we find the ghost of Caldar, who tells us that there is evil here -- he tells you that he needs three vessels that are located below and you agree to get them, flagging the quest Evil in Waiting.
Jump to the quest for help if you need it, and before the end of it you will also have learned the Word Seek, Aura Whisper, the second word for that Shout. Head back to Hrothgar now.
The next destination and Word is located in Ironbind Barrow -- which is just north of the Nightgate Inn... When we arrive we find that there is a party of treasure hunters outside and, no surprise, they insist on coming with us! Well, the more the merrier!
The treasure hunters are rather amusing, but you do have to help them stay alive -- and finally when you reach Warlord Gathrik you need to do the killing on him. Bonus though, he has several empty Black Soul Gems on him! Loot loot loot!
Now the mage that was with the treasure hunter turns out to have his own agenda -- as in killing you to use you as a blood sacrifice so that he can absorb the powers of the undead Warlord we just killed, err, made dead-dead. Whatever. Soooo you have to kill Beem-Ja, and after you do make sure you loot him because he has an interesting note on him as well as some other loot.
After you kill the Warlord for a second time -- apparently killing the mage raised it -- you learn the Word Bind, Become Ethereal, the third word in that Shout. Good on ya!
Arngeir tells us that the next location is Shriekwind Bastion -- and mates this one is a bit of a barney! Not so much combat, though there are a fair number of undead and the odd vampire to contend with, but more the bloody maze that you have to navigate to get through it along with the traps!
The Word Wall at the end of the maze worked out to be Battle, Elemental Fury which is the second word for that Shout. Thankfully we do not have to go back through this maze as we can exit to the Overlook and then fast travel back to Hrothgar from there! Whew!
The next location is Hag's End -- and that is a new location for me as I have not see that before... The path turned out to be through Deepwood Redoubt, which was guarded by some Forsworn, which was an excellent opportunity to fill the Black Soul Gems I have collected -- you may want to as well, since those would be useful in making a new set of better armor later...
The path leads through the exit to Deepwood Vale and after battling more Forsworn and entering Hag's End the path to the Wall was gaurded by witches and hags for the most part, which meant dealing with a lot of spells, but finally reaching the Wall to learn an new Shout -- Time, Slow Time!
Thankfully there was a door to the outside in the final room so it makes fast travel to get the next location a snap!
Arngier sends us to Mount Anthor this time, which turn out to be one of the more traditional Walls that is guarded by a Dragon! I don't know about you but I like those better... On the way up there is a sacrifice alter with a book on it -- The Doors of Oblivion -- which is also a Skill book and worth reading, so grab it if you are interested in the backstory...
I am not sure if this is normal, but when I reached the stairs to the Wall I was attacked by TWO Dragons -- an Ancient and a Blood Dragon. Of course I killed both, no worries! I expect you did too?
The Word of Power is Ice, Ice Form, which is a new word for us -- and considering it required the slaying of two Dragons I suppose it was well won! Now back to Arngier and our next location!
The next location is Kilkreath Ruins -- which was the easiest of the Words so far since there was no Dragon or other guardian all that I needed to do was walk over to the Wall and absorb Grace, Elemental Fury which is the third word for that Shout!
Back to Hrothgar and the next location is Volunruud -- one of the dungeons with the round hole in the ground entrances... To gain access to the area where the wall is you first must obtain two ceremonial weapons in the dungeon -- this is the Side Quest Silenced Tongues -- so head to that section now to follow it if you need to...
Welcome back! You now have the Shout Hunt, Aura Whisper added to your repertoire, and that is word three for that Shout, which means we should have 16 Shouts, of which 6 have all three words!
King Olaf's Verse
 King Olaf's Verse |
The next location is Dead Men's Respite, which is located near Robber's Gorge. When we arrive we find a Dragon has been revived nearby -- killing it is technically optional but I say do it! It is a Blood Dragon and we can always use the extra Soul for unlocking Words of Power!
Inside the Respite there is a Ruby Dragon Claw key and a ghost who seems to be leading us in. Taking the key opens the way and, as we follow the ghost we reach a maze of doors that are controlled by a pull chain in one of the side chambers. The trick is to use the chain once to gain access to the room with the two round grates in the floor, then use the chain in that room to open the grates and drop down the second one into the water.
From here simply follow the ghost and you will to his bones -- his name was Svaknir it seems -- and in his hands is the book we are looking for -- King Olaf's Verse! This is for the Side Quest "Tending the Flames" in which we need to find King Olaf's Verse for the Headmaster of the Bard's College so he can try to convince the Queen to allow the Bard's College to hold its annual festival.
Now that we have that, head towards the marker for the Word Wall and the ghost will remove the spell sealing the door -- the combination for the lock is Wolf, Eagle, Wolf. The ghost leads the way into the main chamber, where we get rat-packed by a bunch of undead and, amazingly he helps us defeat them!
Finally King Olaf One-Eye himself arises and we do battle, with the ghost helping, and having defeated him be sure to loot his body as there are several things including the treasury key worth taking!
Behind his coffin is the Word Wall that teaches us Tempest, Whirlwind Spring, which is the third word in the Shout. Now use the key to open the Treasury door, loot it, then use the secret passage by pulling the lever to get right to the exit!
The next Word of Power location is Ragnvold, in the far west. This is a large Temple that is guarded by undead, so technically it is another dungeon. Sigh. Fortunately it has a very obvious path, and enemies we know how to handle.
To get to the Wall we need to unlock the sarcophagi, and to do that we need to follow the markers to the two items -- Torsten's Skull Key and Saerek's Skull Key. Once you have those, head back to the sarcophagi and open it to release the bars -- the Word Wall is just inside this next area and teaches us Kyne, Kyne's Peace, a new Shout!
The next location is Angorvunde -- another knew location for us -- the closest I could get was the Rift Watchtower and that was a good distance away! When we enter the dungeon we encounter a woman named Medresi Dron who has a sob story for us... You know, we have not had really good luck with the people we meet going into dungeons. I am just saying...
It seems that she is a treasure hunter and her team freed a large number of undead. She needs help making them actually dead, and if we decide to help her we just have to clear the undead we would have to anyway, so why not?
Once we eliminate the three undead she comes into the main chamber and gives us a key then orders us to look for a way to open the bars. We do that by going through the two side doors and locating the switches to open the gates.
When the second gate is opened the treasure hunter rushes in and gets herself killed -- then we head down the stairs revealed by the trap she died from and locate the Word Wall, learning Allegience, Animal Allegiance, the second word for that Shout. With that accomplished it is time to return to Hrothgar for the next location.
Arngeir tells us that the next location is Rannveig's Fast -- a dungeon that is protected by ghosts. Inside there are a series of traps -- so when you approach the Word Wall do NOT go in through the center! Jump on one of the side stones so you do not end up falling into the trap.
The Wall teaches you Peace, Kyne's Peace, the second word in the Shout.
Well that is the final word that we can get from Arngeir! If you go back to ask he will tell you that there is only silence, so for now anyway we have all that we can get this way, so it is time to resume the story!
they are not all in that order they go in random just saying