Abilities
Kingdom Hearts Walkthrough and Guide
by SPV999
Kingdom Hearts Guide - Sidequests
Abilities
 Abilities |
Abilities are exactly what they sound like. Special abilities that augment your power. There are four types of abilities: Helping, Defensive, Offensive, and Limit.
Helping do things like boosting recovery rates. Defensive allows you to defend better through special maneuvers. Offensive increases your attacks. Limit require MP to use and allow you to perform special, usually powerful, attacks.
Abilities cost AP (Ability Points) to equip. If you don't have enough points, you cant equip the ability and therefore cant take advantage of its bonus.
=========
Sora's Abilities
=========
Sora's abilities span all four types. He also has the most abilities of anyone in your party; and rightfully so, considering you're really the only one that can take true advantage of many of them.
Remember that by level 100, you'll have all the abilities you can learn, however, the order in which you learn them if affected by the weapon you chose at the beginning of the game.
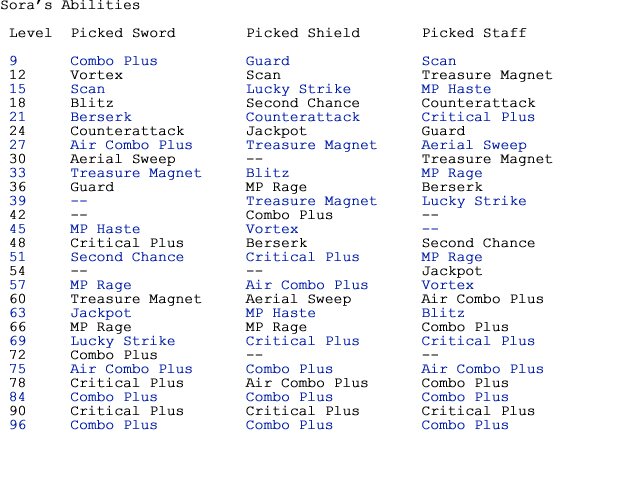 Sora's Abilities by Level |
There are seven more abilities Sora will learn by completing certain tasks.
Dodge Roll
- Defeat Guard Armor the first time
Sonic Blade
- Defeat Cerberus the first time
Strike Raid
- Beat the Pegasus Cup (just all enemies)
Ars Arcanum
- Defeat Captain Hook
Cheer
- Complete all challenges with good scores in the Hundred Acre Wood
Ragnarok
- Defeat Riku the second time
Trinity Limit
- Beat the Hades Cup (just all enemies)
=========
Donald's Abilities
=========
Donald's abilities are more straight-forward. His are pretty much all helping abilities, which is actually good considering you want him to cast as many spells as possible in battle.
10 - Berserk
15 - MP Haste
20 - MP Rage
25 - Second Chance
30 - Treasure Magnet
35 - Second Wind
40 - MP Rage
45 - Treasure Magnet
50 - Jackpot
55 - Lucky Strike
Defeat Maleficent - Cheer
=========
Goofy's Abilities
=========
Goofys are like Donalds level-wise, but he does have more variety, seeing as he cant use pure magic powers like Donald. He relies more on Limit and Helping abilities.
9 - Rocket
12 - Jackpot
15 - Charge
18 - Treasure Magnet
21 - Tornado
27 - Lucky Strike
30 - MP Gift
33 - Second Wind
36 - Second Chance
39 - MP Rage
42 - Treasure Magnet
45 - MP Rage
51 - MP Haste
54 - Berserk
Defeat Parasite Cage - Cheer
What these mean
It's great now that you know what abilities you'll learn and when... but what exactly do they all do? Well lets take a look in ABC order.
--== Aerial Sweep ==--
Cost: 2 AP
Description:
Leap at an airborne enemy and strike a mighty blow.
Learned by:
- Sora
Breakdown:
Definitely equip this as soon as you get it. Basically, before you had this ability, if you attack an aerial enemy you'd have to jump first or your attack would fall short. With this you'll actually jump automatically and with a spin attack at that, which can hit many nearby enemies.
--== Air Combo Plus ==--
Cost: 1 AP
Description:
Extends aerial combo attack by one step. Equip more to extend it further.
Learned by:
- Sora
Breakdown:
This extends your combo ability, meaning you'll get an extra attack in during a combo. This is very useful, HOWEVER, remember that your combo finishing attack is more powerful then a regular attack, so extending your combo means more time before you start your finisher. This could be a problem with enemies that are only vulnerable for short periods of time.
--== Ars Arcanum ==--
 --== Ars Arcanum ==-- |
Cost: 4 AP [3 MP to use]
Description:
A formidable attack. After a combo, select followup attack again for a double combo. [Short-ranged attack. Cost: 3 MP.]
Learned by:
- Sora
Breakdown:
A series of six consecutive strikes that drives the enemy back. It does not have to be used after a combo, and can be select anytime a ground-based enemy is targeted. It is well work the 3 MP, especially against bosses. It normally does an entire bar's worth of damage.
--== Berserk ==--
Cost: 1 AP
Description:
Boosts attack power when HP is critically low. Combine with a weapon skill for more power.
Learned by:
- Sora
- Donald
- Goofy
Breakdown:
It does increase your attack by a fair amount, but if your health is critical, I'd be more worried about using that potion then thinking “Yay, my attack is slightly higher!”
--== Blitz ==--
Cost: 3 AP
Description:
Strike enemies ahead of you with a powerful finishing combo.
Learned by:
- Sora
Breakdown:
This replaces Sora's standard weak half-spin attack with a powerful jump strike at the end of your combo chain. Though it doesn't have the area effect, it does do a lot more damage to pretty much everything in front of you.
--== Charge ==--
Cost: 2 AP [1 MP to use]
Description:
Charge and knock out an enemy with shield. [Special attack. Cost: 1 MP.]
Learned by:
- Goofy
Breakdown:
Goofy charges with his shield. Has good odds of confusing opponent. Does good damage. I say equip.
--== Cheer ==--
Cost: 1 AP
Description:
Increases the summons' MP gauge, giving them more time and attacks per battle. Equip to entire party to boost effect.
Learned by:
- Sora
- Donald
- Goofy
Breakdown:
This wouldn't be bad, if summons where actually useful. Given that they're not, I don't bother.
--== Combo Plus ==--
Cost: 1 AP
Description:
Extends ground combo attack by one step. Equip more to extend it further.
Learned by:
- Sora
Breakdown:
This extends your combo ability, meaning you'll get an extra attack in during a combo. This is very useful, HOWEVER, remember that your combo finishing attack is more powerful then a regular attack, so extending your combo means more time before you start your finisher. This could be a problem with enemies that are only vulnerable for short periods of time.
--== Counterattack ==--
 --== Counterattack ==-- |
Cost: 2 AP
Description:
Strike back after parrying an enemy blow. Successful counterattacks restore MP.
Learned by:
- Sora
Breakdown:
When an attack of yours is deflected for whatever reason, you'll get a prompt wherein instead of “Attack” it will say “Counter”. Pressing X again will allow you to regain your balance and quickly move in for a second strike. If you have a Keyblade that is hard to deflect, counterattacking almost always guarantees a hit on the counter.
--== Critical Plus ==--
Cost: 3 AP
Description:
Increases odds of dealing critical damage. Equip more to boost effect.
Learned by:
- Sora
Breakdown:
Does exactly what it says. Since there is no way of measuring when you actually get a critical, it's impossible to measure how much this actually increases your odds by... or what your odds are to start with. But, if you have the AP, it wouldn't hurt to equip it.
--== Dodge Roll ==--
Cost: 1 AP
Description:
Dive and roll to evade attack by pressing the square button
Learned by:
- Sora
Breakdown:
This is a basic dodge maneuver. Unlike guard, this is preformed by pressing square WHILE MOVING. You'll use this a LOT throughout the game, as most attacks don't effect a wide area and/or don't have very good homing mechanics. Well worth the 1 AP.
--== Guard ==--
 --== Guard ==-- |
Cost: 2 AP
Description:
Guard against an enemy attack by pressing the square button.
Learned by:
- Sora
Breakdown:
Uses your Keyblade to deflect incoming attacks. You'll also use this a lot until you get the hang of using your Keyblade like a bat (deflecting attacks with an attack of your own). Use it early on against Large Bodies to stop them during a charge.
--== Jackpot ==--
Cost: 2 AP
Description:
Receive more munny and HP/MP balls in battle. Equip to entire party to boost effect.
Learned by:
- Sora
- Donald
- Goofy
Breakdown:
This is great for training, as you don't have to worry about staying near a save point or conserve your MP for cure or anything. With this there should always be plenty of balls around to heal up. Plus the extra munny never hurt.
--== Lucky Strike ==--
Cost: 3 AP
Description:
Raises luck so that enemies drop rare items more often. Equip to entire party to boost effect.
Learned by:
- Sora
- Donald
- Goofy
Breakdown:
Equip this. Even if you aren't currently searching for synthesis items or whatever, equip this. Some items, especially Crystals and the Defender and Wizards Relic, will take FOREVER to get anyway, so boost your odds while you're forced to fight them, thus building a stock so you don't have to practice on them so much later.
--== MP Gift ==--
Cost: 3 AP [1 MP to use]
Description:
Give MP to give 3 MP to a friend. [Support skill. Cost: 1 MP.]
Learned by:
- Goofy
Breakdown:
This is a great skill for Goofy to have. This allows both you and Donald to relax your MP use a little without fear of running out (Goofy never seems to run out of MP. Even when his gauge shows empty, he still casts stuff).
--== MP Haste ==--
Cost: 3 AP
Description:
Boosts MP recovery rate in battle, allowing more spellcasting.
Learned by:
- Sora
- Donald
- Goofy
Breakdown:
Every time you hit an enemy in battle, you recover a slight amount of MP. This amplifies that, meaning you gain more then you normally would. It also takes effect if you have MP Rage equipped. I don't cast a lot of spells, so I don't care about this that much, but there are worst things to waste AP on.
--== MP Rage ==--
Cost: 2 AP
Description:
Recover MP whenever you're hit in battle. Heavier damage restores more MP. Equip more to boost effect.
Learned by:
- Sora
- Donald
- Goofy
Breakdown:
Now in addition to gaining MP when hitting an enemy, you gain MP when an enemy hits you. Good tactic, but I don't spellcast enough nor get hit enough to bother.
--== Ragnarok ==--
 --== Ragnarok ==-- |
Cost: 4 AP [3 MP to use]
Description:
After aerial combo, select followup attack at right time to unleast Ragnarok. [For airborne targets. Cost: 3 MP]
Learned by:
- Sora
Breakdown:
A series of 5 aerial strikes (including a spin attack while jumping into the air), finishes with a burst of energy balls that hone in on enemies. It does not have to be used at the end of a combo and can be selected anytime an air-based enemy is targeted. Again, well worth it for latter boss fights. The finishing lasers are hard to actually get to hit, but they are really cool. Be sure to hit X again at the end to fire the lasers period (the are optional).
--== Rocket ==--
Cost: 1 AP [1 MP to use]
Description:
Leap at an airborne enemy and attack with shield. [Special attack. Cost: 1 MP.]
Learned by:
- Goofy
Breakdown:
Another good attack for Goofy to have. It increases his effectiveness against airborne enemies, similar to Sora's Aerial Sweep.
--== Scan ==--
Cost: 1 AP
Description:
View an enemy's HP gauge during battle.
Learned by:
- Sora
Breakdown:
This makes the enemies HP gauge appear in the top left corner of the screen. The gauge shown is either the last enemy hit or the one you've locked-on to. Again, another ability that should always be equipped as it will help you manage your supplies and attacks during battles, especially boss fights.
--== Second Chance ==--
Cost: 2 AP
Description:
Keep 1 HP even after taking a critical hit.
Learned by:
- Sora
- Donald
- Goofy
Breakdown:
Probably the most useful ability in the game. I don't know how many times this has saved me, being in the middle of casting Cure when I take another hit that should have killed me.
--== Sonic Blade ==--
 --== Sonic Blade ==-- |
Cost: 3 AP [2 MP to use]
Description:
Slash an enemy while rushing past. Select followup attack at right time for a combo. [mid-range attack. Cost: 2 MP.]
Learned by:
- Sora
Breakdown:
When reasonably close to an enemy, select Sonic to dash through them. Select Rave in the top box for 4 more attacks (5 total) until the command Blast appears, where Sora does one final much wider-reaching and powerful rush. I don't like this move. It doesn't do a whole lot of damage and it's a pain to get Rave to work right.
--== Strike Raid ==--
 --== Strike Raid ==-- |
Cost: 3 AP [2 MP to use]
Description:
Hurl the Keyblade at an enemy. Select followup attack at right time for a combo. [Long-range attack. Cost: 2 MP.]
Learned by:
- Sora
Breakdown:
Get some distance and select Strike to throw the Keyblade like a boomerang. When it comes back, select Raid in the top box. If your enemy is still alive, you can go back and forth for a total of 4 throws until the Judgment command appears, which makes one final two-handed throw that is much more powerful. Overall though I don't like this attack. Not many situation you can use it in.
--== Tornado ==--
Cost: 2 AP [1 MP to use]
Description:
Whirl after an enemy, using shield to attack. [Special attack. Cost: 1 MP.]
Learned by:
- Goofy
Breakdown:
Similar to Sora's Vortex, but it lasts longer and if he uses it at the right time can do fair damage to even a boss (really effective if you're fighting a bunch of low-level enemies).
--== Treasure Magnet ==--
Cost: 2 AP
Description:
Attract nearby HP/MP balls, munny, and items. Equip two to attract them from even further away.
Learned by:
- Sora
- Donald
- Goofy
Breakdown:
Exactly what it sounds like. Instead of actually having to touch the stuff to pick it up, this will draw them to you. Trust me, you'll think it the best thing since sliced bread when you first get it. Be careful who you equip this to however, as if Sora doesn't have it equipped but Goofy does, you'll still get the Munny and Items, but you wont be getting many HP/MP balls as Goofy will hog them all, sometimes cutting training sessions short.
--== Trinity Limit ==--
 --== Trinity Limit ==-- |
Cost: 5 AP [3 MP to use]
Description:
Channel the party's remaining MP to crush surrounding foes. Minimum 3 MP. [With companions nearby. Cost: All MP.]
Learned by:
- Sora
Breakdown:
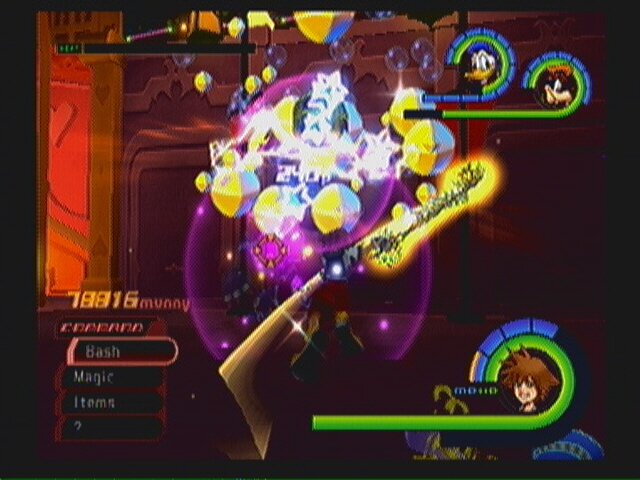
Takes all of your MP (the more, the more powerful), and used it to literally crush all enemies within a huge area with blinding light. I do not think this attack is worth the cost. Maybe, 5 MP total, but not all of it. By the time you get this attack, you wont need it for groups of enemies, and it's a waste to use it on just one enemy (even a boss).
--== Vortex ==--
Cost: 1 AP
Description:
Close the distance to nearby enemies with this powerful spinning attack.
Learned by:
- Sora
Breakdown:
Equip this ability as soon as you get it! It allows you to kind of dash towards a nearby enemy, increasing your odds of hitting him. At the start of the game, you may notice every once in a while you'll attack an enemy only to have your blade fall short by a foot or two. That wont happen anymore.
PS2 Index
Not many situations you can use Strike Raid in? I found it incredibly useful for all situations (apart from when flying/swimming). I hammered Strike Raid throughout the late game with devastating effect.
I had relied heavily on my magic up until the last few worlds when it became pathetically weak, and even though I got rid of the sword at the start, I just bulked with power ups and strength enhancing accessories, meaning Strike Raid literally made Hollow Bastion and beyond an absolute joke!
I set up Goofy to use MP Gift "constantly" (when I have less than 2MP, he uses it, and Strike Raid only uses 2MP), so I just stand in the middle of the battle obliterating everything, and because you can't take any damage while performing Strike Raid, you needn't worry about defense. It's basically cheating, but no fair enough, you didn't find much use for it...
glide is when you glide. Meaning you stay in the air for longer. Really useful
Summons not useful? Lol. Bambi is by far the best way to grind for synthesis materials, and a longer summon gauge is necessary to reach his third tier. And Tink is a lifesaver (literally, giving you HP) - most definitely useful, though not required, in a lot of boss fights and even more so in Final Mix.
glide is a shared ability you get for completing neverland and you can get superglide for beating chernabog at the end of the world hes the huge bat thing coming out of a volcano
You keep talking about glide what is that?