Palworld officially sells 15 million copies on Steam
Pocketpair announced that their breakout success Palworld has now officially sold fifteen million copies on Steam. This number is impressive as the game is also availab.. Read More
Some useful getting started tips for new players
While we also have an extensive guide to Palword, we thought it would be helpful to put a load of hints and tips for the game on one convenient page, so here it is, our best getting started and playing tips for Palword.
Ancient Technology Parts are essential components for some structures or items in the game. They're only dropped by alpha pals and tower bosses - all of which can be fought over and over again. Alpha pals and tower bosses are conveniently marked on the map so it will be easy to remember their locations. If you want to know more, please check out dedicated guides for this topic using the links below:
There are several camps dotted across the map and you can easily locate them by finding a pillar of smoke emanating from a clearing. These camps are guarded by several enemies and there's always a pal imprisoned in a cage. Liberate the camp and kill the guards so you can free the imprisoned pal and automatically transfer it to your ownership.
The game offers a massive experience boost when capturing 10 pals of the same type. This is also applicable when hatching the same pals from eggs. Take advantage of this feature early on to gain levels quickly.
This is a tip especially for new players. Nightime can be especially challenging early on since the temperature plummets and without proper clothing, your character will get cold and slowly lose HP. Standing near the trusty, basic bonfire is enough to stave the cold but you'll want to eventually craft armor if you want to explore at nighttime.
Nighttime in the game is in complete darkness and you'll encounter the same problem when entering mines or caves. Early on, make sure to craft the torch and carry it around until you're able to craft the Hip Lantern. The torch need to be equipped on a weapon slot to use it while the Hip Lantern doesn't take a weapon slot and automatically lights up when traveling at night or entering a dark location. The Hip Lantern requires Technology LV22 before you can craft it so keep the trusty torch for a while until you get it.
As you play the game, you'll eventually expand your base and have your pal work on various tasks throughout the day. You'll start off feeding them with berries and it is going to be enough for a while. This is because raw red berries don't restore any SAN at all. You can at least bake these berries using a simple campfire to turn them into Baked Berries that provide more nutrition and at least 1 SAN recovery. Once you have access to Wheat, you can then start crafting Bread that replenishes 4 SAN (using Wheat only) or Jam-Filled Bun that replenishes 6 SAN (Wheat + Berries). Eventually, you'll want to switch to feeding them Salad (2 Lettuce + 2 Tomatoes) since it replenishes 11 SAN and gives a +30% Work Speed buff. You'll need to deploy Pals with Kindling ability to help cook these food items automatically without your supervision.
For more information about SAN and how it is related to preventing illnesses and injuries, please check out our guides below:
Having pals with multiple work skills is the best way to efficiently run the base. This minimizes idle time since if they're not working on one thing, they'll surely take care of another. The low level pals like Cattiva, Lifmunk, and Tanzee are great examples. As you gain access to higher level pals with higher level work skills, swap them out instead.
For more information about work skills, please follow the link below:
You can build up to three separate bases in the game and it is only natural to eventually find the need to dismantle one of your bases (usually the very first base) so you can relocate to better base locations. The majority of players will often settle at least one of their "mining bases" in a spot where there are a ton of mining nodes.
Ore in particular is very important in the mid and late game crafting so having direct access to a rich ore supply will be very beneficial to your playthrough for a long while. These nodes respawn over time so as long as you don't block their respawn points with structures, simply putting storage boxes, mining and transport pals there will allow you to automatically get valuable resources like ore and coal without doing manual labor yourself.
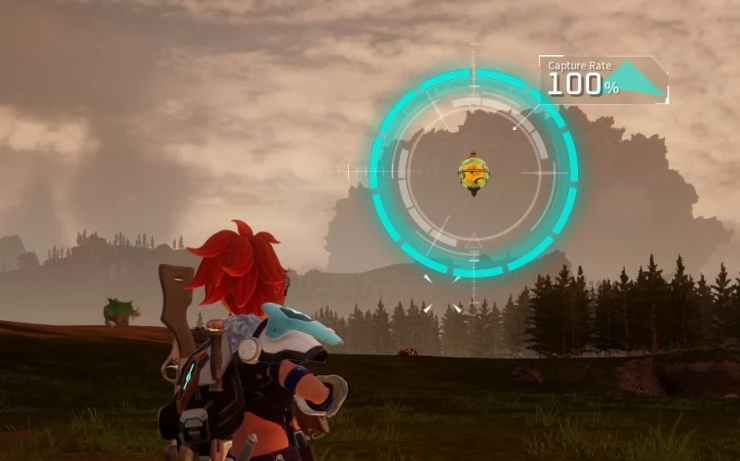
There are several factors involved in determining your pal capture success rate. Some of them include the type of sphere you're using, the level of the pal you're trying to capture, your Capture Level (by offering Lifmunk Effigies), pal's HP, and more. We have made a dedicated page for this topic discussing these factors in detail to help you increase your capture success rate.
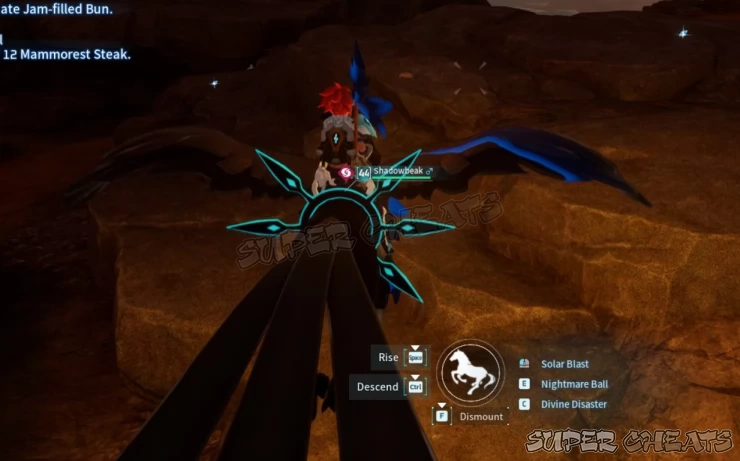
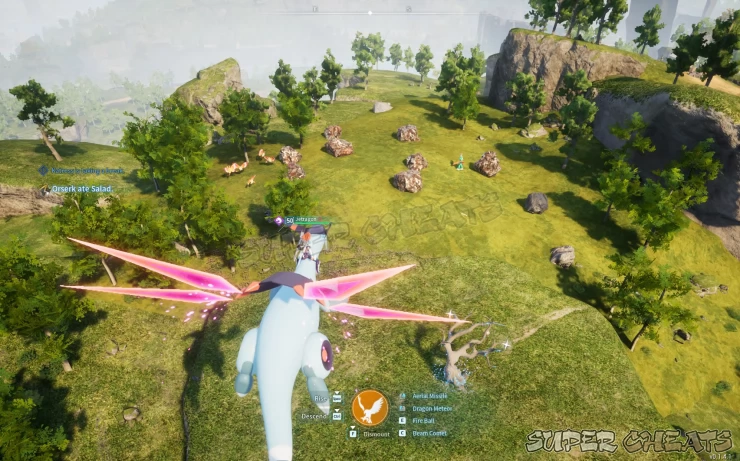
Aside from using your pals in combat and base operations, there's a large number of pals that can be used as ground, flying, gliding, and swimming mounts. While most of the pals that can be mounted are used exclusively for traversal, late-game pals can be mounted and gives you access to their special weapons like rocket launchers and miniguns. Early in the game, you'll want a flying mount as soon as possible since it will allow you to quickly explore large portions of the map without worrying about various terrains and elevations. For the complete list of all pals that can be mounted, check out our dedicated guide below.
If you intend to enjoy the game at your own pace, remember that you can customize the settings of your world. These may include quality of life and gameplay improvements like increased drops, capture rate, pal appearance rate, increase the damage you can inflict to pals, and many more. You can also turn off raids and structure deterioration as well. These settings can be adjusted before loading your world so play around with the settings to know what configuration works for you and your ideal playthrough experience.

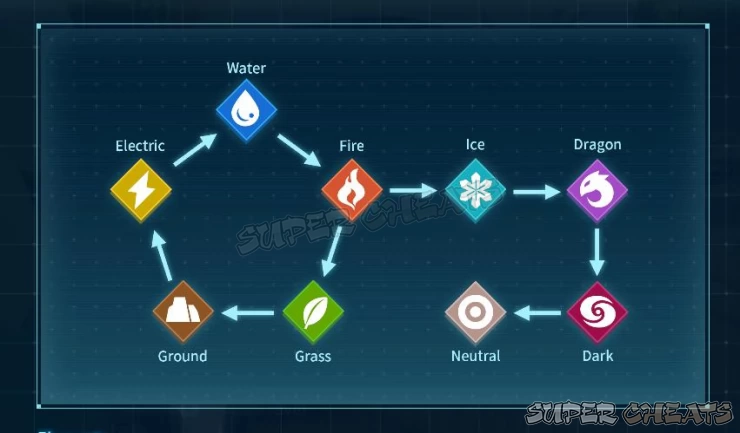
All pals in the game will have at least one elemental type which will dictate the amount of damage they can deal or receive to or from other pals. Paying attention to this useful combat mechanic can be vital when you're fighting tower bosses or alpha pals in the overworld. You can conveniently review this Element Chart in-game by accessing the Survival Guide in your main menu. The arrows in the chart indicate that the element deals higher damage to it. So for example, by referring to the chart below, we can easily tell that Water deals higher damage to Fire while Fire deals higher damage to Ice and Dark. On the other hand, the weaker element will deal less damage to the strong element. In this case, Fire pals will deal less damage against Water pals.
Breeding is a mid to late game mechanic that all players must take advantage of. This is the only reliable method of obtaining rare and highly sought-after pals without hunting them in the wild and potentially wasting spheres in attempting to capture them. There are some requirements that you need to meet to have a self-sufficient base that can support breeding. Please check out our several pal breeding articles that you can find in our Palword walkthrough.

Latest updates to our guide:

Pocketpair announced that their breakout success Palworld has now officially sold fifteen million copies on Steam. This number is impressive as the game is also availab.. Read More
© Web Media Network Limited, 1999 - 2024 This site is not affiliated in any way with Microsoft, Sony, Sega, Nintendo or any video game publishers.
Privacy Policy | Terms of Service.
Super Cheats is an unofficial resource with submissions provided by members of the public. These are not usually tested by us (because there are so many), so please use them at your own risk.