Celadon City
Pokemon LeafGreen Walkthrough and Guide
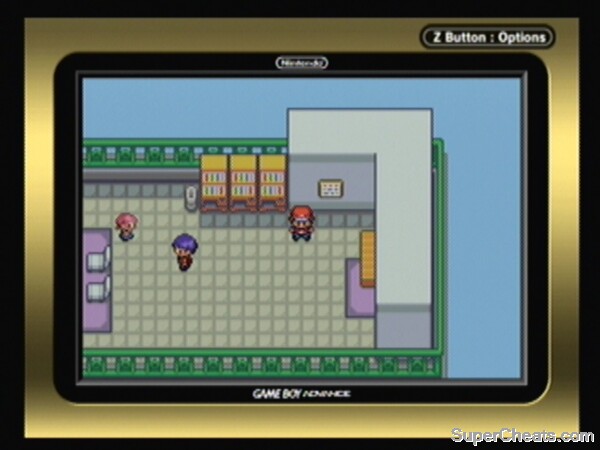
Celadon City
Celadon City
The largest city in the region, Celadon City is the metropolis of Kanto, and home to the Super PokeMart, Celadon Mansion, and the Game Corner, among other attractions. You, country mouse, have arrived in the big city!
-- Celadon City --
First, there are no wild Pokemon for you to capture here, so put that task out of mind as it does not apply. Second, there is a large number of small side-quests we have to do here. Third, I want to congratulate you for making it this far, and encourage you to retain your gung-ho spirit, because the game is only half-over!
After you visit the Pokecenter, heal, and save, talk to the people here -- a purple-haired girl will clue you in about the existence of the Cycling Road and its connection to Fuchsia, and the boy at the table sort of reminds us that we have a bike! The old bloke at the counter tells us the secret to managing that sleeping Pokemon, and that wraps up the intel we can gather here!
Now before we leave, let's take stock of our current status... Our team should consist of five core members who are all at Level 28, and an HM Mule that is whatever level it is. Unfortunately we actually do need the mule to get to the Gym, so we cannot pack our team with six core members... Bummer. Speaking of the Gym, why don't we get that out of the way now? Yes, but first we need to pay a visit to only the biggest freakin' Poke Shop in the world!
-- The Celadon Department Store ---
When we exit the Pokecenter we see a uniformed Team Rocket Grunt standing around outside, who when we try to talk to him is very rude! Heading west we encounter a trainer with a Poliwrath, and he tells us how it got that way, which may be your first introduction to stone-based evolution, I don't know.
The nearby sign tells you about kit you can get to boost performance in battle, and directs you to the Celadon Department Store. We pass by the entrance to Celadon Mansion and chat with a bloke standing between the buildings trying to sooth his burning tongue, and then we see it, off in the distance... The glorious Celadon Department Store, one of the tallest buildings in the region!
Inside on the counter is a guide that lists the different departments and their floors, and a clerk who cheerfully welcomes us to the store! Head to the back and you will find both stairs and a lift -- I took the stairs myself, good cardio workout.
2F: The Trainer's Market
First thing we should do is talk to the trainer walking back and forth near the counter, who advises us that having Revive on long trips is a good idea. A quick browsing of the displays is now the thing to do, and when you get tired of that, head over and talk to the bloke at the lower counter.
He has a good variety of kit for sale, but at the moment all we really need to do is resupply our usual, so do that. You can buy any of the new stuff you like, but right now we have less money than we need to get all the stuff we would like to have, and you need to save a little for beverage shopping on the roof, so fair warning, do not spend it all!
The other clerk has TM's for sale, but hold off on buying any right now, because there are some we can get for free later, and some that really we do not need until we get additional Pokemon. When you are finished here, head up the next flight of stairs.
3F: TV Game Shop
This may not seem like a floor that we need to stop on, but trust me, you might be surprised! First check out one of the posters on the wall -- yes, Red and Green ARE both Pokemon! Now you see the trainers standing by the game consoles? Go talk to them to learn that the Pokemon Haunter will evolve when it is traded -- Trade-based Evolution! Who knew??
Check out one of those cutting edge game consoles! It is a wicked fast... Err... Super NES...
A pair of trainers will fill you in on how to identify traded Pokemon, and the bloke behind the counter will offer to teach you the move Counter -- seriously... This is a decent move and you do not have the best Pokemon to use that so politely decline -- you can come back later.
4F: Wise Man Gifts
This is ground zero for obtaining evolution stones!
The two trainers here will fill you in on how to best use the Poke Doll, and the bloke at the counter will sell you one if you like -- but you can hold off on that, money is tight at the moment. If you check out his selection of Evolution Stones you will see that he has Fire, THunder, Water, and Leaf, all of which we will need eventually, but not at the moment.
The important think is to remember that they are here, and they are $2100 each!
5F: The Drugstore
Head up the next flight of stairs and you will be in the Drug Store. Talk to the trainers to learn about Pokemon Stat Enhancers -- these are drugs that permanently increase a stat. We will want to come back here and do some serious shopping prior to taking on the Elite Four, you can bank on that.
Like real drugs though, this stuff is expensive! Head for the stairs up now.
6F: Rooftop Square
 The Vending Machines - Source for Cheap Healing |
Talk to the pair of trainers up here to learn that the little sister is thirsty! See those vending machines? To start with, go buy one of each selection -- that is one Water, one Soda, and one Lemonade. Give the little girl a Fresh Water and she will give you TM16, Light Screen. Now give her a Soda and she will give you TM20, Safeguard. Finally give her the Lemonade, and she will give you TM33, Reflect. You now have all of the TM's she can give you, good on ya!
Head back to the vending machines and buy 5 of each item now. Our work is done here! Head downstairs and exit the building now!
Back in the City Again
Chat with the people you encounter to pick up on the local gossip, then head down to the south-most road -- see that tree blocking the path there? That leads the the City Gym, which will be important in a bit... There are some buildings along the north side of the road -- enter the first one and you will see that you are in a restaurant! Talking to the people here can reveal some important information, for example one of the diners tips you that there is a basement under the Game Corner, which is good to know...
The bloke at the counter tells you about the man in the corner, who has had a spot of bad luck, and when you talk to him he confirms that, and gives you a Key Item, the Coin Case, as he will not be using it anymore. The Coin Case is used for holding the coins you use to play the slot machines at the Game Corner, if you did not know that.
The building next door is where one of the officers from Team Rocket lives, and if you drop in you wil learn how successful the Game Corner is, and that there is most certainly not a secret switch behind the poster on the wall in the Game Corner!
The last building on the street is the local hotel, but sadly there are no rooms available here. Follow the grassy lane around the side of the hotel and cut down the tree to gain access to the path that will quickly take you back to the Game Corner!
-- The Game Corner --
Enter the Game Corner and chat with the people playing there to pick up some useful intel about the City Gym Leader, and get some free coins! One gamer will give you 10 Coins, while two others will give you 20 Coins each, leaving you a total of 50 Coins.
If you whip out your trusty Item Finder and use that, you will find 10 Coins in front of the right-middle rank of machines on the floor, another 10 in front of the left middle bank, 20 Coins on the floor of the left aisle, 10 Coins by the counter on the floor, 10 Coins on the floor of the left aisle near one of the chairs, 10 Coins on the floor of the middle aisle, 20 Coins on the ground in front of the right side of the counter, and 10 more Coins very close to that last spot!
There are 10 Coins on the ground by the half-wall to the right of the poster, 10 Coins by the corner of the half-wall, and a whopping 40 Coins on the ground above the last machine on the right side of the right aisle! When you tally up the coins you were given and the ones that you found, you already have 210 Coins before you even touched one of the machines! It looks like treasure hunting pays better than gambling!
At this point you should probably save the game, considering that you have 210 Coins in your case without breaking a sweat, it would be sad to lose them on a few bad pulls of the one-armed bandit, right? Why would you want to gamble at all you are wondering? The answer to that is easy enough: the Rocket's give prizes for a certain number of coins!
The prizes can be obtained in the building beside the Game Corner, where there are three clerks at the counter who will take your coins and give you the prizes you select. You can obtain the following:
-- Game Corner Prizes --
- Items -
Charcoal (1000)
Miracle Seed (1000)
Mystic Water (1000)
Smoke Ball (800)
Yellow Flute (1600)
- Pokemon -
Abra (120)
Clefairy (750)
Dratini (4600)
Pinsir (2500)
Porygon (6500)
- Technical Machines -
TM13, Ice Beam (4000)
TM23, Iron Tail (3500)
TM24, Thunderbolt (4000)
TM30, Shadow Ball (4500)
TM35, Flamethrower (4000)
Obviously we do not have the coins we need for most of this, or for the most desirable items -- which means we will have to be very lucky or very good at gambling! At the moment playing the slots is not high on our list of priorities -- but you should go do that a few times anyway to give me an excuse to tell you how it works, right?
-- Playing the Slots --
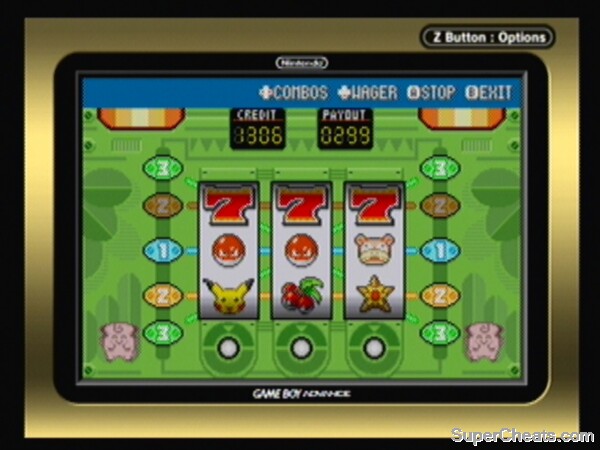 Slot Machine Gambling |
Like in real slot machines, you can increase your bet in order to open up the other ways of winning. Basically the bet of a single coin only allows you to win on the center line, straight across, but by increasing your bet you add in the top and bottom lines, and diagonals when you bet three coins, so betting three coins every time is just smart. When you pull the arm (in this case, push the button) the three wheels start spinning inside. You have to stop them by hitting the button again three times - and this is where it goes from being purely a game of chance to a game of sorta skill...
It really is a matter of timing, but after you play a bit you will get used to the blurred wheels and be able to tell when, for example, the 7 is about to show up. Eventually you will get good enough so that you win more often than you lose, and coming up with the coins to obtain the prizes you want will come down to more a question of time than anything else!
You are looking to make specific combinations when you play the game, as each pays a different rate. The combinations are:
All '7's' (300)
All 'R's' (100)
All Pikachus (15)
All Slowpokes (15)
All Voltorbs (8)
All Stars (8)
2 Cherries (6)
1 Cherrie (2)
I don't know about you, but Porygon is the first prize that I would like to walk away with from playing this game -- but 6500 coins? That will take a while I am thinking...
Before we head on out of here, how about we head to the back and kick that Team Rocket Grunt's butt for some extra XP and money! We don't need a reason, the fact that he is there is reason enough.
Team Rocket Grunt has a Level 20 Raticate worth 496 XP, and a Level 20 Zubat worth 231 XP and $640. The Grunt runs off in the direction of the Team Rocket HQ! Remember that for now, we will be back!
Before you leave the arcade stop at the machine in the lower right corner and have a photo taken for your ID card! I chose black, which gives you a shadow-image of all of your team on the back of your Trainer Card! How cool is that?
Exit the arcade and continue east to bump into a scientist who will tell you that someone stole their Silph Scope! Roh Nohs!
It is time to deal with the Gym Leader, and hopefully score another Badge so we do not have to worry about losing control of our team! So hit the nearby Pokecenter to heal and save, then head down to the south side of town and cut the tree blocking access to the road that leads to the Gym.
More on SuperCheats
Not to brag, but there is one spot you missed. There is apparently a spot where you can find 100 coins in the game corner. And it's next to the Card Printer.
In the building near the mall, you can get an eevee and also talk to the head programmer In the 3rd floor.
I am having this issue where all of the Pinsir I try to buy at the Game Corner are female. Is this a common occurrence?
I absolutely love your guide I laugh and stuff and it's really helpful! I'm a 15 year old girl, and just broke this game out but couldn't get out of a tunnel so I came on here and now I'm still following it because it's so great! Nice work