- Games
- Guides
- Complete Guide to Monopoly GO!Palworld Walkthough GuideThe Walking Dead: Survivors Beginners ..Ravenlock Walkthrough
- Warzone 2 GuidesHogwarts Legacy Walkthrough and GuideFar Cry Primal Walkthrough and GuideVirtual Villagers Origins 2 Puzzles an..
- Fire Emblem Engage Walkthrough GuideLego Star Wars: The Skywalker Saga GuideSurvivor.io Walkthrough and GuideChained Echoes Guide
- Latest
- More
- General ForumsChat and have fun Video Game ForumsFind friend, get help Achievements & Trophies'chieve lists and hints to help
- Pokémon HubFind it all PokédexAll the stats ModsMods and and-ons
- Action Replay CodesAR Codes and cheats GameShark CodesGS Codes and cheats CodeBreaker CodesCB Codes and cheats
Submit Your Stuff· Send in your cheats, hints and codes
· Need help? Ask a question here Help a gamer Can you provide the answers for fellow gamers questions- Forums
- Pokemon
Log into your account here:
Not registered? Sign Up for free
Registration allows you to keep track of all your content and comments, save bookmarks, and post in all our forums.
-
PlayStation 5
PlayStation 4
PlayStation 3
PlayStation 2
PlayStation
PS Vita
PSP
-
Xbox Series X
Xbox One
Xbox 360
Xbox
-
Switch
Wii
Wii U
3 DS
Nintendo DS
Nintendo 64
Gameboy Adv.
Gameboy
GameCube
SNES
NES
-
Roblox
iPhone
Android
PC
FaceBook
Mac
Dreamcast
Arcade
- General Forums
- Video Game Forums
- Teams Forums
- Pokémon Hub
- Pokédex
- Technical FAQ's
- Achievements & Trophies
- Hall of Fame
- Enter a game name to find below:
-
- Or click here to search for specific content.
- All Our Full Guides More Game Walkthroughs Cheats, Hints and Codes Questions and Answers Recent Guide Updates
- Complete Guide to Monopoly GO!Palworld Walkthough GuideThe Walking Dead: Survivors Beginners ..Ravenlock Walkthrough
- Warzone 2 GuidesHogwarts Legacy Walkthrough and GuideFar Cry Primal Walkthrough and GuideVirtual Villagers Origins 2 Puzzles an..
- Fire Emblem Engage Walkthrough GuideLego Star Wars: The Skywalker Saga GuideSurvivor.io Walkthrough and GuideChained Echoes Guide

Thank you for printing this page from www.SuperCheats.com.
Remember to come back to check for updates to this how to and much more content for Windows 7.
How to Create a System Repair Disc
Published by SuperCheats Staff on Aug 31st 2013
Disc Creation
- Click the orb or Start button in the lower left corner of the taskbar, then select Control Panel.
- If you’re viewing the Control Panel in Category View, under System and Security select Back up your computer .
- If you’re viewing via large or small icons, select Backup and Restore
- Put a blank DVD in your drive. If you have multiple burners, select the one where you’ll create the disc.
- Check if your blank DVD is really empty or readable. You can do this by checking your CD/DVD drive in My Computer. Once it’s ready, click Create Disc.
- Once the disc creation is finished, all that’s left is to test your recovery disc.

Next, click Create a system repair disc from the left pane. If you can’t see it there, you can just click Start then type “recdisc” (minus the quotes) in the search box.

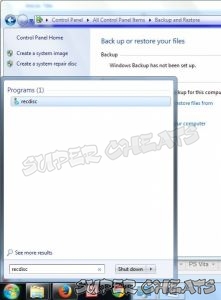


Image source
Testing the Disc
First, you have to make sure that your CD/DVD drive is set as the first boot priority in BIOS. BIOS can be accessed in many different ways – usually by pressing F2, F10, DEL; these buttons depend on the BIOS version or the PC itself. Consult your PC’s documentation or support site for more details.

Phoenix BIOS boot priority screen
Image source

Award BIOS boot priority screen
Image source
Accessing the Recovery Options
- After successfully setting your CD/DVD ROM as the first boot priority, restart the PC with the repair disc loaded. During the boot process, you should see a black screen with the text “Press any key to boot from CD or DVD". Press any key to boot to the disc. In the next screen, select Windows Setup [EMS Enabled] then press Enter.
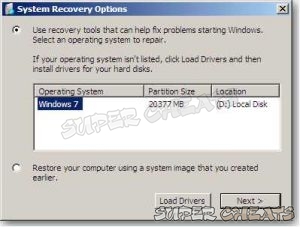
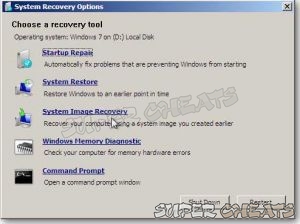
- In the System Recovery Options screen, select the operating system then click next. From the next screen you can perform several options to restore your PC. If it doesn’t boot up, click Startup Repair. If it does boot up but gives you limited access or is generally a mess at the moment, you may want to perform a system restore.

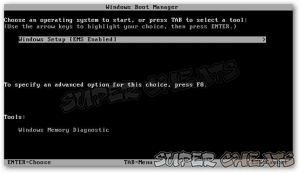
Image source
Image source
Comments for "How to Create a System Repair Disc"
Table of Contents
- Back up your Files
- Disable Visual Effects
- Creating a User Account
- How to Clear Temp Folder
- Turn High Contrast Theme on and off
- Uninstall Internet Explorer 10
- Disable Aero Theme
- Add Run in the Start Menu
- Disable Caps Lock
- Viewing and Making your Files Hidden
- Recover from Sleep Mode
- Connect to a projector
- Set up Parental Controls
- Snipping Tool
- Sticky Notes
- How to Change your Computer Name
- Create a Super Hidden File or Folder
- Using Split Screen
- Enable/Disable Hidden Administrator
- Run old programs in Windows 7
- Determine your Windows 7 if it’s 64 bit or 32 bit
-
 Control Panel
-
General Tips
-
Hardware
-
Networking
-
Security
-
Maintenance and Troubleshooting
Ask a question
Do you have a question about Windows 7?
Click here to post it.
Click here to post it.
Latest Help Articles
Windows 7 came with two versions which are the 32 bit and 64 bit. Both have different versions. One of the most comm..
Some programs won’t run because they are only meant to run on older Operating Systems or has compatibility issues. ..
Administrators have the access to every file to the computer. Hiding the administrator can be done with few simple st..