- Games
- Guides
- Complete Guide to Monopoly GO!Palworld Walkthough GuideThe Walking Dead: Survivors Beginners ..Ravenlock Walkthrough
- Warzone 2 GuidesHogwarts Legacy Walkthrough and GuideFar Cry Primal Walkthrough and GuideVirtual Villagers Origins 2 Puzzles an..
- Fire Emblem Engage Walkthrough GuideLego Star Wars: The Skywalker Saga GuideSurvivor.io Walkthrough and GuideChained Echoes Guide
- Latest
- More
- General ForumsChat and have fun Video Game ForumsFind friend, get help Achievements & Trophies'chieve lists and hints to help
- Pokémon HubFind it all PokédexAll the stats ModsMods and and-ons
- Action Replay CodesAR Codes and cheats GameShark CodesGS Codes and cheats CodeBreaker CodesCB Codes and cheats
Submit Your Stuff· Send in your cheats, hints and codes
· Need help? Ask a question here Help a gamer Can you provide the answers for fellow gamers questions- Forums
- Pokemon
Log into your account here:
Not registered? Sign Up for free
Registration allows you to keep track of all your content and comments, save bookmarks, and post in all our forums.
-
PlayStation 5
PlayStation 4
PlayStation 3
PlayStation 2
PlayStation
PS Vita
PSP
-
Xbox Series X
Xbox One
Xbox 360
Xbox
-
Switch
Wii
Wii U
3 DS
Nintendo DS
Nintendo 64
Gameboy Adv.
Gameboy
GameCube
SNES
NES
-
Roblox
iPhone
Android
PC
FaceBook
Mac
Dreamcast
Arcade
- General Forums
- Video Game Forums
- Teams Forums
- Pokémon Hub
- Pokédex
- Technical FAQ's
- Achievements & Trophies
- Hall of Fame
- Enter a game name to find below:
-
- Or click here to search for specific content.
- All Our Full Guides More Game Walkthroughs Cheats, Hints and Codes Questions and Answers Recent Guide Updates
- Complete Guide to Monopoly GO!Palworld Walkthough GuideThe Walking Dead: Survivors Beginners ..Ravenlock Walkthrough
- Warzone 2 GuidesHogwarts Legacy Walkthrough and GuideFar Cry Primal Walkthrough and GuideVirtual Villagers Origins 2 Puzzles an..
- Fire Emblem Engage Walkthrough GuideLego Star Wars: The Skywalker Saga GuideSurvivor.io Walkthrough and GuideChained Echoes Guide

Thank you for printing this page from www.SuperCheats.com.
Remember to come back to check for updates to this how to and much more content for Windows 7.
How to Calibrate your Display
Published by SuperCheats Staff on Aug 31st 2013
Windows 7 has a tool called the Display Color Calibration Wizard that allows you to adjust your monitor’s brightness, contrast, gamma and even colors settings. Calibrating your display ensures that the colors are represented accurately on your monitor. Before starting the Display Color Calibration, make sure that your display is set to its native resolution. This will help improve the accuracy of the calibration results.
Display Color Calibration enables you to change different color settings. After adjusting the different color settings via DCC, you’ll have a new calibration containing your new color settings. The new calibration will be associated with your screen display and used by color-managed programs.
- Calibration
To access this tool, press start then type “dccw” in the search field without the quotes. In the first window, just click Next. - Basic Color Settings

In this screen, you’ll be told to reset your display’s color settings to default. This is usually done via the buttons in the front, under or the sides of the display hardware itself. Refer to your display’s documentation or just navigate the settings without changing anything so you can get used to it. Here are the default settings you should look out for:
Color mode: sRGB
(If color mode is not available, look for Color Temperature instead. )
Color Temperature: D65 or 6000
Gamma: 2.2
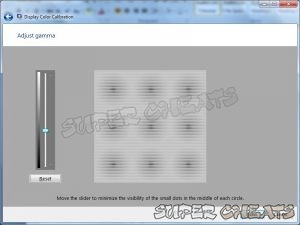
If you can’t find these settings, just find the Reset to Factory Defaults button or something similar. - Gamma
Gamma describes the relationship between the digital input value and intensity of the light that's emitted from the display.
Click Next from the “How to adjust gamma” screen then adjust the slider until the dot in the middle of each circle disappears.

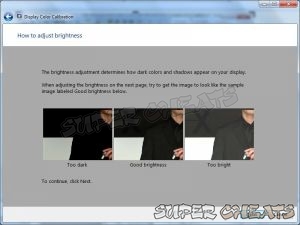
- Brightness
Brightness determines how dark colors and shadows appear on your display. As you adjust the brightness, you’ll want to see dark colors accurately, while the shadows, outlines, and other details in the darker images remain visible. If brightness is set too high, black colors will appear grayish.
In the “Find the brightness and contrast controls for your display”, it will tell you to find the brightness and contrast controls of your display device. You’ll have to adjust the contrast depending on your display device.
For LCD monitors: Set the contrast to default. (If not reset to factory setting yet)
For CRT monitors: Set the contrast to the highest setting

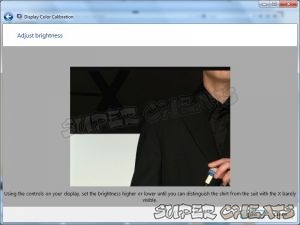
In the “How to adjust brightness” page, take note of the sample images then press Next. Use the brightness controls of your display to adjust and make sure that the large X above the guy’s shoulder is not visible. Once done, click Next.
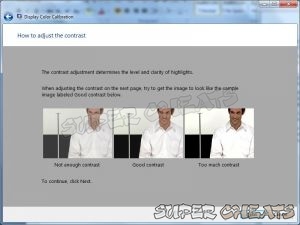
- Contrast
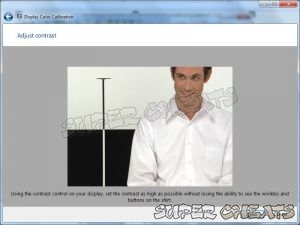
In the “How to adjust the contrast” page, take note of the sample images then click Next. In the “Adjust contrast” page, use your display device’s contrast controls to adjust the contrast. Set it as high as you can while not losing the visibility of the buttons and wrinkles on the guy’s shirt. When done, click Next.
- Color Balance
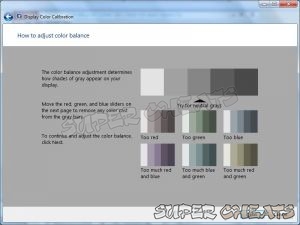
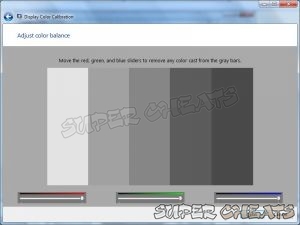
On the “How to adjust color balance” page, look at the sample images that appear, and then click Next. In the “Adjust color balance” page, adjust the red, green, and blue using the sliders until the gray bars become neutral gray colors without any color cast. Click Next once done.
- Calibration Results

You’re done with the calibration! In this last screen, you can click:
Previous calibration: This will revert your calibration to the way your display is before this calibration.
Current calibration: This will save the calibration settings you just did.
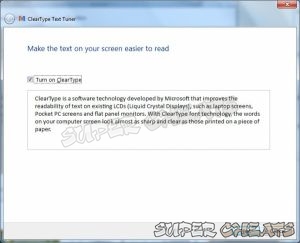
Check the “Start ClearType Tuner when I click Finish to ensure that text appears correctly (Recommended)” check box if you want the ClearType Text Tuner to open after you click Finish. This will help to make sure that text appears clearly with your new calibration
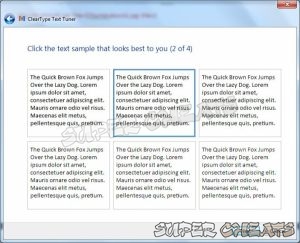
- ClearType Text Tuner
This simple tuner will appear after clicking Finish in the calibration results and when you leave the checkbox checked. You just need to select the best appearances of the texts displayed in the following pages.

Comments for "How to Calibrate your Display"
Table of Contents
- Back up your Files
- Disable Visual Effects
- Creating a User Account
- How to Clear Temp Folder
- Turn High Contrast Theme on and off
- Uninstall Internet Explorer 10
- Disable Aero Theme
- Add Run in the Start Menu
- Disable Caps Lock
- Viewing and Making your Files Hidden
- Recover from Sleep Mode
- Connect to a projector
- Set up Parental Controls
- Snipping Tool
- Sticky Notes
- How to Change your Computer Name
- Create a Super Hidden File or Folder
- Using Split Screen
- Enable/Disable Hidden Administrator
- Run old programs in Windows 7
- Determine your Windows 7 if it’s 64 bit or 32 bit
-
 Control Panel
-
General Tips
-
Hardware
-
Networking
-
Security
-
Maintenance and Troubleshooting
Ask a question
Do you have a question about Windows 7?
Click here to post it.
Click here to post it.
Latest Help Articles
Windows 7 came with two versions which are the 32 bit and 64 bit. Both have different versions. One of the most comm..
Some programs won’t run because they are only meant to run on older Operating Systems or has compatibility issues. ..
Administrators have the access to every file to the computer. Hiding the administrator can be done with few simple st..