Unity Heights Square
Crackdown 2 Walkthrough and Guide
Unity Heights Square
You'd do well to level your Agent's Firearms, Explosives, Strength and Agility skills to at least level four before attempting this one. You'll definitely need Strength level three so your Agent can rip up and carry turreted weapons.
Absorption Unit 1
This unit is on the east-most support structure on the bridge between southwestern Unity Heights and northern Green Bay. To get to the top of the structure, ascend using the ledges all the way up the column on either side of the bridge. When you reach the highest ledge, inch over to the left or right and then jump up to reach the platform.
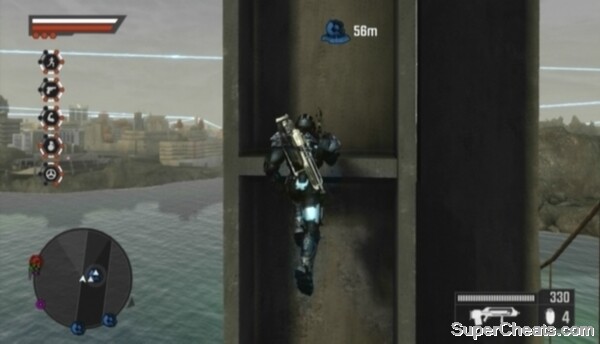 Ascend to the top of the support structure using the ledges all the way up the column on either side of the bridge. |
Once on the platform, gun down the Cell soldiers surrounding the Absorption Unit. There are explosive barrels up here, so be careful not to accidentally detonate one and get yourself killed. When the area is clear of enemies, stand on one of the configuration platform to begin the activation process. Remain on the platform until the unit is online.
Absorption Unit 2
The second unit is on top of one of the buildings south of Unity Heights Square. To reach the unit, start by ascending one of the columns of windows on the west side of the black building next to the Absorption Unit building.
When you reach the window at the top of the column, use the Right Stick to focus the camera on your Agent's side. Push the Left Stick toward the building on the other side of the alley and press the A button to jump over to the ledge there. Once on the ledge, use the balconies on the side of the building you are now on to reach the roof. Ascend to the platform, kill any Cell soldiers there and then get to activating the Absorption Unit.
Reaching Absorption Unit 2
Absorption Unit 3
The final unit is on top of the red and black building northwest of Unity Heights Square. Start by scaling the window column on the north side of the building. When you reach the top of the column, jump onto the platform to your right and ascend to the Absorption Unit using the ridges on the north side of the building. Once at the top, jump up to the platform and activate the final Absorption Unit.
Unity Heights Square Beacon
Before setting out, ensure your Agent is equipped with an Assault Rifle, Flocket Launcher and UV Grenades. If you've levelled your Agent's Explosives skill to level five, trade the Flocket Launcher for a Flak Turret. You can switch your Agent's weapons at an Agency Landing Zone or by selecting the “Extraction” option in the System section of the Intel Screen and redeploying him.
The Beacon deployment area is in the parking garage beneath Unity Heights Square. The parking garage is accessible through the collapsed portion of the square. Drop into the Freak Lair, stand on the Beacon Drop Point marker and call the helicopter to get started.
Hop onto the trailer east of the Beacon Drop Point marker and face west. When the Freaks start coming, a giant Freak will emerge from the ground at the west end of the garage. Use your Flak Cannon or Flocket Launcher to quickly put him down.
Several different types of attacking Freaks will appear on your tracker in this lair. You'll face two giants total (the second will appear when the Beacon is a bit less than half of the way there) as well as a mix of agile, exploding and projectile-throwing Freaks.
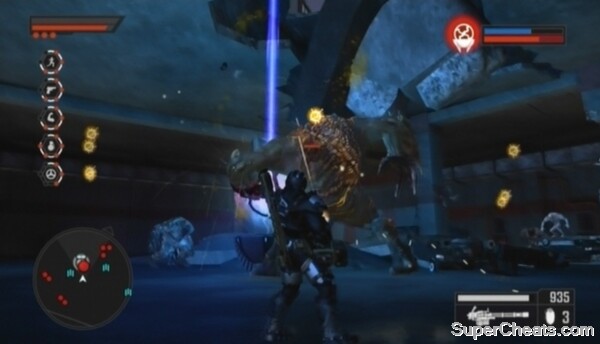 Use the turret to make short work of giants. |
Agile Freaks will perch themselves on the collapsed columns east and north of the Beacon. Use melee attacks or your Ultra Assault Rifle to keep the columns clear with. Exploding and projectile-throwing Freaks will enter the garage in groups. The projectile throwers will line up and pelt the Beacon with acid. Use UV Grenades and your Ultra Assault Rifle to clear away these groups of Freaks. Keep your distance when killing explosive Freaks (the armless ones), as the ensuing burst will knock your Agent down if he's too close.
When the second giant appears, immediately head for the turret northeast of the Beacon and remove it from its housing by holding the X button. Once you have the turret, get behind the giant and continue firing at him until he falls.
As well as the attacking Freaks, you also have brute Freaks to contend with. Brutes are the large, muscle-bound Freaks that can pick up and throw objects. There are plenty of cars and rubble scattered around the garage these Freaks can pick up and throw, so be careful. Try your best to ignore these Freaks and focus on taking out attacking Freaks when they appear on your tracker. Just keep sprinting around the garage to avoid them.
Continue sprinting around the garage, using your Ultra Assault Rifle and UV Grenades to take out attacking Freaks as they appear, until the Beacon detonates.
Defending the Unity Heights Square Beacon
More Crackdown 2 stuff on SuperCheats
No comments yet. Tell us what you think to be the first.