10: Decapitation
Operation Flashpoint: Dragon Rising Walkthrough and Guide
Operation Flashpoint: Dragon Rising Guide - Walkthrough
Mission Ten: Decapitation
Summary:
This is an absolutely stunning, though short, level, which I personally completed using only firing five bullets (and one of the missed). So, there are four enemies to (directly) kill. It is also pretty much my favourite mission in the game. It is a stealth level and we are back in the shoes of Saber Two. You could do it in a much more gung-ho manner, but it's clear that this is the way the level is designed to be played. Indeed, you could probably do it without killing these four PLA soldiers. The mission is to destroy a vital radio station for PLA communications, but it escalates to involve observing and eventually eliminating a PLA VIP. We then high-tail it out of there.
Walkthrough:
Primary Objective 1: Neutralise the radio station by any means:
From the landing on the beach (remember this location, as it is also our extraction later), head to the RV marker nearby. Up on the hill, by the next RV point, you can spot a PLA soldier with your scope. He is on his own, and this is the first of the four kills. If you aim to line his head up around three lines below centre on your scope, at 400 metres out, you can make the shot in one. This is one of the coolest shots in videogaming, if you make it. It's a pretty high powered rifle, so any shot to the head or neck will take him out in one.
Make the shot
With the PLA down, head on all the way up to the next RV point and ensure your team are set to 'Return Fire Only'. If you don't feel confident enough to snipe the guard, just use the stealth tactics we've covered before to get within around 200 metres of him, and the shot is much easier. Your squad mates can also help you out if you put them on 'Fire on My Lead' at this short of range. Remember, we have night-vision and Spec-Ops guns, and the PLA generally don't, so you can get pretty close (though there is some light on this level).
On your way to the high RV point you will be radioed and informed that HQ believe General Han, the second in command of the PLA forces, is in the area. We need to go and check his identity from range. Get all the way up to the shack by the RV marker. From this point, look to the south-east and you will see General Han's helicopter coming in. Keep your binoculars trained on him. Remain crouched as Han flies overhead and then lands in the valley below as a truck drives past. Han will then enter discussions with other PLA on foot. Keep monitoring them, and HQ will radio for confirmation of the VIP's identity. We do have permission to engage, if the situation deteriorates, and you can complete this mission by taking Han out at this stage and skipping to the radio station section. It's a hard way to do it though and is not recommended.
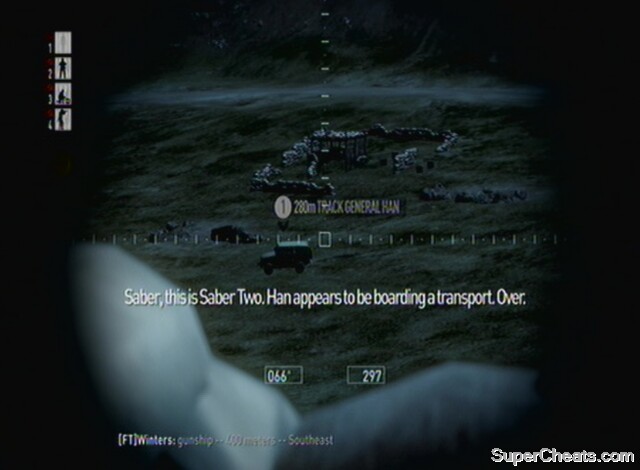 Keep watch over Han |
Secondary Objective 1: Observe General Han's movements:
Han will now get in a truck and drive off. Keep an eye on him, and remember that the objective marker will follow him across the map if you lose site of him. Leave your emplacement and head north-west along the ridge. It helps to have some idea of the PLA in the valley below, but we won't be engaging them so it's best to ignore any enemies at this stage. Follow the ridge up into the hills to the next RV marker. Activate it and get the checkpoint in the ruins. Move to the eastern end of this outlook and spot Han with your binoculars. You need to train your binoculars on him while he is stationary here and get confirmation from HQ before he will move on (unless a timer elapses, in which case you fail, but it's set at five minutes so you should have plenty of time). Stay trained on him as he moves on foot – you will have to move around your position a little to see him get in a jeep and leave. HQ will confirm it. You don't need a good line of sight to trigger his movements.
Han will drive down the road and turn left at the fork ahead. He will then stop at a building and disembark. You need to spot him again with your binoculars here, and follow him as he gets back in his vehicle and drives off again (quite odd movements, admittedly). Begin to move down the hill towards the next RV point, but bear in mind that this is the trickiest section of the whole level. As you get within about 100 metres of the road you should be able to spot a few PLA soldiers in the area. There should be a pair standing in the road, who will move out once you get near the road. Move into the trees so you are about 50 metres or less from the road. Watch the patrol cross paths with another one, made up of three soldiers, which will then walk off to the west and rejoin the road. Once they are about 100 metres away, crouch walk across the road and up towards the next RV marker.
Avoid the guards patrolling the road
Once there you should be safe enough to stand and move on in the direction of the next RV. Move into the trees on the right of this road for additional cover, paying particular attention to the bunker ahead. You should be able to spot Han from your position on this flank and force him to move on. Be aware, there are PLA by the bunker, but you can avoid them easily. Han will travel down the road to the east right underneath your position, followed by PLA backup, so be careful not to draw attention to yourself. The treeline will then merge into a path that curves up past the bunker. Follow this path at a crouch walk, but stay on the side of the RV marker. The track turns into a grassy path, which then joins up with the road below towards the next RV marker (east). You will see Han in a convoy travelling in the same direction in the distance. Continue along your road. You can move all the way up to the RV marker under the bridge without enemy contact.
Head on towards the next one as well, directly up the hill, but once 100 metres away, turn around and look south. You should be able to see Han and tonnes of PLA entering the radio station. That's handy as we were supposed to destroy that as well! When you track him at the radio station the objective to follow him will be completed.
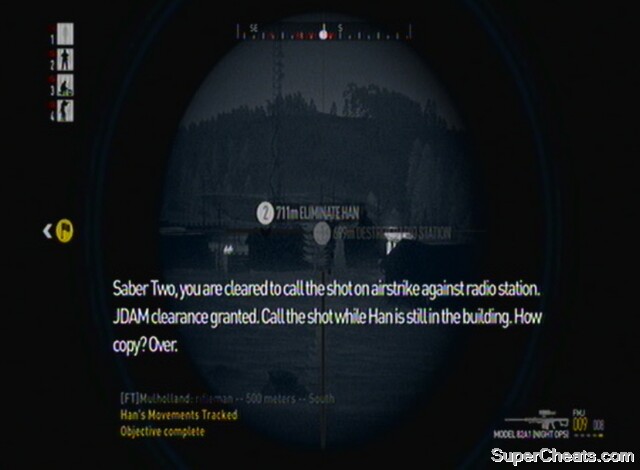
Primary Objective 2: Eliminate General Han:
We are given clearance to take out the radio station with Han inside using a JDAM strike. When we take it out the PLA will be alerted, however, and there are soldiers just above us at the next RV marker who will alter their behaviour if we do it straightaway. Save the strike, and creep up the steep slope towards the RV marker. Set your team to 'Fire On My Lead' so they can give you some help, and at about 30 metres as you near the top (there are a couple of 'false' tops, it's not until you get to 25 metres on the same height as the farmhouse that the enemies are in view), get ready for a very close encounter. The first enemy is a sniper as well, so can't exactly react quickly either – and we have the element of surprise (though these guys do have night vision). At 22 metres and facing one line to the left of north on the compass, you should be able to see the top of his head. He's facing west, so is completely unaware of you. Take him out. The other sniper is around the side of the farmhouse to the left. Move up with your team and eliminate him.
Take out the sniper team
If you want a less risky strategy, flank around the other side of the house (west) and you should have a line of sight on both snipers. The problem of a close quarters encounter will remain, however. Once both are down, a checkpoint will activate. You can now head up the hill above for a vantage point and turn around and use the fire-mission radial to designate the radio station for a JDAM strike. Aim at the structures in the centre, and then turn tail and run up the hill. Once it hits, the PLA will be on the alert, so sprint back down to the house and move fast! If you successfully took both targets out with the JDAM strike, an achievement will unlock and your two primary objectives completed.
Achievement/Trophy: Two Birds, One Stone (Kill Han and destroy the radio station with one fire mission) Silver/30G
If you didn't kill both targets, you're in trouble. It's worth reloading the checkpoint we just hit to try again. If you don't have the luxury of checkpoints, Han will probably leave the base before you can get there, but you need to snipe him as he's on the move. To destroy the radio station, you'll have to fight your way inside and plant C4 on the antenna! The JDAM is a pretty big strike however, and if you miss then you probably deserve to fail really…
 Take out General Han and the radio station |
Primary Objective 3: Rendezvous with team at extraction point:
You want to head directly west now. Ensure your squad are set to 'Return Fire Only', as your position still shouldn't be known to the PLA, they are just on the alert. Look at the map and locate the empty truck parked in the valley below. Follow the gulley in the hill as you move west. Spot the truck with your scope. It is by some camouflage netting. Ignore all the enemies to the south-west, there is just one enemy we need to worry about here, and he is looking in your direction behind a rock straight to the west. Pick him off while you are still in the gulley on the hill. You can then move down to the truck. There is a checkpoint here too. Set your team to 'Weapons Free' on the way, just in case there are any PLA in the area. We're throwing the stealth out of the window now, as everyone gets on board the truck. Note, there is a video below for getting to the truck and safely extracting.
It is possible to drive all the way to the beach without being shot at by the PLA, but you have to ignore the RV markers somewhat. Head straight for the first one until you are about 660 metres away. At this point, head directly west. Watch out for rocks in the field, as if you flip the truck you'll have to stealth your way to the extraction (or go all out and take out the PLA en route). Note that you can, however, find another truck on the road to the west too. It's not timed, so it isn't the end of the world, but it's much more fun to do it in the truck. With such last minute turns due to the low visibility and plethora of rocks, drive slowly at this stage. Drive towards the western field boundary marked by trees (and a road on the map) and then turn south-west towards the extraction objective marker – bypassing the RV point completely. This was all to avoid PLA patrols which block the direct route. You'll have to drive through some trees to get there, but keep it slow and it's not too difficult. Cross the road and back onto the grass again.
From here you can get the speed up as the number of rocks is greatly reduced, and race directly to extraction on the beach where Saber Three are waiting to take us back to base.
Take the truck to extraction
Achievement/Trophy: Bug Out (Successfully extract from the area) Bronze/20G
Extras:
There are lots of possibilities on this map, with by far the most interesting being to engage Han as soon as HQ says it's ok 'if the situation deteriorates'. You will have a lot of enemies on you, but it's brilliant to see how differently the mission could play out. You do still need to neutralise the radio station, however, so you'll have to make your way there. Once there, plant C4 on the mast and extract using the vehicle in the base. You can then tear down the hill and back towards the extraction beach. It's great fun.
There are no secondary objectives for using stealth, so don't feel constrained by it. Han may alter his movements if he knows there is an elite Spec-Ops team in the area though, so bear that in mind if you go around making too much noise.
I shot down the attack chopper (cobra) with small arms fire only ONCE. This was done by positioning my squad near the road with the bridge in the flight path of both choppers. I downed the cobra so he made a controlled crash landing while leaving the pilot alive. I had to eliminate the pilot and then repair the chopper an was able to fly it…AWESOME fire power with about 24 rockets and machine gun. Never been able to do it again. When i shot down the chopper, it was from behind and i believe a shot to the engine cowling did it.
In this level after you have called in the airstrike on the VIP and radio tower, look up behind the house and go to the top of the mountain so you can see the remains of the radio and your evac point. From the top there lie down and snipe at the enemy over at the radio tower area. I shot someone at 829m away. I used the binoculars to range find that's how I knew the distance. Happy sniping
thanks! ive been trying to get that achivement! did you know, you can get a wz-10 helicopter gunship in this mission? its the second one that flies overhead; very rarely it will land and its crew get out. look for it on your map. you can just get in it like a normal vehicle without the vehicle glitch! you just swoop over and kill gen.han with rockets, use more rockets on the radio station and fly down to the beach. the end. (its incredibly fast about 400mph)