Earthen Peak (1)
Thank you for printing this page from www.SuperCheats.com.
Remember to come back to check for updates to this guide and much more content for Dark Souls II
Follow this guide to hear about updates
Last Updated:
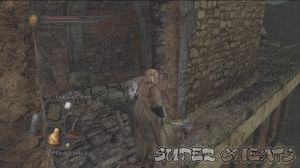
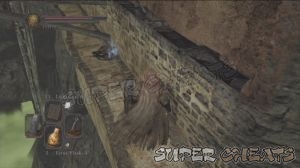
If you take the path to the right, you'll find a couple of hammer-wielding maulers inside the room. Avoid destroying the urns here since they're laced with poison. You can climb up the ladder and just ignore the mauler there and continue towards the next misty entrance where you have to fight another boss.
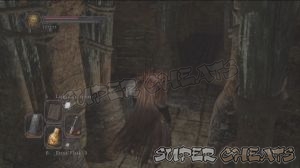
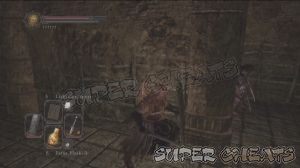
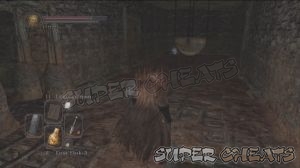
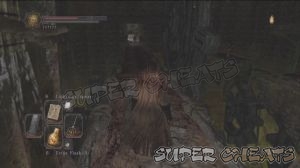
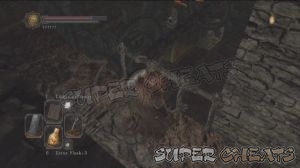
Boss: Covetous Demon
This demon is really slow but hits hard. Ranged characters can easily pummel it; just keep circling around it and roll away once it moves in for an attack. Melee characters need to keep circling it as well and after evading, land some hits. Just be careful when it is not turn around; it will most likely roll over you. Other than that, this battle shouldn't be that hard to win.

Slow, heavy and disgusting.
After winning the battle, you can check the room right before the entrance of the boss room. There's a chest inside with a mauler and some poisonous mushroom insects. The chest only contains a torch and it is rigged with poison gas so don't bother.
You can also sprint-jump to the ledge over the swamp below but you have to make sure that you consider your character will roll upon landing. I suggest lighting up the bonfire so you can respawn somewhere near just in case you didn't make the jump.

The next room has some fast and powerful headless, two-bladed enemies. Make sure to block their attacks and quickly move in to counter attack. After taking care of them, avoid stepping on the pressure plate in the middle of the path; otherwise, you'll be hit by an arrow trap. The chest may be visible but don't be fooled; there another enemy in the alcove to the left. Take it out first then loot the corpse in the other alcove to get Titanite Shard x3 and Soul of a Nameless Soldier. Open the chest to get a Heavy Crossbow +3 and x15 Heavy Bolt. You can now leave the area by jumping towards he stairs below or simply using a Homeward Bone to be safe.
Continue past the boss room and go upstairs to find the Lower Earthen Peak bonfire. You'll also find Lucatiel here if you've been talking to her whenever you encountered her, she'll give you a Ring of Steel Protection +1. Like before, exhaust her conversation options.

Lower Earthen Peak
Move forth and go upstairs. There are more of those fast, arm-bladed enemies so lure them one by one. Take out the mauler behind a cauldron then loot the corpse in the corner containing a Radiant Lifegem. Continue to the narrow pathway. Beware of the archers on the right side and the lance-wielding enemy ahead.
Go outside and turn to the right. You can reach one of the archers by enter the doorway to the immediate right if you haven't killed it yet. Continue through the doorway and go downstairs. A bladed enemy waits below so anticipate its attack and continue along the ledge to reach the chest containing a Pike.

Backtrack and approach the ladder. Don't climb it yet; two enemies will fall down so take them out first. After getting rid of them, climb up and take out another enemy. Enter the misty door to find the Central Earthen Peak bonfire.

Central Earthen Peak
Light up your torch and backtrack a bit. You have set the large windmill blades' shaft on fire. You can reach it by walking on the broken part of the wall, near the edge. This will make the blades to stop which will be useful in an upcoming boss battle.

Rest if you want and continue up the ramp and loot the nearby body to get x3 Black Firebomb. Be careful since there's a pressure plate near it that shoots bolts. Take out the enemy in the corner and loot another corpse nearby to get a Manikin Mask.
Ignore the ladder for now and go outside. There's another enemy to the your left; take it out and destroy the wooden railing. Continue along the ledge to the right to find a corpse that contains a Simpleton's Spice.

Backtrack behind you along the ledge to find an NPC named Laddersmith Gilligan. Pay 2000 souls and he'll move the ladder to allow you to access another ledge below. Exhaust his dialogue options to make him move to Maluja. You can also buy the Prostration gesture. Go down the ladder and loot the corpse there containing a Pharros' Lockstone and Twinkling Titanite.
Continue along the corridor. At the end of the corridor is a switch; pull it then ride the lift before it rises. There are enemies behind the urns so quickly loot the chest to get a Mirrah Shield. You should still be able to jump down back to the lift as it goes down to avoid fall damage.

Go back to the switch again and pull it once more to raise the lift. Quickly loot the corpse to get Large Soul of a Proud Knight and Divine Blessing. Quickly take the stairs to avoid getting crushed by the lift as it descends.

There's an enemy behind the three large urns; you can destroy them deliberately and hit it with a ranged attack. Continue forth along the corridor and take out the grave warden. If you go upstairs to the left, you'll find a group of enemies, including a group of sorceresses. Use ranged attacks to lure them then carefully open the crossbow-rigged chest to the left that has a Pharros Lockstone.

There's nothing else to do here so go downstairs again and follow the other corridor this time. Kill the sorceress using a ranged attack but don't sprint-jump to cross the gap yet. Destroy the wooden railing and drop down the ledge below. You can open the door ahead to give you access to backtrack. Continue forth and open the chest in the dead end to get a Greater Soul Arrow.
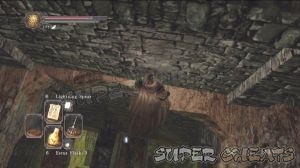
Backtrack a bit to the door you opened earlier and drop down to another platform below. You'll find another chest inside the low alcove to the left to get a Lightning Spear. If you drop down the ledge again below, you should be able to walk back to the lower Earthen Peak bonfire or make your way up again to the central bonfire.

Backtrack to the broken balcony again and kill the sorceress if you've rested and reset the enemies. When jumping, make sure to keep to the left since the other ledge has a broken floor. Loot the corpse to get a Radiant Lifegem and Soul of a Brave Warrior, and Crimson Water from the chest.

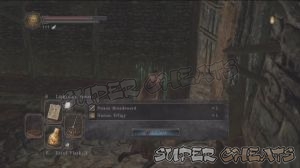
Now equip the Silvercat Ring (you should have one by now) and carefully hug the wall while walking along the broken part of the floor. To reach the item below and to survive, you have to carefully drop to the shaft below and keep hugging the wall so after the shaft breaks your initial fall, the doorway below will help break it even further. Take out the enemies and loot the corpse there to get a Poison Broadsword and Human Effigy. From there, travel back to the central bonfire.
Anything missing from this guide?
ASK A QUESTION for Dark Souls II
Comments for Earthen Peak (1)
Add a comment
Please log in above or sign up for free to post commentsNo comments yet. Tell us what you think to be the first.
Table of ContentsClose
Guide Updates
Get notified of updates to this guide
Many of our guides get updated with additional information. To get an email when this guide is updated click below.
 Join us on Discord
Click to close