The Daedric Artifact Quests
The Elder Scrolls V: Skyrim Walkthrough and Guide
The Daedric Artifact Quests
The Daedric Artifact Quests are a series of quests -- some story related most not -- that include an artifact in them that you can collect and by doing so (as long as you do not miss any) you will unlock an Achievement that is associated with them -- "Oblivion Walker" (30 GS).
You should have already completed A Night to Remember and Darkness Returns so they are not included in this section -- A Night to Remember will be in the Miscellaneous and Side Quests Section, and Darkness Returns was covered under the Thief Faction Section (Darkness Returns does not count for the total of 15 Artifacts for the purposes of this Achievement).
So without further comment here are the remaining quests for you to complete!
You can scroll down this page of the guide to find all the quests in section or use the links below to jump to the specific quest you are interested in.
A Daedra's Best Friend
The Black Star
Boethiah's Calling
Break of Dawn
The Cursed Tribe
Discerning the Transmutation
The House of Horrors
Ill Met By Moonlight
The Mind of Madness
The Only Cure
Pieces of the Past
The Taste of Death
Waking Nightmare
The Whispering Door
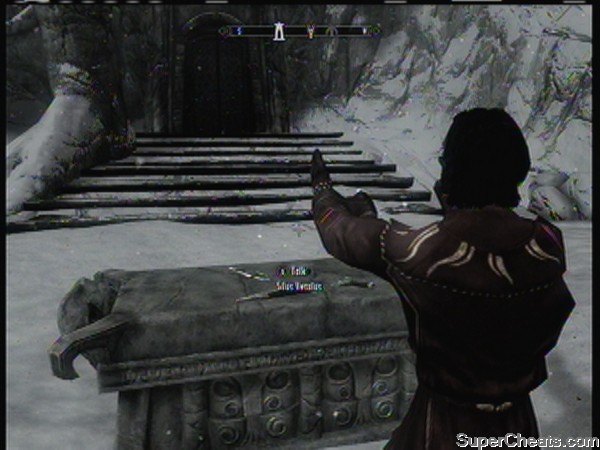
A Daedra's Best Friend
You flag this Side Quest after speaking with the talking dog Barbos on the road outside of Falkreach. You need to journey with him to the shrine of Clavicus Vile in order to help him reconcile with his former master, or so he says...
When you are ready to do the quest you need to follow Barbos to the Shrine. If you flagged it and did not immediately follow him, he will be in the Shame at the Alter waiting for you.
You need to get to the Shame, and to do that you need to go through the mine -- so head through and fight your way past the Vampires that occupy the mine, emerging out the other side and you come to a large chamber in which there are several powerful Vampire -- and if you got separated from Barbos he will be here fighting them! Take them out.
Activate the Shrine and Clavicus Vile will talk to you -- he asks you what you want and, when you tell him you are here to unite him with his dog he gets rather cross with you... He wants an axe -- a specific and powerful one -- and he wants you to bring it to him. If we do that, we get our wish -- no questions asked. He says Barbos can lead us right to it.
Talk to Barbos to learn about the Axe and then head to the marker to obtain it. There is an exit above and behind the Shrine -- use that and fast travel to the marker, or as close to it as you can get since you probably do not have it discovered already -- then hoof it the rest of the way!
When you reach the cave you go inside and battle a powerful mage and his Fire Atronachs -- and then take the Axe from the table in the back and then exit the cave and fast travel back to the Shrine.
Basically we need to get him to take the dog back -- so we have to insist upon his taking the dog and the axe together -- and once he does, you should ask for Masque of Clavicus Vile (that is the actual artifact not the axe). After he takes the axe and the dog they become part of the Shrine!
The quest ends with you receiving the Mask.
The Black Star
This Side Quest is flagged by talking to the mage at the top of Azura's Shrine when you are doing the Miscellaneous Quest of that name. You encounter Aranea Ienith, who claims that the Gods predicted your coming -- you are the Chosen One! That's right, Azura has picked you to be Her Champion.
After you agree to this, you flag this quest, and are instructed to find the Elven Mage in Winterhold.
When you inquire at the College you eventually learn that the person you should speak with is Nelacor -- and when you track him down you learn the big secret after you bribe him with some coin... So it is a Soul Gem that is reusable! Interesting!
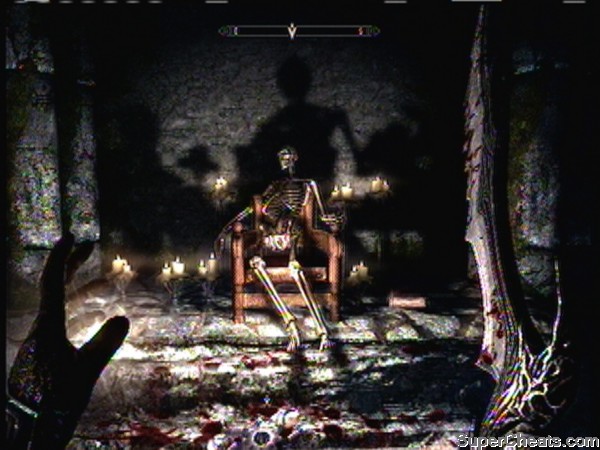 The Mystery of Varen Solved |
Ilinolta's Deep is our next destination -- which is just north of The Lady Stone. When we get there we find it is a flooded Keep with a trapdoor on top. Heading inside we discover that it is occupied by evil mages -- so we need to kill them.
Eventually we reach a barred door, raise the bar and go in, and shortly zone. and then work your way along the obvious path until you arrive at the last chamber with a ladder leading up to Skyrim. In this chamber you will find ashes and skeletons scattered around and the bones of Malyn Varen -- remember Malyn Varen? This is a quest about Malyn Varen -- sitting in the chair.
The Broken Star of Azura is on the floor at the foot of the chair by the ashes -- take that and return to Nelacor now!
There are actually two possible special Soul Gems you can get, Azura's Star (from the Mage at the Shrine) or the Black Star (from Nelacor) -- basically you want the Black Star because it is a reusable Black Soul Gem.
After he examines the Star he tells you that we need to deal with Varen, who is still inside the Star... He wants to Soul Trap US?! Ah well, you cannot live forever, right? When you are ready let him Soul Trap you -- and when we get inside take him out!
Thankfully he pulls our soul back out of the gem -- he finishes the repair and then gives you the Star, ending the quest. Good on ya! Well done!
Boethiah's Calling
Reading the book Boethiah's Proving flags this Side Quest, and sets you on the path to yet another Daedric Artifact. The thing is, you really should read the book -- it is not only interesting but it makes this quest make a lot more sense. I am just saying...
Our task is to locate and reach the Sacellum of Boethiah -- which is in the far east -- so get as close as you can and hoof it in. When you arrive you encounter a Priestess of Boethiah who challenges you -- letting you know how low you are in the pecking order of life according to her God. You need to exhaust the conversation options with this woman in order to build rapport, and then you learn that the price of admission here is bringing a sacrifice to the Shrine and, well, sacrificing them... And if you did not figure this out it has to be a follower.
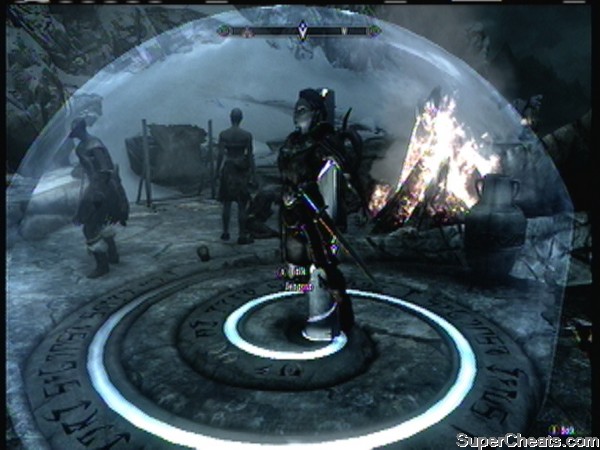 A Sacrifice Most Vile |
Since I did not want to kill anyone I know, I went to the Drunken Huntsman in Whiterun and hired a Mercenary follower, and then fast traveled back to the Shrine and took them up to the top of the Shrine and tell them to use the pillar, and they will become trapped. Now just kill them and the God will appear all angry and annoyed. A ballsy approach is best -- and once you tell the Conduit that you are not afraid the quest advances, and the Conduit tells you all that whoever is left alive is The Man!
Basically you need to kill all of the cultists and once you do the Conduit will address you again. Say what you know you have to and the Conduit will order you to take out her current representative -- him and his band -- and it has to be all stealth kills mind you... Hope you leveled Sneak... If you did not look at the Power Leveling Section for how to do that in half an hour.
When you arrive at the Ridge the outside people do not count so kill them as efficiently as you can, but the people inside the mine DO count. So stealth kill them right? Just move slow and stay in the shadows, and once you kill the last one loot the set of Ebony Mail and equip it, and the God talks to you, telling you that you can keep the armor. The armor IS the Artifact, so carry it or go stash it in your house, just do not sell it, right? This ends the quest!
Break of Dawn
Fast travel to Dragon Bridge and head north -- you are looking for a honking huge Statue to Meridia! No worries here mate, you will know when you have found it! When you approach the Statue talks to you -- obviously this is another Daedric Lord. Listen as it explains what it wants from you...
The quest item is called Meridia's Beacon -- here is the thing, it can spawn practically anywhere, so I cannot tell you where it will be for YOU. Wherever it is, go there and obtain the Beacon; it will not be that hard it is really. There will be protectors and likely a puzzle to get past.
Once you have the item she will talk to you again telling you to return to the Statue and that your job is not quite done! Fast travel back and when you replace the Beacon on the Shrine you are summoned above to meet with the Daedric Lord -- who tells you that she wants you to go to her Temple, kill the Wizard, retrieving her Artifact (Dawnbreaker) and restoring justice in the world, Hoo-Rah!
After you agree you are returned to the world and you should drop down below to the Temple, go in and kill the Wizard, and then (don't you just LOVE "and then?") you will have fulfilled your duty to the Daedric Lord!
 The Face of a Daedric Lord |
But there is always more to it than that, right? Halfway down the hall is a locked door -- pick it and throw the lever inside, then continue along the marked path to the light you just let in with the Lever and activate the first pedestal. Now continue along the path, free the three Captured Souls by slaying them, and activate the second pedestal.
Head out the side exit to this chamber and follow the path to the next large chamber, free some more Souls then jump across the gap and activate the next pedestal. You are doing really well mates! Hop back across and go through the door to zone to the Balcony, and then follow the path and zone back into the Ruins and free some more souls then activate the next pedestal above!
Make your way to the other side above and hop to the platform to activate the next to last pedestal, and then look up -- see the last pedestal? You need to get to it. You accomplish this by going through the door in the back and up the ramp, then through that area to the pedestal and activating it! That opens the door for which there is no key -- so head back below and zone into the Catacombs through the now open door!
--== The Catacombs ==--
In the first chamber you activate another pedestal to open the door and follow the path, and you finally encounter the Wizard! He will use Frost-based attacks so quaff a Resist Frost Potion and be sure to stay healed as you struggle to him and kill him. When he dies his Shade is summoned -- kill THAT and you have completed this part of the quest!
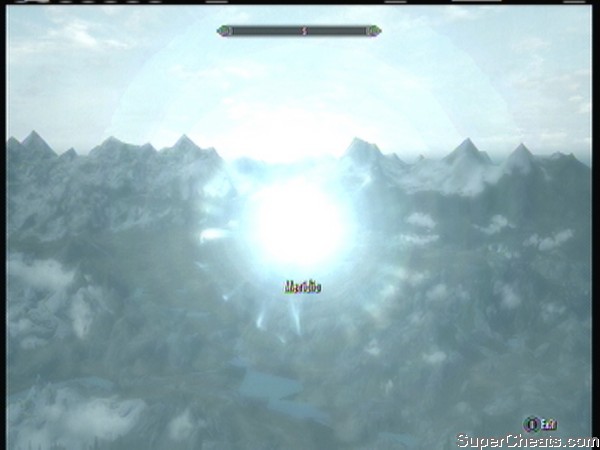
The Daedric Lord instructs you that it is done, and to take Dawnbreaker from the pedestal -- do that -- and it is added to your inventory and you immediately zone out to the sky above where you have been summoned once again by the Lord -- she has her final say and gifts you with the Daedric Artifact Dawnbreaker! Good on ya mates! That is one more Artifact acquired!
Now I don't know about you but the first Deadric Heart I acquired was used to craft a Daedric Sword which I then upgraded to Legendary and Enchanted with 28 Fire, 28 Shock... That gives it a Damage of 163 plus the magic effects, and while Dawnbreaker is cool and all, it is nothing close to my personal weapon, so I am sticking with that!
This ends the quest!
The Cursed Tribe
BEFORE you go to flag this quest make sure you have Troll Fat and a Deadra Heart in your inventory.
To flag this quest head to the Orc camp of Largashbur (it is below Riften and to the west of Darklight Tower if you have yet to locate it) and you will encounter a battle in progress: Orcs Vs. Giant. Help them out and kill the Giant and one of two things will happen -- either you will have arrived in time to save the pair of Orcs battling the Giant and then be asked to help them break the curse that has been placed on their camp (this is good) -- or the two Orcs are dead, and there will be NO Orcs to ask you this and you will have to go into the longhouse and talk to the Chief and do a fetch quest. Hopefully you will get the shorter version -- but if not...
I am assuming that you saved the Orcs -- if not you may want to reload your last autosave and approach the Camp again and this time actually save them... After the conversation you are asked to help, and the Orc tells you what is needed.
 The Transformed Artifact |
Hand over the required ingredients and the ritual will commence but things do not go quite as planned, because Their Personal Daedric Lord is pissed. He is angry about the Giants and until the Orcs deal with that problem he will be withholding his love. The Chief blames all of this on you and demands that you accompany him on the quest and serve him. Fine! We can do that, we don't even need a reason, but this was clearly NOT our fault!
Instead of following him to the cave you may want to just head straight there yourself -- it is northeast of Riften -- since he takes a very long walk down the garden path on his way, including through Riften! If you go straight there just wait for him to arrive to begin this part.
Basically we need to follow the Orc Chief to the Giant's Lair and keep him alive until we reach the designated chamber with the Giant Leader in it, at which point the coward tries to weasel out by paying YOU to do the killing. Here is the thing, this is a plot split-point. You CAN accept his offer, but if you do you will kill the Giant Leader and he will get the glory. You do NOT want to do that because YOU want this Artifact to be YOURS. So instead tell him no, a deal is a deal, the Lord told him to do it, and it is his to do. He will promptly get himself killed and then you can kill the Giant Leader, take the Club, and return to the Camp.
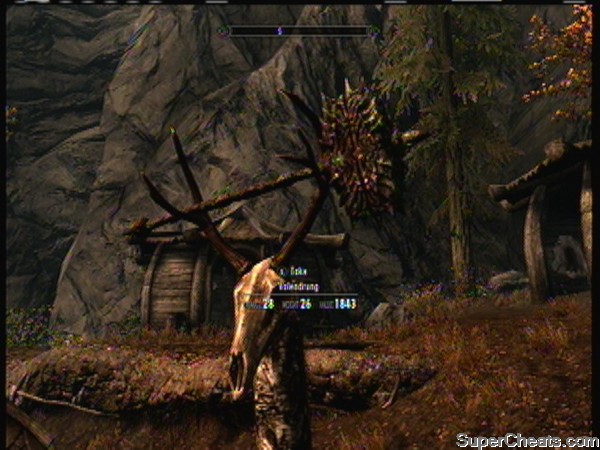
When you get there place the Club on the alter and it will transform into the Daedric Artifact Volendrung -- and the Lord will declare you his new champion and gift it to you! There ya go mates, that was the outcome we desired!
With that the quest ends and you have acquired yet another Artifact!
Discerning the Transmutation
In the process of completing the Elder Knowledge Quest from the main story we flag this Side Quest -- and we go about finding Septimus Signus and the Elder Scroll, head to High Hrothgar, and have our battle with the World Eater. But now that we have saved the world, won the day, and managed to do it without falling ill with the ego disease Lindsay Lohanitus, it is time to embark upon the rest of the story with old Signus!
So, Lexicon in hand, return to his lair in the frozen north and present him with it, whereupon he becomes very happy but then you he decides you need to collect a bunch of blood samples for him... Now as you leave you have to talk to the Wretched Abyss which is blocking the exit -- the Daedric Lord who Septimus is working with. It seems that the Daedric Lord is only interested in getting the box open -- and he wants you to kill him once the deed is done so that you can replace him! Tell him what he wants to hear, and then go on your way!
Basically that means harvesting the following:
-- Orc Blood
-- Falmer Blood
-- Dark Elf Blood
-- Wood Elf Blood
-- High Elf Blood
You can easiily find the following at Alfrand:
Any Fulmer will work.
The body of Yag gro-Gortwog will give you Orc Blood.
 Making an Important Choice |
The Elf Blood can be obtained in Liar's Retreat with is southwest of Solitude and directly west of Chillwind Depths. Head there and take the blood samples from the bodies of the dead bandits -- you can get all of it here except High Elf. Basically their bodies will be in the main room along with some Falmer who killed them.
Last but certainly not least is the High Elf, which we can find in the Thalmer Embassy! So head there and kill one -- I just picked the gate lock and attacked the guard outside the entrance myself -- harvest its blood and return to the Lair and talk to Septimus to have him complete the preparation and open the box.
Inside is a book called the Oghma Infinium -- this is the objective and the Artifact -- talk to the Wretched Abyss at the exit to the box and you will hear his praise. He explains what the book is, and tells you how to read it. After he finishes talking to you and vanishes the quest ends but you are not quite done.
Open the book and read it and you have to pick from three paths or not read it. These paths are:
Might: 5 in Archery, Block, Heavy Armor, One-Handed, Smithing, and Two-Handed.
Shadow: 5 in Alchemy, Light Armor, Lockpicking, Pickpocket, Sneak, and Speech.
Magic: 5 in Alteration, Conjuration, Destruction, Enchanting, Illusion, and Restoration.
Just choose the one that works best for you! Reading the book and making your choice removes it from you but no worries, you still get credit for getting it... Now the quest is really done, so good on ya!
The House of Horrors
Note: The Quest Giver for this quest can be killed. IF he is killed and you cannot flag this quest. You can try to go to the bartender in the Silver-Blood Inn here in town and ask the bartender about rumors. If he does not tell you about the rumor of the investigator, try leaving and go back in, and keep doing that until he does flag the quest or you have done it enough to know it is not going to happen. If this does not work, then you cannot do the quest on your current save, sorry... The town can also be bugged by the quest that sends you into the mines as a prisoner, and he can die during the aftermath of that quest. Again, if he is killed, you cannot do this quest, you cannot complete the Achievement.
 The Abandoned House in Markarth |
To flag this quest head to the town of Markarth and look for the Abandoned House there -- outside you will find Vigilant Tyranus who will ask you if you know anything about the house -- you see it has been used for Daedric Worship. After you flag this quest follow the investigator into the house and the story plays out until you have to kill him when he attacks you.
After that you speak with the Daedric Prince, Molag Bal, and do as he says (you really have no choice here) and you will be told what he wants you to do. Head to whatever Forsworn camp he marks on the map and clear out the Forsworn to rescue Logrolf the Willful and then return to the Abandoned House.
Kill Logrolf will end up downstairs and trapped, then you are told to put the beat-down on him! DO that and then again and finally you will be told to kill him -- your reward is the Daedric Artifact Tge Mace of Molag Bal -- well done! That is one more Artifact down!
Ill Met By Moonlight
 The Daedric Lord Hircine |
Speak with Mathies at the graveyard in Falkreath and ask him who died then for the details -- then talk to Sinding the Prisoner in the barracks to learn his version of what happened -- starting with the Cursed Ring of Hircine. You agree to take the ring back to the Daedric Lord for him and then he escapes.
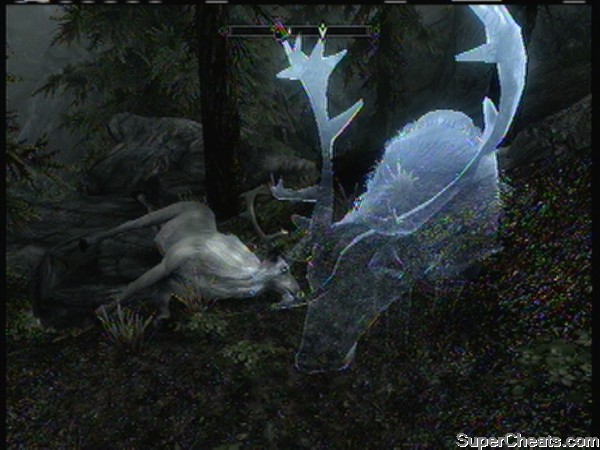
What you need to do now is track down the White Stag and kill it, and Hircine will appear as its spirit form and talk to you. He tells you that he wants you to hunt down and kill Sinding in order to please him.
Track Sinding to the location on the map (not sure if it is random or not but for me it was The Bloated Man's Grotto) and kill him -- actually you have the choice to either kill him or the hunters but you were asked to kill him so...
Talk to the wounded hunter and then talk to Sinding -- then kill and skin hom and Hircine appears again. The skin is actually called The Savior's Hide and it is Light Armor you can wear if you want and also the Daedric Artifact for this quest!
This ends the quest and you now have another Artifact.
The Mind of Madness
This Side Quest is flagged by speaking with Dervenin the disturbed man wandering near the Bard's College who is the target for the Miscellaneous Quest Investigate the man wandering the streets near the Bards College.
The first step in this quest is speaking with the maid Erdi in the Blue Palace -- she has the key to the wing and will give it to you if you tell her that Falk asked you to check it out. The entrance is the door to the right of where you speak with Erdi. Head through the door, up the stairs and along the hall and suddenly we zone to a tea party in which we meet a character from Oblivion and an homage to Lewis Carol!
Talk to Sheogoroth and tell him you are there to deliver a message and then deliver the message. The conversation goes a little sideways and then he introduces himself as the Daedric Prince of Madness. He agrees to leave -- and you ask what the catch is. The catch is you are being manipulated!
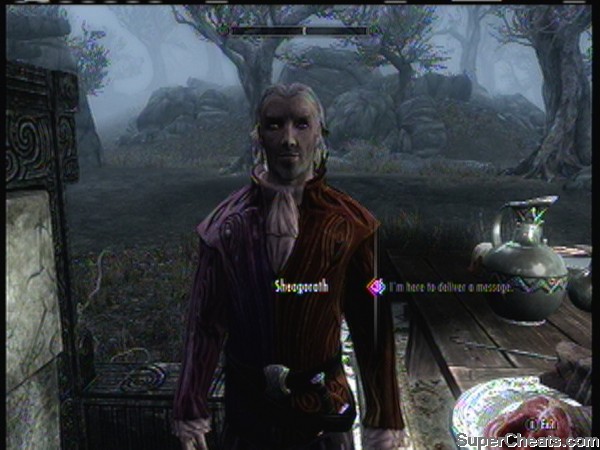 The Daedric Prince of Madness |
He then gives you the Daedric Artifact called The Wabbajack -- which you automatically equip -- and now you need to find the way out! Basically there are three arches with paths beyond them -- pick the closest one and go to the end where you will see a battle. He says to use the weapon on the monsters but instead target the guy on the throne on the left across from you, and that solves this puzzle.
Now head back and take the first arch on the left -- that leads to the path of Dreams -- well, specifically Night Terrors but still. Target the bloke on the bed with the Wabbajack and then target whatever gets summoned -- rinse and repeat that process until the quest ends.
Now for the final arch -- head back and to the arch on your left and you see a really small version of the man and a large version -- use the Wabbajack to first make the one big then the other small to complete this part of the quest!
Now head back and chat with Sheogoroth again and and after you exhaust all the chat options you are back in Skyrim and you got to keep this Daedric Artifact! Nice one, this has to be the best weapon in the game!
The Only Cure
Go to the Shrine of Peryite northwest of Karthwasten and you will talk to Kesh the Clean, who will tell you about Peryite. and then about the incense. He needs you to fetch the following items:
-- A Flawless Ruby
-- Deathbell Flower
-- A Silver Ingot
-- Vampire Dust
If you have been hording resources you may have all this at home -- if not go collect or buy it now. It is quests like this one that are why you should never sell flawless stones...
Once you have the items return to him and talk to hand over the ingredients, and you will then inhale the fumes and have your audience with Peryite. Exhaust the chat options and learn that he wants you to kill Orchendor -- his former acolyte.
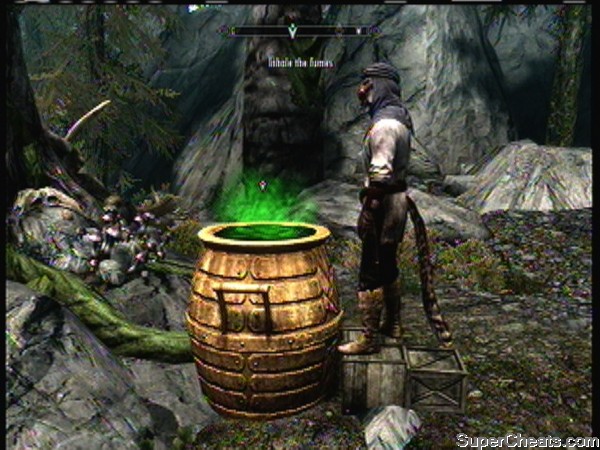 Incense to call a Daedric Lord |
Simple enough really, get as close as you can to the marker on the map and then hoof it the rest of the way, track this Orchendor down and kill him.
Of course there is more to it than that... You have to work your way through the maze of another Dwarven dungeon and, oh yeah, battle an army of the Afflicted along the way! By the time you actually get to him you are going to be very eager to make him dead!
I have to admit that this was the quest that pretty much soured me on the entire game. From this point on it was no longer fun, because they got lazy and instead of making this interesting they made it tedious... They buried this guy so deep in a pointless dungeon through zone after zone after zone so that you can mindlessly kill Afflicted and mechs with nothing to explain WHY you are doing it.
After you kill him loot him to get the lift key and a skill book, then use the lift above to leave this tedious place and return to the shrine and use the incense pot again to talk to the Lord -- and your reward for doing his bidding is the Daedric Artifact Spellbreaker, a shield. It is actually sort of cool but not really worth what we had to tolerate doing this quest...
Pieces of the Past
This Side Quest is flagged from Silus Vesuius, the Museum curator in Dawnstar during the Miscellaneous Quest to visit the museum. After you follow him inside and exhaust all of the chat options you learn more than you probably wanted to know about the Order -- and you advance this quest getting your immediate goals added to it!
You need to retrieve the three broken pieces of Mehrunes' Razor, so head to the first marker at Cracked Tusk Keep -- fight your way to and into the Keep until you battle Ghunzul -- loot his body for the Vault Key and then go to the door to the Vault and go in to get the blade shard from the rear. Lots of traps so haul your butt out of here fast!
Next marker on the map is at Dead Crone Rock which is near Markarth. So fast travel there and then run along the path to the road leading to Hag Rock Redoubt, which you have to travel through to get to Dead Crone Rock. Go through Dead Crone Rock all the way to the top and you will find a named Hagraven named Drascua with the Pommel Fragment on him. After you kill him and take it, head to the nearby Word Wall to learn Run, Dismay.
 Calling Upon a God to Repair the Artifact |
Now for the third and final piece is in Morthal, so head there now and speak to Jorgen at the Mill -- he denies knowing anything about it. Persuade him to give you the hilt and he gives you his keys and tells you where the fragment is. The house is directly across from the Mill so head in and grab the Hilt then return to Silus in Dawnstar.
Now here is the thing -- he will admit that he knows how to put the weapon back together -- he has the fourth and final piece and he knows that Dagon at his Shrine can fix it. Meet him at the Shrine and watch as he puts the pieces on the alter but for some reason the God will not talk to him. He asks you to try and yes, he will talk to you!
Dagon demands that you kill Silus -- and you do have to kill him because you cannot get the Artifact any other way. Sorry. Talk to him then touch the alter and the artifact is repaired!
Before he lets you leave though, he summons a pair of Daedra for you to battle! After you kill them be sure to loot them and take the Shrine Key and their hearts! You need one of the hearts for another of the quests so do not use it. Inside the Shrine are two more Daedra you can kill for their hearts and some nice loot including a Skill Book, gold ingots, enchanted kit and some Glow Dust (you need that for another of the quests) -- so your call!
The Taste of Death
Journey to the Silver-Blood Inn in Markarth and speak with the bartender to get the Hall of the Dead quest. Speak with Brother Verulus and persuade him to tell you what is going on. He tells you that some of the dead are being eaten -- they do not know what is doing it but the mystery needs to be solved. He gives you his key and admonishes you to be careful.
Inside the Hall of the Dead you will hear a voice -- when it is done speaking Eola runs up to you and starts talking to you -- she thinks you are one of her kind, eaters of human flesh... Find out the location of the lair and then you flag the quest. Return to let the brother know that the Halls are safe again, and then leave town and fast travel to the Reachcilff Cave.
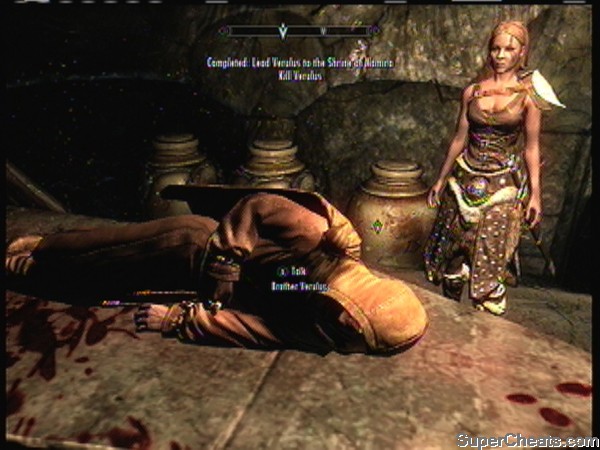 Dinner is on the Table |
When you arrive Eola meets you outside and tells you that the enemy is within... You should leave her outside and do this yourself -- tell her that and go inside and clear out the undead. Once you have done that return to Eola and tell her, and she will ask you to help prepare a feast...
She wants you to lure Brother Varius to the Shrine and gives you gold to pay him to come and help explore the cave (your cover story). So go do that and bring him back, and when you get to the feast area the feasting umm... Yeah...
If you are wondering, yes, you have to eat some in order to get the Artifact... So dig in and the Daedra Lord will then talk to you -- she is pleased with your gesture and gives you her ring -- The Ring of Namira -- which is the Artifact for this quest!
That completes the quest... Now you should go home and brush your teeth.
Waking Nightmare
 The Skull of Corruption |
Head to Dawnstar and speak with Erandur at the Inn about the nightmares that the people of Dawnstar are having and he explains that the dreams are the acts of a Daedric Lord. Offer to help him and then you will follow him to the Nightcaller Temple in the Tower of the Dawn. You may want to run ahead and kill the pair of Frost Trolls that are sometimes outside...
Talk to him outside to get the rest of the story and then head inside and battle your way to the library where you need to find the book The Dreamstride. Now you need to find Vaermina's Torpor in the laboratory in order to enter Dreamwalk, at which point your goal is to find and activate the chain that will release the Miasma.
You need to remove the soul gem to stop the force field, after that and then make your way to the sanctum and kill Veren and Thorek -- you then need to kill Erandur so that you receive the Skull of Corruption (if you choose not to kill him then he will travel with you as a companion but you do not get the Artifact).
Wait for him to remove the barrier and then the Daedra talks to you -- Kill him and then take the Staff thus completing this quest and scoring another Artifact! Well done!
The Whispering Door
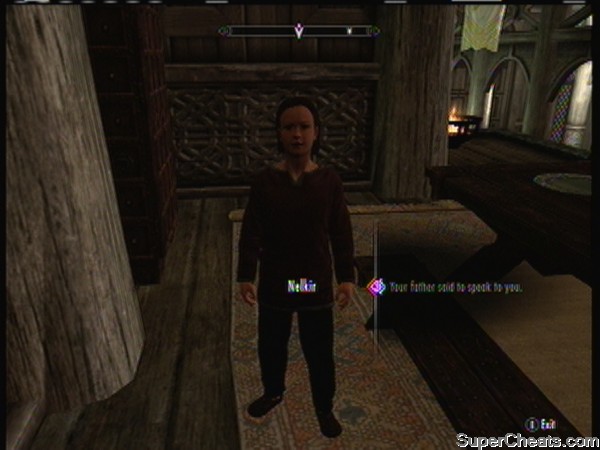 The Bad Little Prince |
Head to Whiterun and speak with the bartender at the Bannered Mare to hear the rumors and you will learn that some of the Jarl's children are acting oddly -- head to Dragonsreach and speak with the Jarl and ask about it. The Jarl tells you that his youngest son is a dark child and has changed, going silent.
The Jarl asks us to speak with the child, and when we do we find a very disagreeable and calculating if indiscreet young man. Further questioning reveals that he has been listening to the Whispering Lady at a door in the palace basement. You learn where the door is from the boy and head there, listening at the door.
The voice you hear is clearly a Deadric Lord! Work through the conversation options and then talk to the boy again to learn how to open the door. Unfortunately the key and the door are closely held secrets and talking to the Wizard or the Jarl will not get us the key no matter what, so we are going to have to steal it. I hope you have leveled sneak and pickpocket!
You might think that the Wizard would be the easy mark here but he is evidently very aware of his body because 9 times out of 10 you get caught by him -- of course there is the 10th time... You might have better luck waiting until he is asleep since you have easy access to his quarters -- once you have the key go in and open the door.
On the table is a sword and a book -- READ the book!
To complete this quest simply pick up the sword and listen to the Daedra Lord make her impassioned pitch to you -- and the quest ends! Well done! That is your last Artifact and you unlock the Achievement "Oblivion Walker" (30 GS) for your effort!
what about the staf of magnus
u forgot sanguine rose quest a night to remember
you can find the dark elf and wood elf i whiterun dark elf is a the drunken huntsmen and wood elf lies behind warmaiden and your house
First of all the Ebony Mail is received from the Boethias calling, you get the Skeleton key from the thieves guild questline, it is Nocturnals artifact.
for the meridia quest perhaps it is on a diffrent level of the sanctuary
For one of the quests u don't really need a dark elf u can use a wood elf as well to complete the sacrifice it worked for me
You forgot Nocturnal during the thieves guild quest line, this is where you get the ebony mail... Do the thieves guild, you cannot get the achievement without it.
Yo all I have to get is the black star any tips to get it quickly
Hey, your missing the Ebony Armor Daedric Artifact (a enchanted armor that poisons enemy's when they get to close to you, and greatly increases your sneak skill).
Where do I find the Steward in Solitude to buy the house? The Steward with the Jarl does not provide me the option of purchasing one and he is the only Steward I can find.
what may be the 15th one if i may ask?
because i only counted 14 so if you are referring to hercine's ring, it doesn't matter if you get the ring or the saviors hide.
you can even get them both so, what is the 15th one?
yo theres 15 artifacts nt 14 wheres the last one
go to the college of winterhold and their is at about two dark elfs
I am trying to do Boethia's calling but i cant find a dark elf since Jennessa already died on me. I tried the one jorvassker but it didnt work for him either. Does anyone know of another dark elf that can become your companion and be used for Boethiah's Calling?
Yeah so I was trying to do Meridia's Quest but the beacon was in the Dawnstar Dark Brotherhood sanctuary. The quest arrow said it was in a corner but all that was there was a torture device, is there anyway to reset the location?