West Elizabeth Walkthrough
Red Dead Redemption Walkthrough and Guide
Agent Ross's Missions
(West Elizabeth Walkthrough)
Complete 'An Appointed Time' in Abraham Reyes' mission line and then meet Agent Ross in Blackwater to get started.
Bear One Another's Burdens
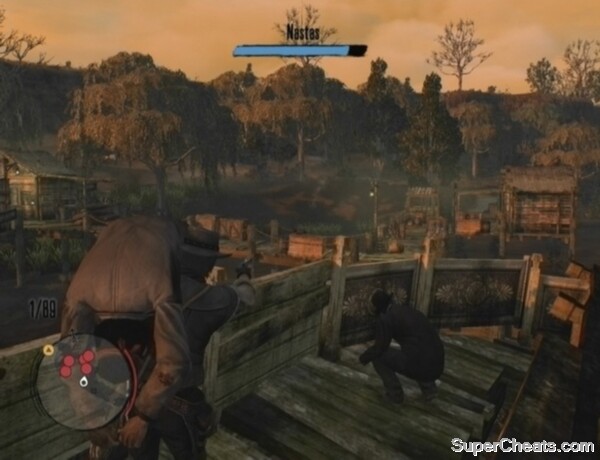
Dutch van der Linde is hiding out at the Wreck of the Serendipity in West Elizabeth, according to a U.S. government informant. You must go there with agents Ross and Fordham and bring Dutch to justice.
You can skip the trip to the Serendipity or sit through it and listen to the dialogue between the three characters. When you reach the wreck, get out of the car and follow Agent Fordham down to the pier. You'll hear a man calling for help from the top deck of the ship along the pier. To get to the top deck, step onboard, walk around the front of the ship, head up the stairs on the other side to reach mid-deck, then walk to the other end of the deck and proceed up the stairs there.
 You can still wield your new High Power Pistol while carrying Nastas. |
Approach the bound man to trigger a cutscene. You must carry Nastas back to the car while fighting off Dutch's men. Nastas' health meter is visible at the top of the screen. If the meter is completely depleted, you'll fail the mission, though Dutch's men are more likely to target you than Nastas.
You can only wield a handgun while carrying Nastas and you can't enter cover or crouch. Fortunately, the High Power Pistol Agent Ross gave Marston during the cutscene shoots fast and deals plenty of damage. If you're low on health, hang back and wait for your health to replenish or use Medicine to restore your health instantly.
Kill all of the enemies marked on the Mini Map and then follow Agent Fordham back to the car. The car will break down on the way to Blackwater and another wave of Dutch's men will appear. You must defend the car from these enemies.
As soon as you regain control over Marston after the cutscene, take cover with Fordham behind the short boulder along the left side of the road and use your High Power Pistol to pick off the enemies as they approach. The High Power Pistol should be able to kill most of these enemies with one or two body shots. You can activate Dead Eye and tag their heads if they're getting too close.
 Defend the car from Dutch's men. |
Kill all of the enemies marked on the Mini Map and then either skip or sit through the rest of the way to Blackwater to complete the mission.
Great Men Are Not Always Wise
Climb up the ladder to reach the roof and pick up the sniper rifle ammo by the chimney next to the yellow marker. Hit the yellow marker to get started.
Dutch is holed up in the bank at the other end of the street. One of Dutch's men will soon come through the front doors with a hostage. Look through your scope, but don't take a shot until the hostage taker pushes his hostage outside. Shoot the hostage taker in the head and another of Dutch's men will run outside.
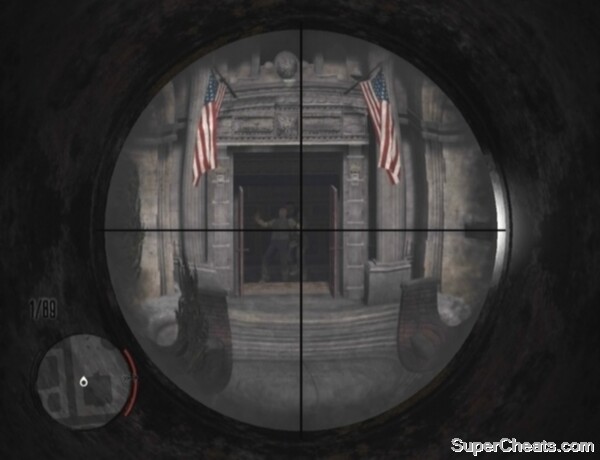 Don't shoot until the hostage taker pushes his hostage outside. |
You must prevent Dutch's men from escaping. They'll make a run for their horses, which are hitched to the hitching post across the street from the bank. Use Dead Eye to take out the fleeing outlaws. You don't need to tag your targets when looking through the scope of a sniper rifle.
Activate Dead Eye just long enough to slow your target down. As soon as you've shot him in the head or body, click the Right Stick to deactivate Dead Eye to conserve your meter. Two of Dutch's men will run out of the bank after you kill the hostage taker; take them down before they can escape.
If you have Chewing Tobacco, you can consume it to instantly replenish your Dead Eye meter. Chewing Tobacco shouldn't be necessary here if you switch Dead Eye off as soon as you've killed your target.
There are three snipers visible through the bank windows. There are snipers in the middle and right-side windows on the upper floor and one in the left-side window on the bottom floor.
Five more outlaws will eventually run out of the bank and attempt to escape. These guys will run off to the right, so activate Dead Eye and cap them before they get away. Eliminate any remaining outlaws marked on the Mini Map to move on.
Sniping Dutch's men
After the cutscene, sprint toward the bank and equip your High Power Pistol. When you reach the bank, aim and shoot between the two door knobs to open the front doors. With that, sprint through the front doors and take cover behind the counter in the lobby. There are four outlaws to deal with here -- one of them holding a hostage.
The guy to watch out for is the outlaw coming down the stairs to your left, as he can get a bead on you when he takes cover below the window at the bottom of the stairs. Blast him as soon as he comes down the stairs and appears in the glass window behind the bench to your left. Take out the two outlaws visible through the bars in front of you when they emerge from cover to shoot.
When you've killed the first three outlaws on the first floor of the bank, leave cover and proceed through the doorway to your left. Once through the doorway, turn right and look down to spot the hostage taker in the doorway at the other end of the room. He'll kill his hostage if you get too close, so stay in the doorway, activate Dead Eye, tag his head and fire to kill him and free the hostage.
Proceed up the stairs to the second floor after rescuing the hostage. Take cover behind the desk at the top of the stairs and use your High Power Pistol to take out the three outlaws here. With that, hit the yellow marker in front of the door at the other end of the room to confront Dutch.
Finding Dutch
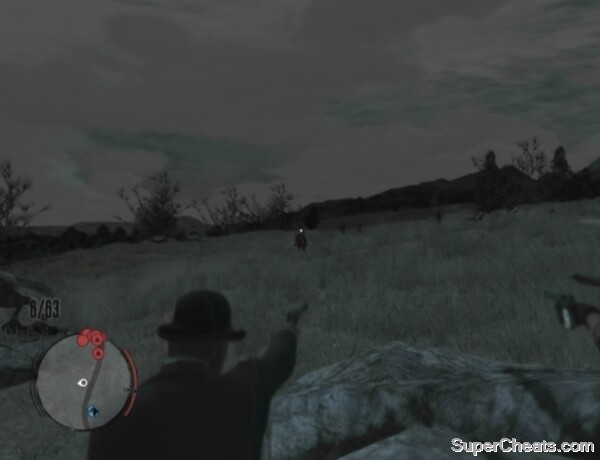
Dutch is getting away. Exit the bank, hop on your horse and start following the agents. You'll soon reach a forest. Dutch's men are here as well. You can stay on your horse and pick them off with your High Power Pistol or dismount and get behind cover.
Kill all of the outlaws marked on the Mini Map and then join the agents at the cabin to complete the mission.
And You Will Know The Truth
You must complete 'The Prodigal Son Returns (To Yale)' in Harold MacDougal's mission line before you can undertake this mission. The army is readying an assault on Cochinay, Dutch's mountain hideout. They want Marston to come along.
During this mission, you'll be in control of the turret that's mounted on the back of agents Ross and Fordham's armoured car. The agents will drive to the army camp outside of Blackwater and then to Tall Trees. The plains on the way to Tall Trees are swarming with Dutch's men, so put that turret to good use. The machine gun has infinite ammo and doesn't need reloading, but you are left vulnerable to enemy gunfire while manning it. Use Medicine to restore your health if you're close to death.
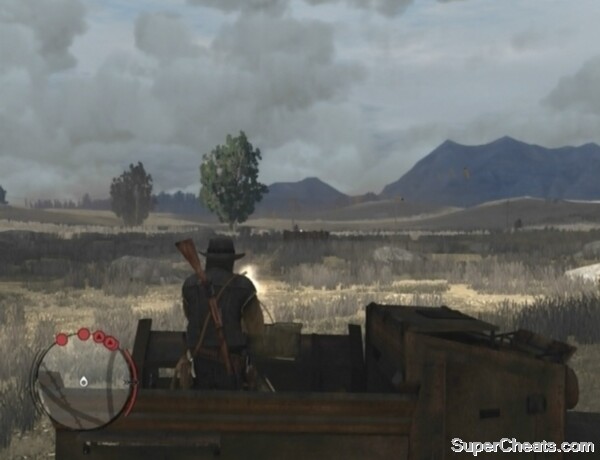 The turret will make short work of Dutch's men. |
As you're nearing the forest, a wagon filled with explosives will come careening toward the armoured car. A 'Look at wagon' prompt will appear in the bottom-right corner of the screen while this is happening. Target the wagon with the machine gun and blow it up before it reaches the car. Continue gunning down Dutch's men until you reach a cutscene.
And the Truth Will Set You Free
This mission immediately follows 'And You Will Know The Truth.' The armoured car is trashed, so you have no choice but to go the rest of the way on horseback. The trip through the forest is long and uneventful, but there's at least enough dialogue between the characters to keep the journey somewhat engaging. You can ride ahead of the group if you prefer and get to Cochinay by following the yellow line on the Mini Map, but you're still in for a long trek.
Continue following the agents and soldiers through the forest and you'll eventually reach Cochinay's front gate. After the army blows open the gate, run through and start picking off the enemies that are marked on the Mini Map. You have some allies with you, so Dutch's men have more targets than just you. As such, you can likely run-and-gun your way through the first area of the camp with your Bolt Action Rifle or High Power Pistol. If you're taking a lot of damage, use Medicine or duck behind cover and wait for your health to replenish to get back into fighting shape.
 Use the Gatling gun to waste the enemies in the camp. |
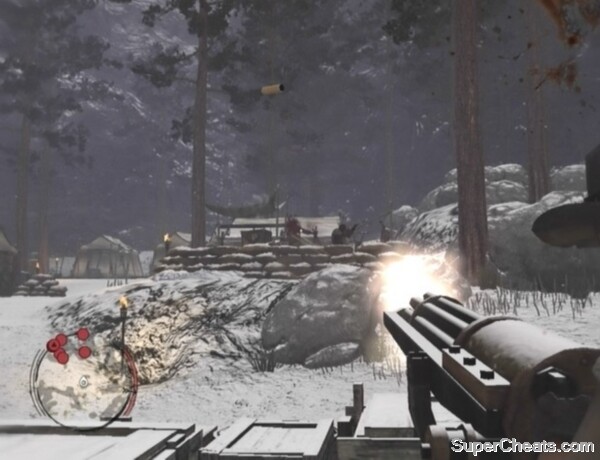
Once through the first area, you'll come to a camp with an unmanned Gatling gun by the gate. Hop on the Gatling gun and start mowing down the enemies around the camp. There are several red crates of TNT scattered about the camp; target these crates when there are enemies covering nearby to blow the enemies away. Though the Gatling gun has infinite ammo and doesn't need reloading, you are left vulnerable to enemy gunfire while using it. As such, use Medicine if you're low on health or leave the Gatling gun and take cover behind the boxes surrounding it until your health is replenished.
When the camp is clear of enemies, make your way to the yellow blip on the Mini Map to meet with the army captain. Two soldiers are planting dynamite at the gate here to blow it open. You must defend them while they do this. Enemies will appear on the elevated walkways on either side of the gate. Take out these enemies as they appear on the walkways to protect the two soldiers fixing the dynamite.
After the cutscene, target the gas lantern hanging on the post next to the shielded turret Dutch is using to force him off. You can activate Dead Eye to slow down Dutch's fire and then use your Rolling Block sniper rifle to shoot the gas lantern if you're having trouble making it out.
 Shoot the gas lantern hanging on the post next to Dutch's turret to force him off. |
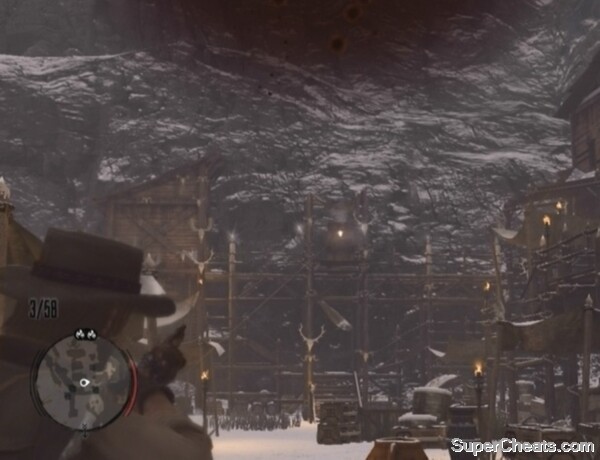
When Dutch runs off, proceed up the steps and turn left. Head up the stairs here and go through the doorway at the top. Climb the ladder to trigger another cutscene. After the cutscene, sprint to the other end of the walkway, enter the building there, then head up the stairs and enter the cave.
Continue chasing Dutch (the red skull icon on the Mini Map) through the cave and you will soon trigger the end-mission cutscene.
Catching Dutch
No comments yet. Tell us what you think to be the first.