Abraham Reyes' Missions
Red Dead Redemption Walkthrough and Guide
Abraham Reyes' Missions
(Nuevo Paraiso Walkthrough)
You must complete 'Cowards Die Many Times' in De Santa's mission line before you can accept a mission from Abraham Reyes. Once you've done that, meet Reyes in Agave Veijo to get started.
The Great Mexican Train Robbery
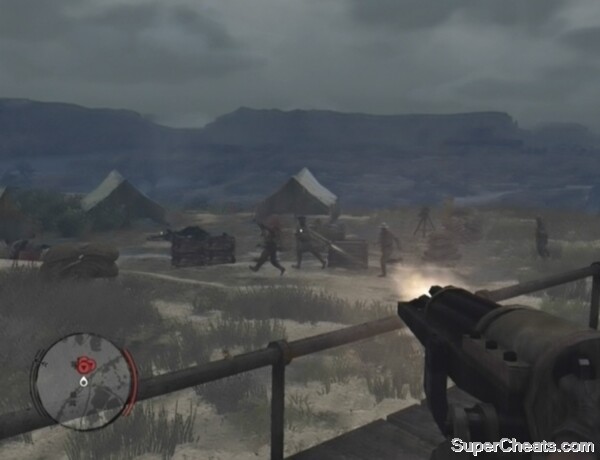
Reyes' first job for you is to rob a Mexican Army supply train. The train is heavily guarded, so you'll have to sneak onboard. The train is nearing the station in Chuparosa, so get on your horse and accompany Reyes there.
Reyes has given you 20 Throwing Knives to use to take down the soldiers around the train. With these, you can silently kill the soldiers without alerting the others. If you are detected, you'll have to face a ridiculous amount of soldiers head on, so it's in your best interest to use stealth.
When you regain control over Marston after the cutscene, wait for Reyes to lure away the two soldiers standing guard in front of the station. Move up to the station entrance once the two guards are out of the way and click the Left Stick to crouch.
 Use the Throwing Knives to silently kill the soldiers without alerting the others. |
There are six soldiers to kill. The first is standing with his back turned to the station entrance, so lock on and throw a knife at his back to put him down. Just one throwing knife is enough to kill these guys. A second soldier is standing by the post in the corner of the wall to your left. Knife him and then move up to the pillar closest to the train.
Three more soldiers are sitting on the flatbed train car by the yellow X. Lock on to the first soldier, hit him with a knife, then immediately target the second soldier and put him down to avoid being detected. With those two soldiers dead, start east down the platform. Look for a soldier on top of the building here and take him down with a throwing knife. Then, kill the third soldier on the flatbed train car and head back to the yellow X.
Once you're onboard the train, walk to the couple at the other end and press the Y/Triangle to detach the train cars. Your task now is to take control of the Gatling gun on the next car. Sneak up behind the soldier manning the Gatling gun and hit him with a throwing knife. Use the Gatling gun to waste the soldiers in the camp next to the train. There are a couple of explosives you can target: the gas lantern on the crate to the right and the TNT crate between the two sandbags to the left.
 Take control of the Gatling gun and waste the soldiers in the camp. |
When the enemies stop coming, leave the Gatling gun and climb the ladder at the other end of the car. There are three soldiers on the next car. Equip your Winchester Repeater or Springfield Rifle at this point and gun them down. With that, make your way to the train engine and pull the brake lever to steal the train.
After the cutscene, you must use dynamite to blow open the hatch on the armoured car. Climb on top of the armoured car, approach the hatch and press the Y/Triangle button to set the dynamite. When the dynamite has been set, run to a safe distance and it will explode. With the hatch open, climb back on top of the armoured car and climb down the ladder to get inside.
There's a locked safe inside the armoured car. Approach the safe and press the Y/Triangle button to start cracking. To crack the safe, you must use the Left Stick to turn the dial and find all three numbers to the combination. You must turn the dial to the right to find the first number, to the left to find the second, and to the right again to find the third.
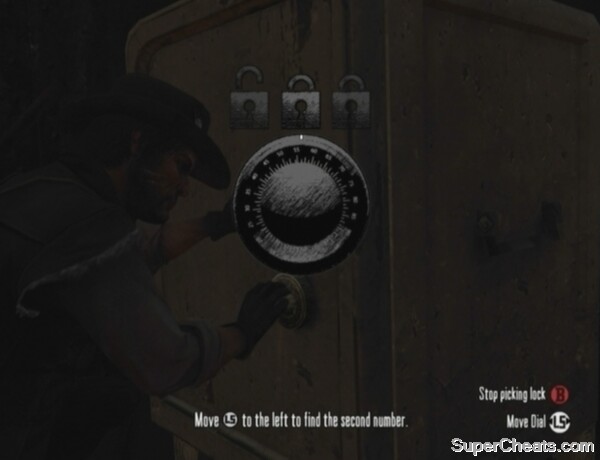 You'll have to crack the safe inside the armoured car to get your plunder. |
Look to the locks at the top of the screen to know whether you've landed on the right number while turning the dial. If your controller has a rumble feature, you'll feel your controller rumble when the dial stops on the right number. If your controller can't rumble, use the lock icons at the top of the screen: the icon will shake when the dial stops on the right number.
Push the Left Stick just slightly when turning the dial to avoid overshooting the right number. If you're turning the dial one way and you skip past the number, moving the dial back will force you to reset the dial by rolling it to zero.
Unless it's determined randomly, the combination is 50-75-35. Inside the safe are $200, some explosives, revolver ammo and a mysterious envelope.
Once you've looted the safe, climb out of the armoured car and return to Reyes to end the mission.
Sneaking onboard and robbing the train
The Gates of El Presidio
You must complete 'Captain De Santa's Downfall' in Luisa Fortuna's mission line before you can take on this mission. Javier Escuella, one of the men Marston is after, is holed up in El Presidio. You must accompany Reyes there, find Escuella and either capture or kill him.
While riding shotgun with Reyes, you can skip the trip to El Presidio or sit through it and listen to the dialogue between Marston and Reyes.
When you're down the road from El Presidio, Reyes will light the fuse to the TNT in the back of the wagon. You must drive the wagon down to El Presidio and crash it into the front gates. Maintain your speed and follow the road to the front gates. As soon as you hear Reyes tell you to jump (or you see the text appear at the bottom of the screen), press the Y/Triangle button to jump out and save yourself from a messy death.
When you regain control over Marston, you must then search for Escuella inside the fort. The three question mark icons on the Mini Map denote possible hiding spots for Escuella. He's hiding in the barracks, which is marked by the icon on the Mini Map nearest to you.
To get to Escuella, turn left once through the front gate and move through the archways there. Head up the stairs at the other end and turn right. Blast the soldier covering in front of the door and then move through the door to enter the barracks. Proceed up the stairs across from the door and enter the room at the top to confront Escuella.
Finding Escuella in El Presidio
Escuella is trying to escape. At this point, you can either kill him or capture him alive. Aside from a bit of dialogue, whether you kill or capture Escuella won't affect the story, but you might earn a bit more Honor at the end of the mission by keeping him alive.
Killing Escuella is the easier of the two options. Just climb out the window after him, drop onto the walkway, head down the stairs, then turn around to face the gate, activate Dead Eye and tag Escuella before he can get away on his horse.
Capturing Escuella is a bit more work. As soon as you regain control over Marston after the cutscene, press up on the D-pad to call your horse and then climb out the window after Escuella. Drop down onto the walkway, head down the stairs and turn around to face the gate there. Your horse should be arriving by now. There's a horse right outside the gate you can use, but it's rather slow, so it would be best to wait for your own.
Hop on your horse and start after Escuella. He'll shoot at you while you pursue him, but he's a terrible shot. Swerve to avoid his fire and use Medicine if need be. Escuella's horse is very fast, so it's unlikely you can catch up to him. You can use Dead Eye to kill his horse, then move in with your Lasso and capture him. Alternatively, continue following Escuella and he will dismount once he reaches Roca de Madera, allowing you to then lasso and hogtie him.
Once you've hogtied Escuella, pick him up, put him on your horse and return to El Presidio. At El Presidio, remove Escuella from the back of your horse and carry him to the yellow marker to put him in the cell.
Capturing Escuella
Whether you killed or captured Escuella, you will then have to defend El Presidio from the Mexican Army's reinforcements. Fortunately, there aren't very many of them. As well, you're able to use the cannon marked on the Mini Map to defend the fort. When you regain control over Marston, head up the stairs in front of you, walk past the second set of steps and turn right. Move through the tunnel here and climb the ladder at the other end to reach the cannon.
The cannon's blast radius is quite large, but the cannon ball will take some time to reach the target. To compensate for this, aim a bit in front of your target -- where they will soon pass -- and then fire. The wagons are easy targets, but cavalry may take a couple of cannon balls to kill completely. Aim the cannon at the horse in the middle of the formation and the blast should kill that soldier as well as the soldier on either side of him.
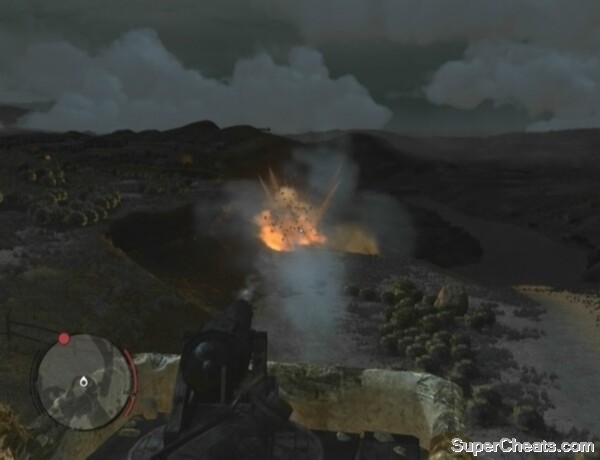 Use the marked cannon to decimate the reinforcements. |
Once you've decimated the reinforcements, make your way back down to ground level and pick up Escuella in his cell to complete the mission.
An Appointed Time
Find Reyes in Escalera to get started. First, you must defeat Raul Zubieta in a duel. Take out your gun when 'Draw!' disappears from the screen and place five marks on Zubieta's head to win out. Cut Reyes free once Zubieta is down.
Next, you must free the rebels being held in the Escalera jail. Follow the yellow blip on your Mini Map. When you pass through the archway, be ready with your Winchester Repeater. Three soldiers will come running through the door to the cellblock. Activate Dead Eye and tag each soldier's head to take them out. With that, enter the jail and open all three of the cells by shooting the lock on each door.
Once you've freed the rebels, follow the blue blip on the Mini Map to join Reyes. You must eliminate the soldiers at the barricade. Activate Dead Eye and tag some heads to thin their ranks. These soldiers are using powerful weapons, so take cover. When aiming your weapon, don't stay up for too long; just take a shot, then drop back down and remain down until your health is completely restored.
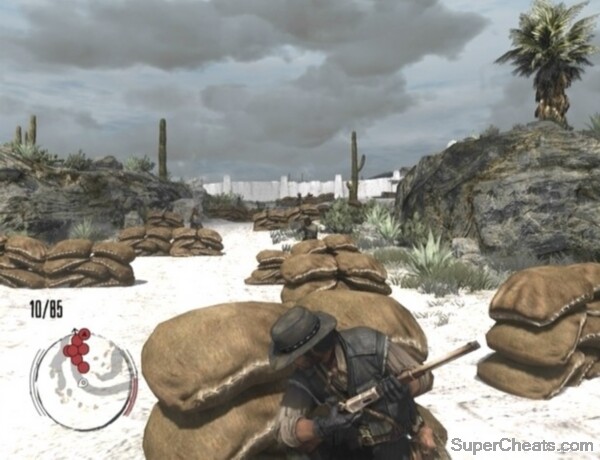 Fight your way to the front gate of Allende's villa. |
Move from cover to cover as you fight your way up the slope to Allende's villa. There's a Gatling gun by the front gate at the top of the slope. Kill the gunner with Dead Eye or take him down while he's focused on one of the rebels.
When the barricade is clear, one of Reyes' men will set down a powder keg in front of the villa's front gate. Man the Gatling gun and shoot the powder keg when the area is clear to blow open the gate. Remain on the Gatling gun and shred the soldiers that appear. When you've dealt with the first batch of soldiers, move in and take cover behind the sandbags just through the gate. Kill the soldiers outside the villa and then approach the front door.
While Reyes' men work to break open the door, you must defend them from incoming soldiers. You can use the Gatling gun to fend off the soldiers, but you'll be very vulnerable while using it. As such, leave the Gatling gun if you're taking a lot of damage and take cover behind the sandbags. Continue killing the soldiers until Reyes' men gain access to the villa. Join Reyes at this point to trigger a cutscene.
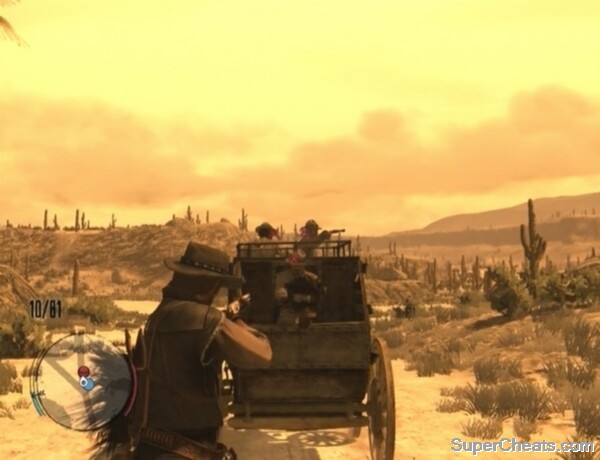 Use Dead Eye to disable the stagecoach. |
After the cutscene, follow Reyes through the villa and to the backyard. You must catch up to Williamsons' stagecoach and disable it. Kill the three soldiers in the yard, then hop on one of the horses by the back gate and start after the skull icon on the Mini Map.
Williamson's stagecoach is accompanied by three soldiers on horseback. As well, there is a Gatling gun mounted on the back of the stagecoach and the driver and passenger each have a revolver. Once you're trailing behind the stagecoach, take out the cavalry and then move up. Take out the gunner from afar if you can, but if he's firing at Reyes instead, move in closer, activate Dead Eye and tag the gunner, driver and passenger in the head. Kill all three to disable the wagon.
Catching Bill Williamson
Shoot Williamson after the cutscene. Reyes will take care of Allende.
You'll unlock the Reyes' Rebels outfit for completing this mission.
No comments yet. Tell us what you think to be the first.