02: Oldale Town
Pokemon Emerald Walkthrough and Guide
02: Oldale Town
 The tiny town of Oldale |
As you enter the town you will immediately spot the Poke Center (it has an orange roof and the letters "PC" on its front). To its right is a house, and north is another house, while to the northeast is a blue-roofed building you will come to know as the best place in the world for buying kit! That is the Poke Mart!
For now, head inside the Poke Center and talk to Nurse Joy behind the counter to have her heal your Pokemon. Good on ya mate! You have used the Pokemon Healing Station for the first time! You will be using the services of Nurse Joy and her identical twin sisters all over the land a LOT!
Now first, have a chat with everyone here and you will learn a bit about this place. Now head to the corner where there is a PC set up for trainers to use.
Configuring your Storage Boxes
-- Poke Center PC --
This PC can actually access two different systems -- the PC you have at home, in which you may store items and receive mail, and a special PC that is part of a global network of Poke Centers in which you can store actual Pokemon!
At the moment as we do not know who the inventor of this awesome device is it is known simply as "Someone's PC" to us. This PC contains 14 boxes, and each box can hold 30 Pokemon, which means that in addition to the 6 Pokemon you can have on your team at any time, you can store up to 420 Pokemon in the digital storage system, and gain access to them at any Poke Center in the region, as well as at certain other buildings that have PC's connected to this network.
The first thing that you will want to do is edit the boxes to reflect their basic function, a practice used by most professional trainers to simplify the collection and storage of Pokemon. The basic steps that you will want to take are as follows:
Box 01 -- Change its name to "A-Team" and set its Wallpaper
Box 02 -- Change its name to "B-Team" and set its Wallpaper
Box 03 -- Change its name to "Fire/Fgt" (for Fire and Fighting Types)
Box 04 -- Change its name to "Grnd/Rck" (for Ground and Rock Types)
Box 05 -- Change its name to "Bug/Gras" (for Bug and Grass Types)
Box 06 -- Change its name to "Water" (for Water Types)
Box 07 -- Change its name to "Flying" (for Flying Types)
Box 08 -- Change its name to "Normal 1" (for Normal Types)
Box 09 -- Change its name to "Normal 2" (for Normal Types)
Box 10 -- Change its name to "Misc 1"
Box 11 -- Change its name to "Misc 2"
Box 12 -- Change its name to "Legendry" (for Rare and Special Pokemon)
Box 13 -- Change its name to "Outgoing" and set its Wallpaper
Box 14 -- Change its name to "Incoming" and set its Wallpaper
This nicely covers the sorting in a way that matches the distribution of types that you will collect, giving you a place for each. Note that the way that the box system works, whatever the box was set to that you quit the last PC session was is the box that any new Pokemon will be placed into when you capture a wild one and your team is full.
That being the case, you want to ALWAYS quit the PC on the Incoming Box, right?
This system allows that you will always know what Pokemon are new, and where they are, so you do not end up having to hunt through boxes to find them to sort them out! Every so often you will want to visit a PC and sort out the new ones in the Incoming Box to see to it that they get put where they need to be.
The first pair of boxes that you named "A-Team" and "B-Team" you use to conveniently keep the team that you use for the game -- the A-Team -- and the team you use to battle other real life trainers -- the B-Team -- as configuring and training will be different for both types of battling.
Once you have the boxes squared away, take a quick peak upstairs -- this is the area you will use to interact with other trainers in real life, as it has a special room for battles, and another for chatting and trading Pokemon. As it is presently under construction (it stays that way until you have X number of Pokemon in your collection) head back downstairs once you have had a look see, then go ahead and leave the Center.
-- Oldale Town --
First have a chat with the bloke standing by the house to the east -- he is from the Poke Mart and will give you a bit of a tour, then gift you with a free Potion!
After you chat with the various people outside and inside the two houses, head to the Mart to shop. Sadly they are out of Poke Balls! All that you can purchase are kit items like Potions, Antidotes, Paralyze Heal, and Awakening -- nothing we absolutely need at the moment, so after checking out the menu, quit out.
On the counter to the left is a piece of paper -- go ahead and move to it and open it, and you will see that it prompts you to enter a phrase. This is the trigger that unlocks the Mystery Gift System, and we may as well do this now so that it is done!
For the first word, select the Section "Trainer" and the word "Link" -- for the second, select the Section "Conditions" and select "Together" -- then the Section "Endings" and the word "With" -- and finally the Section "Endings" and the word "All" before hitting OK. What you have done is unlock the Mystery Gift System, but it will not actually activate until after you link to another gamers Pokemon to battle or trade -- after which when you turn the game on you will have the Mystery Gift Menu Selection thereafter available from the Start Menu.
Now that we have taken care of all that, head to the north exit of town and use it!
-- Route 103 --
Route 103 links Oldale Town to Route 110, and is the direction that we need to go in so that we can meet up with the Professor's daughter May. Be aware that this meeting will immediately result in a Pokemon Battle!
- - - - - - - - - - - - - - - - - - - -
Route 103 Area Pokemon Report
-- #261 Poochyena (C)
-- #278 Wingull (U)
-- #263 Zigzagoon (U)
- - - - - - - - - - - - - - - - - - - -
After you enter the Route you will find a ledge blocking the way, and forcing you to go through the Tall Grass. There is a trainer here that remind you that Potions are a great idea, and then after the second patch of Tall Grass you will find May waiting. This would be a very good time to Save Your Game!
May wants to establish the pecking order with you right off the bat -- you apprentice, May master -- got it? Well we cannot have that, so I sincerely hope that you leveled your Pokemon to at least Level 7 so you can kick her butt! Her Pokemon will be whatever is strong against the one you picked -- meaning that it will not be the same one as you picked, and it will not be the one that is weak versus your Pokemon's type, got it? Good.
Your first Trainer Battle with May
-- May Battle Number One --
If you have not leveled your Pokemon to Level 7 minimum go do that prior to talking to May.
Walk up to May and say hello -- she will be recording information into her journal when you approach, and you will surprise her. Without giving you the option to refuse she pushes you into Battle Mode.
For my battle -- and yours if you chose Torchic like I did -- she has a Level 5 Mudkip. The fact that it is Level 5 is fortunate, because if it were a higher level it could know a water move, which would be deadly for Torchic!
Beating her -- you did win right? -- gets you a reward of $300 and the satisfaction of winning. After the battle May compliments you and then departs, telling you that she is returning to the Lab. Now would be a good time to save your game.
Return to town by jumping down the ledges rather than going through the Tall Grass, as you took damage in the battle. When you get to town the first thing you should do is have Nurse Joy heal your Pokemon, and then save the game again.
-- Leaving the Center --
After you leave the Poke Center you run into May again outside, and she encourages you to return to Littleroot Town and her father's Lab. She must have a reason for being so enthusiastic for us to come back home and visit the Lab, right?
Using the ledges it is a quick and safe trip back home, and when we arrive at the Pokemon Lab we find May waiting for us with her father, who greets us as we arrive!
First he tells you what May told him about your battle, and then as something of a reward he gives you the Pokedex that he says he ordered for himself (May already has her own). Birch tells you all about the Pokedex and what it does, and then May acts as if she was not standing right next to him while the entire conversation took place and he gave you the device and is surprised that you now have a dex like hers!
May has her own rewards to gift to you -- Poke Balls! That is a most excellent reward for several reasons -- one, we really need those balls if we are going to start building teams and filling that Dex, and two, now that May has shared some balls with us, the Poke Marts will suddenly be able to sell us more!
** A word on Poke Balls **
The Poke Balls that May gave us are the bog-standard common type, but all that means is they have the normal capture rate of the standard Poke Ball. With that in mind, it is time to reveal that there are in fact many types of Poke Ball, normal and special, with each type having strengths and weaknesses built into them.
The different types of Poke Ball are:
-- Dive Ball: 3.5 x chance for capturing water Pokemon underwater.
-- Dusk Ball: Works best at night or in caves.
-- Great Ball: Has a higher chance of capture than the Poke Ball.
-- Luxury Ball: Same chance as Poke Ball but increases rate of "Like" in Pokemon.
-- Master Ball: Will capture ANY Pokemon without fail.
-- Nest Ball: Higher chance on weaker Pokemon.
-- Net Ball: Increased capture rate on Bug-type Pokemon and in water.
-- Poke Ball: Standard ball with regular catch rate.
-- Premier Ball: Commemorative ball with same stats as regular Poke Ball.
-- Quick Ball: Best capture rate when used at the beginning of a battle.
-- Repeat Ball: 3x chance for capturing types you already have one of.
-- Safari Ball: Used only in the Safari Zone to capture their Pokemon.
-- Timer Ball: Capture rate improves the longer a battle takes.
-- Ultra Ball: A much higher capture rate than the Poke and Great Balls.
Poke Balls are sold at Poke Marts and also are received as rewards for quests and sometimes found. When you are purchasing the standard Poke Ball from a Mart, ALWAYS buy them in lots of 10 balls! The reason for that is because the Poke Marts have a standing special that gives you a free Premier Ball whenever you purchase 10 regular Balls.
Note: the list of balls above presents the balls you may encounter in this game, but does not represent a full and complete list of Poke Balls, as there are other types from the other games as well as these.
 The Professor's Pokedex |
-- Our Pokedex --
As she gives you the Balls she tells you about her plans to capture the most Pokemon, an admirable goal to be sure! Now that we have our own Pokedex, what do you say we take a look at it?
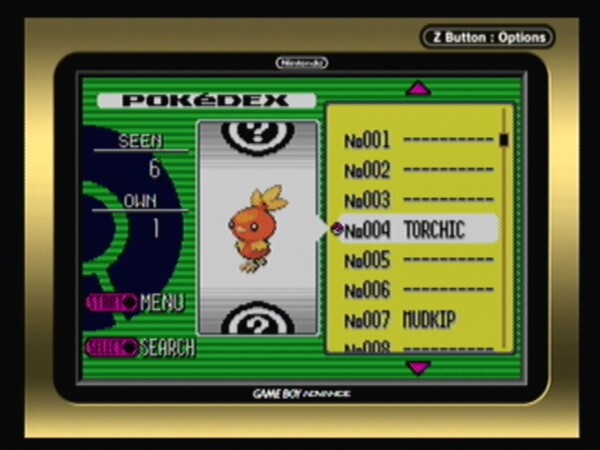
The main page of the Dex (or Index Page) contains a summary of our Dex Contents including the number of Pokemon that we have seen, the number we actually own, and a search button for use when our Dex is so full that scrolling through the listings is no longer practical. To the right is the listing Index that we can scroll through to find the Pokemon we want to look up.
The first thing that you will likely notice is that the Dex contains an entry for every Pokemon that we have encountered in the game up to this point! That is rather odd since its function is to automatically scan any Pokemon we encounter and then add them to its database, but we did not possess it when we saw these Pokemon!
Still it is rather cool that it does this since we now have a short-list of what Pokemon we can definitely capture in the areas that we have visited. When I opened my Dex for the first time it showed me entries for:
-- Torchic
-- Mudkip
-- Poochyena
-- Zigzagoon
-- Wurmple
-- Wingull
Note that Mudkip is the starter Pokemon that May chose, and is not encountered ANYWHERE in the region in the wild, so discount that from the list above, and of course discount our Torchic, and that leaves four Pokemon that we can and should capture to add to our collection.
You will also note in the Dex that any Pokemon that we own or have owned / captured have a regular Poke Ball symbol to the left of their Local Dex Number, which is good for letting us see which we have and which we do not. In addition to that, you will note that the Dex is displaying the Pokemon by their Hoenn Region number scheme rather than the National Dex numbers that we use in the guide here.
As mentioned previously, later in the game you will unlock the National Dex, and it is after that point that you will begin to seriously start capturing Pokemon to complete your Dex, and that is why they are listed by their National rather than Local Dex Numbers.
Go ahead and move the Dex selector to your Starter Pokemon's entry and click the action button to open it up. As you can see there is a lot of information about your Pokemon -- a page containing a basic description, The Local Dex Number and proper name start the page, followed by its vital statistics, and a representation of its footprint. Below that is a description of the Pokemon that includes any special or helpful information that you may need to know when you battle or capture it.
The next page shows a map of the region, and if this were a regular Pokemon that could be captured in the wilds of Hoenn, the map would indicate -- using colored shading -- what specific areas of the region this Pokemon can be found in -- if it could be found in the region, which it cannot.
The next page utilizes the built-in audio player and sound sampler for your Dex, and allows you to play a recording of your Pokemon's basic cry so that you can learn what they sound like. That can be useful whenever you are moving through large areas of Tall Grass, because when you get close to a Wild Pokemon who is concealed in the Tall Grass you often hear their cry.
The final page for each Dex entry contains a standard size comparison image represented by a shadow outline of you, and one of the Pokemon, in order to give you a perspective based on yourself.
While the Dex contains entries for Pokemon that we have seen (but have not owned or captured) these entries are very basic indeed, containing only its Local Dex Number and Name, its Cry, and the area that it can be found in on the Region Map.
-- Home Again --
Once you have finished examining the Dex, go ahead and leave the Lab, returning to your house in town, where you will find your mum standing outside waiting for you to come home!
She asks if you spoke with the Prof, then notices your new Pokemon and tells you how adorable it is. Recognizing that as you are now well on your way to becoming a Pokemon Trainer you will likely be spending a lot of time away from home and, more to the point, doing a lot of traveling, she gifts you with a pair of Running Shoes.
-- Running Shoes --
Mum gives you instructions on how to use the new shoes -- simply hold down the B-Button when walking to run. The Running Shoes are not added to your Key Items Pocket since you are actually wearing them, so this is the only description that you get in the game, but as is often the case with items in these games, there is a bit more to them than is evident.
- Wild Pokemon: When you are using the Running Shoes in regular areas they double your movement speed, but beware! When you use them in Tall Grass they also double the rate at which you encounter wild Pokemon! In simple terms, if you wish to move through a section of Tall Grass without a wild Pokemon encounter, you should walk, not run.
- Trainers: Normally the trainers that you encounter are a predictable lot; they stand around wherever it is that they happen to consider their spot, and look this way and that. If they are the fighting sort -- and you have never fought them -- then the first time that they see you and you are within their range (around four squares usually) they will automatically engage you in battle.
Fighting these guys always gives more XP than a wild Pokemon battle, and also results in some amount of money as a prize when you beat them, so unless your team is injured it is generally a good idea to go ahead and battle them. Ah, but if your team is in fact hurt, you may not want to fight them, so you will likely wait until they are looking in some other direction and try to sneak past them. Well, if that is the case DO NOT RUN. Using the running shoes to run makes noise, so when you try to run past them they will naturally turn, see you, and go into battle mode. To get past them you will want to walk, not run. Easy-peasy Lemon Squeezy!
Now that you have your new shoes, head inside to talk to your mum and heal up, then head back outside to test out your new shoes. Run back and forth a bit to try them out - pretty spiffy addition to your kit, eh?
Pokedex | More Emerald Stuff on SuperCheats.com
1
^ That is wy you have 2 Misc boxes, duuuuh e_e
let me ask you why you sepparate water and flying when there are some of them that are mixed. And where is the steel? (naming the boxes)
This is a very good walkthrough!
I've already beaten pokemon Emerald
And I'm reading this thinking:
"Dang! I wish I knew that then!"
Also, I had no idea about the running shoes.
Kudos to You!
THERE IS NO DUSKBALL ON POKEMON EMERALD !!!!!!!![/size]