09: Trumpets Sound
Operation Flashpoint: Dragon Rising Walkthrough and Guide
Operation Flashpoint: Dragon Rising Guide - Walkthrough
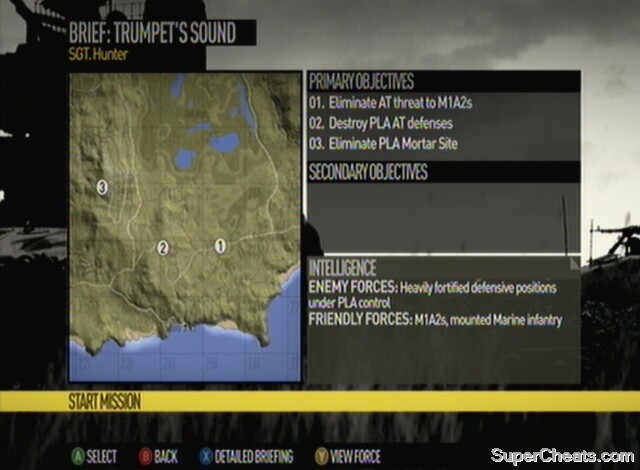
Mission Nine: Trumpets Sound
Summary:
Not for the first, time, we have a fun, aggressive mission after that stealth 'em up one at Mission Eight. It's a long one, however. Back in the shoes of Dagger One Bravo, we take on the familiar task of ensuring our vehicles make it through various anti-tank defences, culminating in an assault on a monastery where the PLA are penned in.
Walkthrough:
Primary Objective 1: Ensure M1A2s clear the first checkpoint:
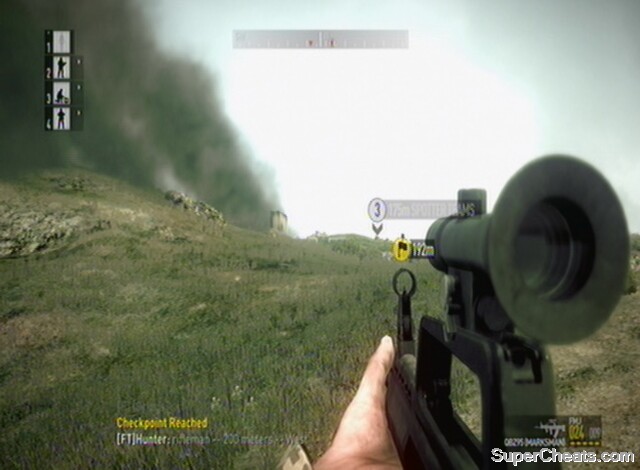
Unusually we start with a vehicle, but before you embark and get your squad to do the same, get a M4A1 Marksman from the ammo crate by the sandbags once the dialogue has played out. Once in the humvee, drive up the road and past the tank convoy, codenamed Gridiron, that we are protecting in this mission. Pass through the distant RV marker, and then disembark at the next one, just ahead by the bushes. From here, you need to run forwards to the logs at the next RV marker. It may be worth leaving your team behind for this bit. You should activate a checkpoint en route. Direct fire-support on the enemy anti-tank vehicles on the hill in the distance. There will be two in plain sight, and another to the right which you may have to move to see clearly. Thankfully we have plenty of fire missions (nine), so don't worry about taking multiple targets out a once. Designate these targets and then take cover. They can kill you in one shot if you're too careless!
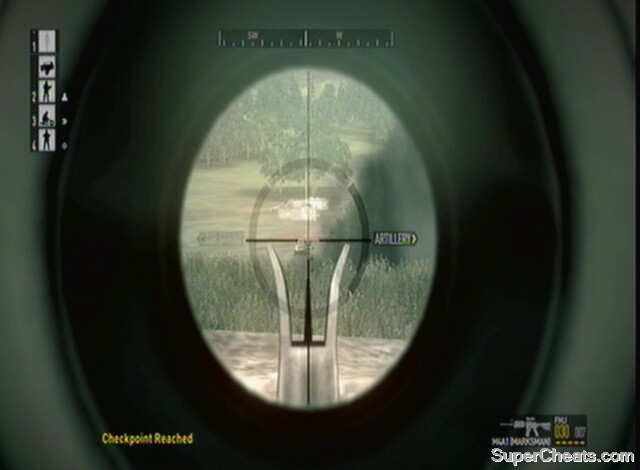 Order fire-missions on the PLA vehicles |
There are also enemy AT teams on the hill. You'll have to leave your cover to get a clear shot on these targets. Scan the hillside and order in three more fire missions to take out the three AT teams (south, north and near the vehicles we destroyed earlier). If you get the message that Gridiron is rolling and you haven't taken out the AT teams, it may be an idea to get back in your vehicle and drive around to take them out quickly using the emplaced gun. You run the risk of being blown off the ground, but it's worth it for the sake of keeping the tanks alive. Objective markers should also help point you towards your next target.
When all are taken out, drive through the next two RV points. You will hit a checkpoint at the second, as you come into view of a depot ahead. Head up to the off-road RV marker and disembark. From here, use your scoped weapon to pick off any enemies you can see in the depot and the hills nearby. You can take your humvee in closer, but there are anti-tank soldiers in the vicinity and they will be able to take it out. High priority targets include gun emplacements guarding the entry to the depot, and any AT soldiers you can spot. Gridiron will roll on past, and you should remember that it will be moving along the road into an area full of enemies – time is important here to avoid them getting destroyed (there is an achievement for keeping all members of Gridiron alive). Move up through the area with your allied forces (check your map to spot them). Head through the RV markers and then up into the trees.
 Push up the hill to get to Gridiron |
Primary Objective 2: Destroy PLA AT defences:
You can proceed into the hills using the foliage for cover. Continue until you are about 120 metres from the RV marker that is at the top of the hill. You should be able to see the gun emplacement ahead. Snipe the two soldiers taking cover inside it. Move up with good haste, and pick off the PLA around the road above. There will also be a team moving in to reinforce from the hills even higher up. Order your squad to engage any PLA further south, as these are the ones that will present the initial threat to Gridiron. It's a good idea for you to flank north away from danger, but use your ranged weapon to hit the PLA in their sides. Once Gridiron make it through, you'll receive your reward.
Fight through the fuel depot and keep Gridiron alive
Achievement/Trophy: Keep 'em Rolling (ensure the entire tank convoy survives the first checkpoint) Silver/30G
Now you can head up the road to the north through the next RV marker and a checkpoint. You may be concerned to hear that we are now entering an enemy mortar zone, which means if you stay still or slow down for too long, you will be blown off the ground. Once the 'Oorah' rings out and you hit the next RV marker, you need to watch out in the skies! Ahead and to the west of the second RV marker is a small hut with a guard inside and another two nearby. Take out the occupant and his allies.
Tip: You can use previous PLA positions to avoid mortar fire as even the enemy regime won't bomb their own men.
There is also an ammo crate inside the hut with a M4A1 Marksman. Sprint towards the next RV marker. When you are about 210 metres out, look down your scope and pick off the enemies holding position by the RV marker. Remember, keep on the move to avoid the mortars. The enemy will be covering by some logs. Clear the area and hit the RV marker and checkpoint. Rather than heading straight for the monastery, it is advisable to go for the AAA vehicles which are preventing us from being able to use air support. Move down the road to the next marker and an ammo crate, and then on to the next one to the north-west. En route to this one, there will be enemies in the road at this next marker, so stay on your guard. With them taken out, hit the marker but rather than heading up the hill to the next one, continue along the road to the north.
 Head to the village and its ammo crate |
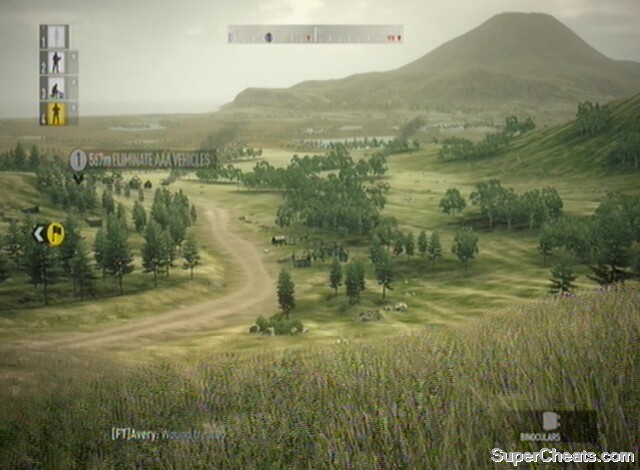
Secondary Objective 1: Destroy AAA vehicles for CAS mission:
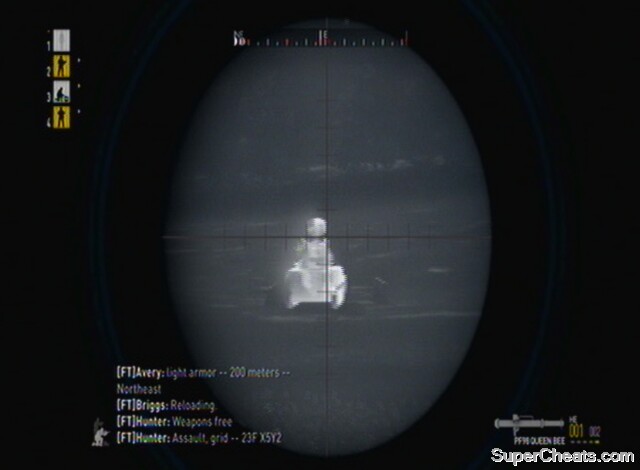
This is the way to take out the AAA vehicles. In the village ahead, just off the road to the right, is an ammo crate with a Queen Bee that we need to take out the vehicles (if you haven't picked one up already). The village is also guarded by a few PLA soldiers. Once in the base, locate the ammo crate by the road, and get the Queen Bee. Continue on along the road to the north. There are enemies guarding the AAA vehicles, so cut the corner just before them by heading up into the hills on the left and use the height to your advantage to take out the pair of PLA guarding them. From here, you will also be able to get a good angle on the first AAA vehicle.
You will probably need more than three Queen Bee rounds to take out both vehicles, but there is more ammo for it in the ammo crate by the unoccupied jeep in the village. Once the first one has been destroyed, do the same to the second, just behind the buildings in a field to the north-east. Use your map if you're struggling to locate it. Remember too that the mortars are still trying to get us, so as soon as this is done and the objective is ticked off, get in the jeep. This will unlock a checkpoint and allow fire support (automatically called in by the AI) to reduce PLA numbers in the mountains above.
 Take out the AAA vehicles |
Primary Objective 3: Eliminate PLA mortar site:
HQ will inform you that in 15 minutes the assault on the monastery will begin. We need to eliminate the enemy spotters to render the mortar team useless, before our tanks get taken out. Drive the vehicle up the hill, off-road to the west. Be very careful not to get stuck on any rocks, as not only will the mortars train in on your location, but it will dramatically reduce the speed with which you can get to the monastery if you lose your vehicle. Meet up with the RV marker near the stone building, and then head up further on to the next one, which is back onto a road. Drive between the ruins that flank it, heading west. On the corner before the next RV marker will be PLA, who your allies may be fighting on foot, and a checkpoint. You can run a few of them down on your way to the next RV if you want, though if you want to be certain that you don't get any nasty surprises you should disembark and take them out on foot. On the next straight of road is an enemy jeep and PLA, so either disembark and fight them or drive straight past. It is not a bad place to resume on foot, in fairness, as you can use the edge of the mountain, to the right of the road, to protect you from enemy fire from further above. There is also an ammo crate here with a Marksman rifle in. Carry on through the next two RV points. At the second, get low and look up towards where should be an objective marker designating a spotter team.
 Move up towards the monastery |
The monastery assault is now beginning. Proceed very slowly, picking off one PLA at a time from range. As well as enemies further above, including a spotter team, once you move up slightly to where the road bends round, you will also be engaged with enemies to the south-west. These guys should, if your allies made it, be fighting some USMC soldiers, and you can continue directly up to the west. Don't be afraid to help out your buddies though. Once you get to the top of the hill at the RV marker you will be told to prioritise the spotter teams, meaning pretty much all the other PLA that can threaten you are now eliminated. Be careful though, without the undulating terrain you are a much more open target.
Continue west and head around the back of the monastery, along the cliff-edge. The final RV marker thankfully isn't that far away, and once you have rounded the edge of the monastery you will have eyes on it in the distance. Use your Marksman rifle to take them out to complete the mission and allow the siege of the monastery to go ahead.
 Pick off the final position |
Achievement/Trophy: Uphill Struggle (Kill all the spotters to render the mortar team useless) Bronze/20G
Extras:
This is a huge map focused on the large hill, and you can, at certain times, go off the beaten track to explore on your own. You can choose to tackle the fuel depot in numerous ways, for example driving around the road in your fast jeep and attacking it from above, though clearly you risk losing members of Gridiron.
Once the final push towards the monastery begins, you can take literally any path up to the monastery. Try fighting alongside your USMC allies for a different take on the level, as they battle against the other side of the monastery than recommended above. Once you get the vehicle near the AAA units you have a lot more freedom for exploration, so make the most of it! Following the roads is ideal, but it is certainly more fun to go off exploring.
 The basic map of the area, with road layouts |
I'm having alot of trouble with what seems to be a glitch on this mission. When I am going up against the AT team at the top of the hill, when I finish killing the AT teams, the game says mission failed. Does anyone know why it is doing this?
The M1A2 Abraham is more or less bulletproof against the anti tank weapons in this game. The designers could have use the Bradley APC to make it more realistic. Altogether an enjoyable game. Eventhough I didn't expect the Abraham to be picked of that easily.
I found that I needed to restart the mission after getting trapped by the AAA vehicles that moved into position before I could hit them. I ran down the valley to prioritise them, and although I lost my little blue guys, once I was under the fire angle I could take out the rest of the group... otherwise I would've been in a bit of trouble. The hill taking was insanely stupid at one point, but engaging a handful at a time helped me get the mission done.
This level is ridiculous, i try to use PLA positions as cover from Mortar and i get blown up, i try to double time it i get blown up, i even decided to go a completely stupidly different way round and i made it to the monastery but the rest of my team got blown up... so i didnt have much chance of getting in there and killing them all... depressing annoying mission
I did this level on Coop with a friend, and when we were near the halfway point between the monestary and the Anti Air, the AA opened up on us from a kilometer out almost, took out half my team and all of alpha and charlie squads, i love Dragon rising, but it can be extremely random sometimes with the AI and gameplay, guess thats what makes it so fun is having to adapt quick or die.