07: Bleeding Edge
Operation Flashpoint: Dragon Rising Walkthrough and Guide
Operation Flashpoint: Dragon Rising Guide - Walkthrough
Mission Seven: Bleeding Edge
Summary:
This is a fun all-out attack level after the last stealthy affair. We are supported by a large force of US Marines and vehicles against an even larger force of PLA and emplaced guns. The aim is to break through their defensive lines and secure the fuel depot.
Walkthrough:
Primary Objective 1: Eliminate AT teams covering the road
As with some of the earlier missions, we need to prevent the enemy from taking out our allied vehicles, which will move up just behind us. So it's us against lots of anti-tank soldiers. From the start, run to the first RV marker, and then on towards the second one. Stop behind the white car in the road en route. From here you should be able to pick off the PLA in the distance with your scoped weapon, they will be by the RV marker. Watch out for the AT gunner specifically, as you need to remember where he falls. Once the horizon looks clear, move up to the next car (in the middle of the field). Do the same to the next one, by the barn, and finally progress into the trees if all is clear. Allied troops should move up with you at this stage. Ensure you try to locate the downed AT gunner and pick up his Queen Bee, as this will come in handy later. There is also an ammo crate here.
Secondary Objective 1: Eliminate MG nests
Hit the RV marker and move up the hill, out of the trees. Bear slightly right away from the next RV marker. In the distance you should be able to see an objective marked as MG Nest, approximately 280 metres away and directly east. You can snipe the gunner from here – take your time and don't be afraid to keep plugging away until he drops. At this range you need to aim at least one marker above his head to make the shot. Just to the left of this first emplacement (north) is another soldier dug in at an emplaced gun. Use your long-range tactics to take him out.
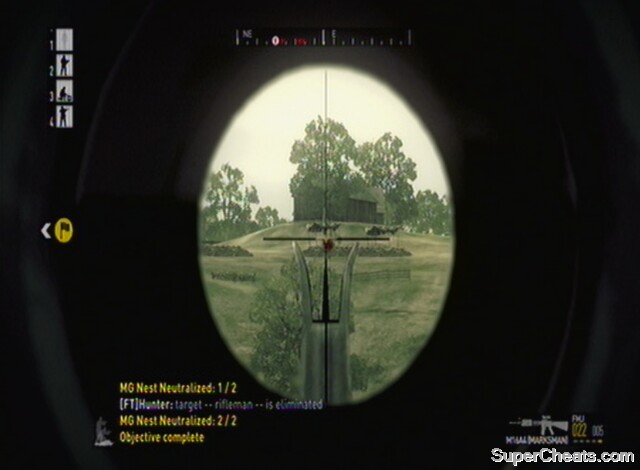 Take out the MG nests |
Good, that's the second MG nest done, and the secondary objective ticked off. Now head for the next RV marker, by a small emplacement. Once you get there, edge over the crest of the hill and scan in the distance for PLA. This is the front of their first defensive line. Move through the trees and more and more enemies will come into sight on the horizon, including an anti-tank team behind some sandbags. Once HQ tells you the assault is beginning, you need to hurry it up and find the next anti-tank team. Move down into the gulley and then up the other side to the RV marker. To the left (east) you should see a sandbag emplacement. You are now in a good position to flank the AT team in place there. Take it out, and then backtrack somewhat (use the map) to get the checkpoint in the trees near where the RV marker was. The next RV marker is also in this direction, so proceed towards it through the trees. Watch out for PLA in the forest.
Primary Objective 2: Locate and eliminate PLA spotter team:
Proceed through the next RV marker, and then get to within about 50 metres of the following one. From here, you should be a little over 200 metres away from the PLA spotter teams as indicated by the objective marker. Use the trees and terrain to attempt to take them out. Move up to the stone wall ruins if you need to get closer. You should be able to hit both the first spotter team and any other PLA on the ridge from below, just be patient and wait for them to show themselves. Move up the slope if you have to.
Secondary Objective 2: Locate and eliminate PLA AA team:
There are also AA teams in the area causing problems. These should be taken out too, but you'll probably have to get right to the top to be able to engage. The first are quite deep in the woods, so it may be worth sending half your squad to engage them, while you go and deal with the next lot further along the ridge.
Head along the treeline to the north-east, and take out the AA soldiers at the emplacement there. Hopefully by now your team will have dealt with the others, and you can call them back to follow you. You should also now be able to see the third AA team, even further along the ridge. Move up to the emplacement where the PLA were and you should see the next spotter team (combining two into one), directly north, and the AA team, north east. HQ will radio in confirming you have a fire mission to use, so call it in on the spotters. Aim it in between the soldiers there to take them all out in one. This will complete the objective of taking out all the spotter teams, unlock a checkpoint, and give you an achievement, if you took all four soldiers out in one, that is. Note, the best type of fire-mission to use is a barrage for this.
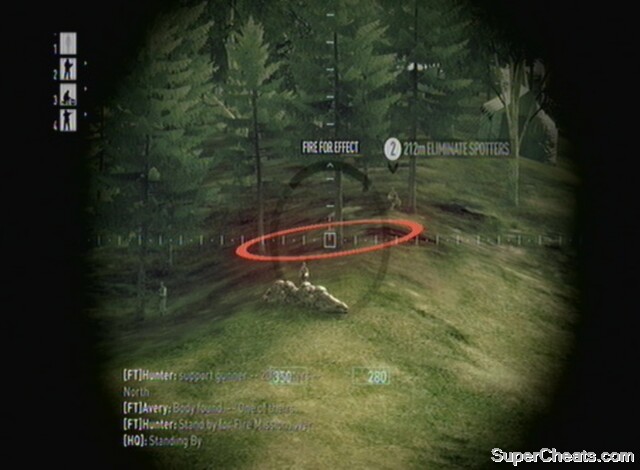 Use a fire-mission to finish off the spotters |
Achievement/Trophy: Ruthless Efficiency (Take out all the soldiers on the hill with one fire-mission) Silver/30G
Now you can head down to the next RV marker and checkpoint. There is a jeep in the road which we'll need shortly, but first engage the AA team in the trees to the east. With them down, the final AA team will be highlighted with an objective marker. Engage this group of PLA, who should be in the trees to the north. With that, the objective will be complete and confirmation that air support is now inbound will be received. Now head back to the road and jeep. Order your team to repair it, then climb on board and head along the road. Speed along onto the dirt track and up to the next RV point.
Primary Objective 3: Destroy key defences around the fuel depot
Get out around this area, near where the two structures are. We are now right up on the fuel depot. HQ will give the all clear and a checkpoint will activate. You need to watch your fire in this area because, as you may expect, the fuel is highly flammable. Smoke grenades will be popped between you and the depot, but if you picked up the Queen Bee from earlier, this has a sight which allows it to see through. Head around to the right (east) to the area where all the PLA are dug in. Use your Queen Bee to blow up any emplacements or groups of soldiers you can see. You will have to fire above them in order to hit, by a couple of lines on your scope.
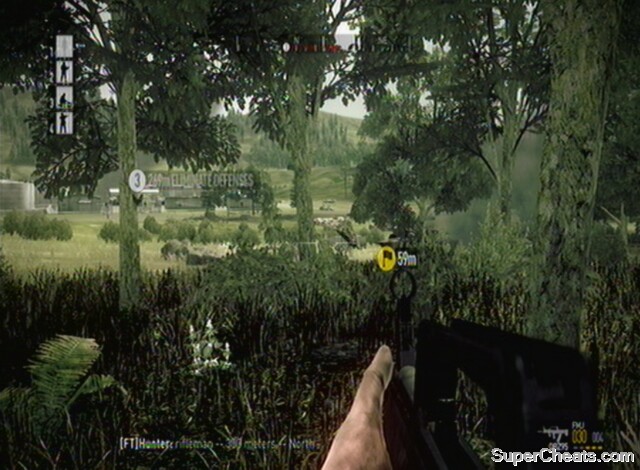 Head around the side, following the RV markers |
With your ammo gone, head east, through the trees, to the burnt out vehicle and your next RV marker. There is a long overdue ammo crate in this area too, against some concrete blocks. The QBZ95 Marksman is a good choice. From these blocks you have a decent position to pick off the PLA in the field ahead. As you take out the PLA you will see the PLA Defences Neutralised counter increasing. With all five targets down, move into the field and mop up any stragglers as you head for the RV marker. Stay in the trees until the field looks clear, keep a particular eye on the buildings, as there will be PLA in the windows there. Order your team in to assault the nearest building, and use the map to locate any PLA left over. Once the last PLA in the depot is down, the level will be completed.
Attack and secure the fuel depot
Achievement/Trophy: Resource Management (Secure the fuel depot) Bronze/20G
Extras:
The only vehicle on this map is the one we will be using to join up with our convoy and head on over to the fuel depot. As such, there are not many different ways to play it. You need to eliminate the spotters and AT soldiers or the convoy will be destroyed, and you can't take your vehicle all the way into the fuel depot as there are AT soldiers all over the place, not to mention emplaced guns, and so you really do have to disembark before hand. The map is still quite large, however, so it's worth taking advantage of your time in the jeep to explore the area on repeat play through.
Queen bee despawned when I died. Great...
Took the LAV in the beginning which was located on the right at the start of mission. Took it throughout the mission and used the thermal sights to fight through the smoke. Easiest mission in the game.
i hate is fracking game so much... the enemy ai seems able to one shot me every %&%$ time, trying to beat this level for 20th time now.
Doesn't help that the buildings in the depot can be shot and ran straight through. So many bugs ruin this game.
13th time lucky what is it with this game and one shot kills i like a challenge but this games takin the p@#s i found sending your troops in and hiding behind some concrete and sniping them is a good idea
I ate applesauce
after taking out the AT teams i simply stole one of the friendly LAVs and stormed the fuel depot with its 30mm autocannon