Counterstrike - C5
Lost Planet 2 Walkthrough and Guide
Counterstrike
Chapter 5
Mission 1
Objective: Activate Data Posts and Transmit Intel
All Data Posts Activated -- Activate all five Data Posts in the level to earn this GJ award.
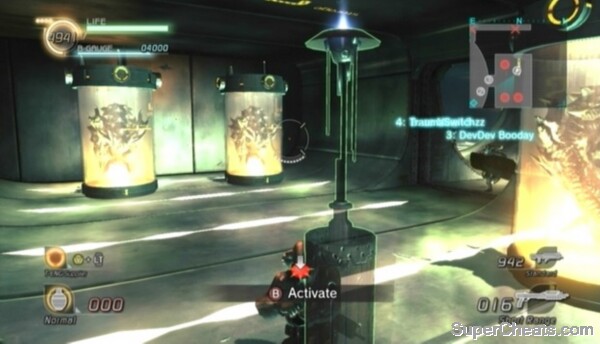
Activate the Data Post in front of you at the start of the level and then head through the automatic door on the left. Approach the door on the south side of this room and be ready with a Hand Grenade. Throw a grenade down at the group of soldiers once both automatic doors are open and shoot the grenade to clear out the soldiers before entering the room.
Approach the unlocked door on the east side of this room. Gun down the two soldiers in the next room and then proceed through the unlocked door at the other end. Kill the three soldiers here and exit through the doorway at the opposite end of the room to find the second Data Post. There are three more soldiers in this room; kill them, activate Data Post 2 and then collect the Shotgun in the southeast corner.
 Lob grenades at groups of enemy soldiers. |
Once the second Data Post is online, backtrack to the room marked 1-04 and then enter 1-05 via the doorway at the north end of the room. There are six enemy soldiers in the next room. Toss a grenade over the Shield user and hit the soldiers standing by the Data Post. To kill the Shield user, either get behind him and let your allies take him out or bounce a grenade behind him.
Activate Data Post 3 once the room is clear and then exit through the door at the north end of the room. Head through the door marked 1-04 and then the door marked 1-A. Kill the soldier behind the cover at the bottom of the ramp. The door marked 1-B will open, revealing three soldiers (one of whom has a Plasma Gun) and an enemy Baylid VS. It helps if you still have grenades, but if you don't, just take cover by the side of the door and wait for the Baylid to come to you. Blast the VS with your Shotgun to destroy it.
Once the Baylid and enemy soldiers have been dealt with, proceed through the door marked 1-C and head down the ramp to reach the second floor. The ramp down to the storage area is infested with Genessa, Sepia and Bolsepia. Blast your way through with your Shotgun. Bolsepia are the red exploding akrid, so kill those from a distance.
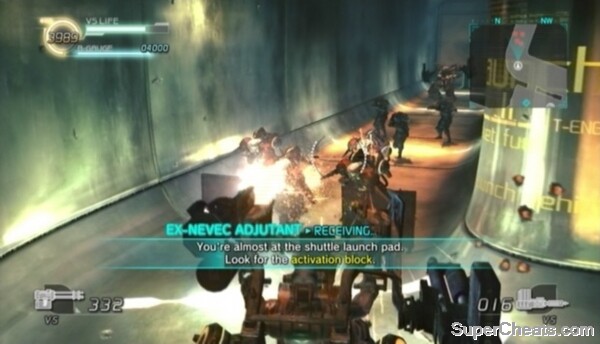
Turn right at the bottom of the ramp and pick up the Shotgun by the doorway to the shuttle launch site. There are Vodoggs roaming this floor, so be careful.
Objective: Beware the Cylinders
All Akrid Defeated -- Kill all of the Vodoggs that break free from the cylinders in rooms 2-B and 2-C to earn this award.
In 2-B, activate Data Post 4 and then fight off the three Vodoggs when they break out of the cylinders (as if you couldn't see that one coming). Shoot these akrid in the head with your Shotgun to make short work of them. There are four more Vodoggs in cylinders in 2-C, as well as some Body Armor.
 The Vodoggs will break out of their cylinders once the Data Post in 2-B is online. |
After activating Data Post 4, proceed through the door marked 2-D at the south end of the main room and head down the ramp to reach the third floor. At the bottom of the ramp, sprint to the automatic door marked 3-B up ahead and enter the room.
Objective: Defeat the Akrid Sentries!
All Sentries Defeated -- Destroy all three of the Dongo Gears in the launch facility to earn this award. Activate Data Post 5 to find the third Dongo Gear.
Blast the enemy soldiers in 3-B and then open the T-ENG chest closest to the door to find a Rocket Launcher. Swap your Machine Gun for the Rocket Launcher and hop in the Baylid VS parked on the other side of the room. The Baylid is armed with a Gatling Gun and a VS Shotgun, which you can use to tear through the two Dongo Gears outside.
Kill the two Dongo Gears and then start down the corridor marked 3-06. Don't turn the corner just yet, as four enemy soldiers wearing Battle Armor will soon appear. Fallback a bit and blast these guys with your VS Shotgun when they come around the corner. One of them is wielding a Shotgun that can paralyze targets, which can make killing this group a bit difficult.
Once those four soldiers are down, turn the corner and take down the enemy Baylid VS at the other end of the corridor. These Baylid is armed with two VS Shotguns, so if it wrecks your VS, eject and use your Rocket Launcher to finish it off.
 Data Post 5 is heavily guarded, so be careful. |
Activate Data Post 5 at the other end of the corridor and head back to 3-A. Leave the Baylid behind and make sure you end this level wearing Battle Armor. You can either re-equip the armour you dropped when you hopped in the Baylid or take the Battle Armor in one of the T-ENG chests in 3-C.
The elevator in the middle of 03-A is accessible now that Data Post 5 is online. The last Dongo Gear is on the elevator, so kill it with your Rocket Launcher before crossing the red line to end the level.
Mission 2
Tap the A/X button while in mid-air to swim while underwater.
Objective: Find the Control Post
Be sure to activate the four Data Posts here before activating the Control Post. To get to the first Data Post, walk out onto the ramp outside the facility and look northwest for a Data Post next to a VS Rifle on the walkway below. Drop down to the Data Post and activate it to reveal the map on your Radar, as well as the locations of the other three Data Posts and the Control Post.
To determine if you're at the same elevation as one of the Data Posts, look at that Data Post's symbol on the Radar. If the symbol is greyed out, this means the Data Post is at a higher or lower elevation. If the symbol is bright yellow, this means you're at the same elevation as that Data Post. Use the large fans (look for turbulence) on the walkways around the facility to propel yourself up one level.
Collect any Rocket Launcher and Shotgun ammo you come across while searching for the other Data Posts, as you'll need plenty for the boss battle coming up. Once you've activated all four Data Posts, make your way to the Control Post and activate it to get started.
 Take down the Experimental Weapon! |
Objective: Destroy the Experimental Weapon's Armor
Armor Completely Destroyed -- To earn this GJ award, destroy the two weak spots on the Vital Fortress's wings, the weak spot on its front sensors and the weak spot on its rear thrusters.
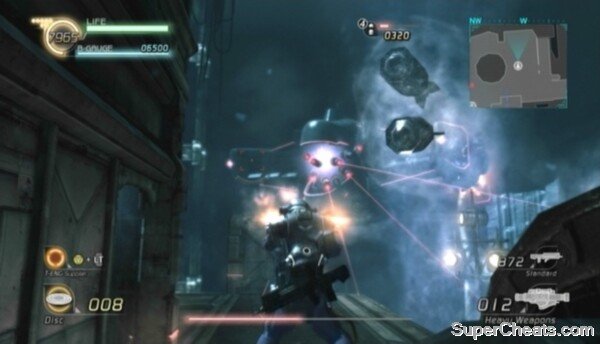
The experimental weapon -- dubbed 'Vital Fortress' -- is a large, heavily-armoured submarine craft capable of firing a ridiculous number of torpedoes at once. Throughout the battle, Vital Fortress will circle around the facility, occasionally stopping to fire a barrage of torpedoes at you and your allies.
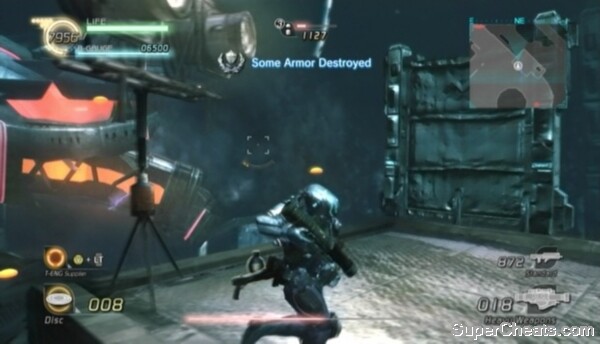
Vital Fortress has eight pieces of armour: two on each of its wings, two on its front sensors and two on its body. To destroy the armour on its wings, target the stabilizer on the back each wing and the engine on the front of each wing. When a stabilizer is destroyed, it will bend and the light on it will change from red to yellow. The engine and front sensors, when destroyed, will continuously spark. The rear thrusters will fall completely off.
When all of Vital Fortress's armour is destroyed, keep on targeting these weak spots to continue dealing damage.
The Rocket Launcher is most effective against this enemy, as are other explosive weapons such as the Rocket Pod and Grenade Launcher. There is plenty of Rocket Launcher ammo scattered around the facility. It is safest to attack Vital Fortress from above, as doing so gives you ample time to dodge incoming torpedoes.
 Destroy all of Vital Fortress's armour to earn the Gold GJ award. |
Objective: Defeat the Reinforcements!
Reinforcements Routed -- Kill eight of the enemy reinforcements to earn this GJ award.
At some point, enemy reinforcements will drop onto the upper walkways. Kill eight of them to earn the Gold GJ award. Look for red blips on your Radar to track them down.
Objective: Take Out the Torpedoes!
Torpedoes Destroyed -- Destroy at least 20 of the torpedoes fired by Vital Fortress to earn this award.
Vital Fortress has three different types of ammo: standard torpedoes, interdiction torpedoes and mines. Use the Shotgun to destroy incoming torpedoes or mines. The standard torpedoes can be easily avoided if you keep moving. If you do stand in one spot, all of the torpedoes Vital Fortress fires will come at you one after the other, making them difficult to dodge with a roll.
Mines are the large, spiky, slow-moving projectiles fired by Vital Fortress. They have a huge blast radius, so destroy them from afar.
Objective: Escape from the Interdiction Torpedo!
Team Member Rescued -- This objective will become active if you or one of your allies is hit by an interdiction torpedo (the spinning cluster of smaller torpedoes). When hit by one of these torpedoes, the character will be stunned for a short period of time. A stunned player can rapidly move the Left Stick back and forth to escape. Alternatively, a teammate can shoot a trapped ally to instantly free them, earning this GJ award in the process. If the trapped player is forced to free themselves, the bronze 'Team Member Escaped' award will be earned instead.
 Shoot incoming Interdiction Torpedoes to break them up. |
If you're playing solo, it's unlikely the AI will free you if you're hit by one of these torpedoes. Even so, you can still earn this award by freeing a trapped AI partner.
Objective: Get the [?] Boxes!
Completist -- Collect 20 of the [?] Boxes dropped by Vital Fortress when it's destroyed to earn this award.
Once you've depleted Vital Fortress's health bar, it will circle around the facility twice more, spewing [?] Boxes as it goes by. Make sure you're on level with Vital Fortress when it's health is low to give yourself a better chance of grabbing more boxes.
No comments yet. Tell us what you think to be the first.