Gold Bricks
Thank you for printing this page from www.SuperCheats.com.
Remember to come back to check for updates to this guide and much more content for Lego Jurassic World
Follow this guide to hear about updates
By mogg1342
Last Updated:
The game has a total of 275 gold bricks waiting to be picked up, and while this is completely optional and you can pass on trying to look for the entire lot, finding every last one of them is required for the Next Time It'll Be Flawless! trophy. Gold Bricks are awarded for the following:
That brings the total to 150 Gold Bricks. As for the remaining 125, they are scattered throughout all four hub areas in the game and you'll have to locate them yourself. I strongly suggest having the Gold Brick Finder ability to assist you for this, as it will definitely help in this long, long process.
Jurassic World Gold Bricks
Here's a list of the gold bricks I've found in this hub so far.
Gold Brick #151: Main Street. Enter the Arcade Building and have Lex play the racing game. Reach the finish line within the time limit.
Gold Brick #152: Main Street. Outside the Arcade Building, fire at the target off to the left corner of the roof.
Gold Brick #153: Main Street. Shoot the target to the left of the Coffee Shop, then fire at all the targets that appear.
Gold Brick #154: Main Street. There are two green pipes on both sides of the guitar shop. Send a small dino through them and destroy the gold objects on the awning.
Gold Brick #155: Main Street. The building to the left of the Coffee Shop has handholds to climb to the roof with. At the end of the roof is the brick.
Gold Brick #156: East Boardwalk. At the petting zoo, kick three of the red soccer balls into the goal.
Gold Brick #157: East Boardwalk. After getting #156, go right to an elevator. Activate the generator, go up, track scent with raptor to find brick.
Gold Brick #158: East Boardwalk. After getting #157, ram the destructible wall nearby.
Gold Brick #159: West Boardwalk. Enter building at end of T. Rex Kingdom. Use lift to go down and destroy the amber rocks on the dino paddock.
Gold Brick #160: West Boardwalk. Enter building at end of T. Rex Kingdom. Use lift to go down and shoot target on upper left side of the lift.
Gold Brick #161: West Boardwalk. After getting #160, summon a T. Rex, smash the orange rock up ahead. Solve the math puzzle and have the other T. Rex kill the Galimimus herd that shows up.
Gold Brick #162: West Boardwalk. After getting #161, ram the four white destructible rocks in the area.
Gold Brick #163: West Boardwalk. After getting #162, search the edges of the area for a green pipe the Comsognathus can fit into and follow it to the brick.
Gold Brick #164: Mosasurus Arena. Go down to the lower level and finish rebuilding the device on the left.
Gold Brick #165: Mosasurus Arena. Summon a Mosasaurus and swim underwater near the bottom and search. This one is surrounded by studs.
Gold Brick #166: Mosasurus Arena. Summon a Mosasaurus and swim underwater, killing 2 seahorses and a starfish
Gold Brick #167: Mosasurus Arena. Summon a Mosasaurus and swim underwater, killing 4 sharks.
Gold Brick #168: Gyrosphere Valley. Take a gyrosphere to a forward to a platform so you can jump across the lake. At the other side, turn around and look for a small dock. Throw a grappling hook here to drag the brick to you.
Gold Brick #169: After getting #168, look for a dino paddock and summon a Brachiosaurus. Destroy 3 of the big white glowing rectangular panels on the ground.
Gold Brick #170: Shady Grove. Kill 5 of the small dinos that swarm near the brick.
Gold Brick #171: Shady Grove. After getting #170, go forward and cut the lock off of the wooden gate.
Gold Brick #172: Shady Grove. After getting #171, find the bridge to cross the water and hop on the footholds to cross the stream. The brick is in the cave.
Gold Brick #173: Shady Grove. After getting #172, turn around back across the stream. Climb to the top of the hill then destroy the black rock with a Dilophosaurus from across the gap. Parachute across afterwards to grab the brick.
Gold Brick #174: The Aviary. Use Dilophosaurus to smash the black rock then track the scent with a Raptor to find the brick.
Gold Brick #175: The Aviary. After getting #174, enter the building and summon a flying dino to get this brick some distance away.
Gold Brick #176: Indominus Territory. Look around the area for 4 destrictible trees and ram them.
Gold Brick #177: Indominus Territory. After getting #176, summon an Apatosaurus from the dino paddock and destroy the big white glowing rectangular panel.
Gold Brick #178: Indominus Territory. After getting #177, summon a dino that can roar (Indominus Rex) and enter the gate that is guarded by the security camera. Destroy the 3 orange rocks here to get the brick.
Isla Sorna Gold Bricks
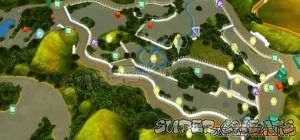
For Gold Bricks 191 - 195 refer to the image for the general location of the area. Here's a list of the gold bricks I've found in this hub so far.

Gold Brick #179: InGen Compound. Kill at least 5 of the small dino pack that ambush you within the time limit.
Gold Brick #180: InGen Compound. After getting #179, shoot the blue target nearby and the red object gives the brick.
Gold Brick #181: InGen Compound. There is a glass in the area for Lex to shatter. Solve the math puzzle in the room beyond.
Gold Brick #182: InGen Compound. Locate 3 letter panels for the faded INGEN logo outside and this piece is yours.
Gold Brick #183: InGen Compound. To the right of the INGEN logo is a device the raptor can pull for this brick.
Gold Brick #184: Crash Site. Search the area for a piece of white wreckage that can be rammed.
Gold Brick #185: Crash Site. After getting #184, Have a Raptor track the scent nearby all the way to the brick.
Gold Brick #186: Crash Site. Find a total of eggs and put them back into buckets where they belong.
Gold Brick #187: Spinosaurus Territory. Summon a T. Rex and roar at the orange rock to trigger a dino attack. Kill all of them.
Gold Brick #188: Spinosaurus Territory. Dive into the dung pile near the dino paddock. Build the device and it spits out this brick.
Gold Brick #189: Spinosaurus Territory. Look near the base of the trees for a plant to water and grow, leading to this piece.
Gold Brick #190: Spinosaurus Territory. Summon a T. Rex and roar at the orange rock by the ledge. Send someone to climb the wall and enter the cave.
Gold Brick #191: A little deeper in the area, activate the control panel and ram the wall. Crawl into the hatch for the brick.
Gold Brick #192: Destroy the three black rocks with a Dilophosaurus to get this.
Gold Brick #193: Cross the pond and grow the plant at the other side, allowing you to reach the brick.
Gold Brick #194: After getting #193, turn around and have Eric Kirby scatter the small dinos from the debris.
Gold Brick #195: Destroy the black rock nearby and enter the cave.
Gold Brick #196: Ankylosaurus Territory. Go forward and scare off the small dinos with Eric Kirby to find a digging spot where this brick is buried.
Gold Brick #197: Ankylosaurus Territory. There are four big white boxes that can be rammed with a dino and doing so gives you this piece.
Gold Brick #198: Ankylosaurus Territory. Have a dinosaur that can roar smash the orange rock by the tree.
Gold Brick #199: Aviary. Go downstairs, fix the dino paddock and summon a Pternadon. Drop off on the left side and fly straight to spot this piece.
Gold Brick #200: Aviary. After getting #199, fly left and land on the area that has 3 eggs. Kill at least 5 of the small dinos that attack.
Gold Brick #201: Aviary. After getting #200, fly and search for three campsite models, destroy them.
Gold Brick #202: Aviary. As a human, try a locate a launching point for your parachute and fly over to one of the remote ledges for this brick.
Gold Brick #203: Aviary. This is behind a locked gate. Use the Pternadon to pull on the levers on the ground to open it.
Jurassic Park Gold Bricks
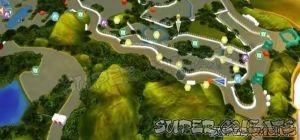
For Gold Brick #235, refer to the left image for the general location of the area. For Gold Bricks 248 - 253 refer to the right image. For Gold Bricks 258 - 262, check the bottom image. Here's a list of the gold bricks I've found in this hub so far.

Gold Brick #204: Jurassic Park Gate. Turn around and you'll find a generator to fix at the bottom of the staircase. Fix it to open a smaller gate.
Gold Brick #205: Isla Nublar Helipad. Head to the rocky area, shoot at the target and have a raptor track a plant you can grow.
Gold Brick #206: Brachiosaurus Plains. Run to the edge of the plain until you spot the giant dinos and shoot the target on the tree.
Gold Brick #207: Brachiosaurus Plains. A bit further from #206 is a destructible wall you can ram and find the brick beyond.
Gold Brick #208: Visitor Center. Pull down the pillar on the lake and use it and the lilies to reach the brick.
Gold Brick #209: Visitor Center. Head to the rear of the building shoot at the target on the roof, then turn back and give someone a boost to reach the crate and push it down. Build the ladder and climb to the roof.
Gold Brick #210: Visitor Center. Head to the rear of the building and you'll see something a raptor can hang onto. Climb up to get the brick.
Gold Brick #211: Raptor Territory. Look for a crawl space beneath the fence. Go through it then use the zip line.
Gold Brick #212: Raptor Territory. After getting #211, drop down, operate the panel and ram the wall down for this brick.
Gold Brick #213: Raptor Territory. Drop off to the outer perimeter and pull oprn one of the containers. Defeat the small dinos.
Gold Brick #214: Raptor Territory. Return to the main area, shoot the blue target by the stairs and also the one at the other end. This adjusts all the lights producing a box you can pull open.
Gold Brick #215: Jurassic Park Gate. Simply fix the vehicle and this brick is yours.
Gold Brick #216: Jurassic Park Gate. Hang onto the torches and climb along the left side of the gate for this.
Gold Brick #217: Jurassic Park Gate. Use Lex to break the glass by the toilet hut.
Gold Brick #218: Jurassic Park Gate. Build a fulcrum on the left of the toilet hut and use it to reach this brick.
Gold Brick #219: Jurassic Park Gate. Back on the main path, go along until you see a door that can be pried open. Operate the panel inside and climb the ladder.
Gold Brick #220: Jurassic Park Gate. Back on the main path, go left some more and you'll see a hatch. Go through and collect this one.
Gold Brick #221: Jurassic Park Gate. Summon a jeep from the paddock next to the toilet. Drive out of the gate and along the left side until you spot a hut. Operate the panel here to open garage door with thid one inside.
Gold Brick #222: Dilophosaurus Territory. From your starting position, Shoot the 3 targets on the coconut trees.
Gold Brick #223: Dilophosaurus Territory. Cut the vines behind the shack and enter the cave.
Gold Brick #224: Dilophosaurus Territory. Dig up the patch not far ahead of the hut, build the trampoline and use it to reach the brick.
Gold Brick #225: Dilophosaurus Territory. After getting #224, cut across through an opening in the fence and use the Dilophosaurus to shoot 3 coconuts off some tree.
Gold Brick #226: Dilophosaurus Territory. Ram the yellow container to destroy it and get this piece.
Gold Brick #227: Dilophosaurus Territory. There is something you can pull from atop the pillar. Follow the scent with raptor to find this.
Gold Brick #228: Tour Route. Go forward, grab the tracker at the side of the road and dig up the plant to grow it for this brick.
Gold Brick #229: Triceratops Territory. Move along and jump over the fence to the left to find a cave. Send Timmy inside to build the chest.
Gold Brick #230: Triceratops Territory. Go through the opening on the wire fence. Circle around the lake until you spot a tracker. Use that to find this one.
Gold Brick #231: Triceratops Territory. Locate and ram 10 destructible wood pillars within the time limit.
Gold Brick #232: Triceratops Territory. Search for a dino paddock and summon a T. Rex then go pull the lever on that gray block near the metal bridge.
Gold Brick #233: Triceratops Territory. After getting #232, turn left and go forward. This brick is on a ledge to the left.
Gold Brick #234: Triceratops Territory. Just a bit ahead of where you got #233, use Eric Kirby to scatter the small dinos behind the fence. Smash the object.
Gold Brick #235: Hop on the small footholds to cross the stream and reach this brick.
Gold Brick #236: T. Rex Enclosure. Go forward and scale up the wall when you can. Parachute across the gap on top.
Gold Brick #237: T. Rex Enclosure. Drop down and continue forward after getting #236. Shoot the two blue targets at the end of the path.
Gold Brick #238: T. Rex Enclosure. Dive into the dung pile then have the raptor track the scent to this brick.
Gold Brick #239: T. Rex Enclosure. Enter the pen area, have a raptor grab onto the bar there to reach the section with this piece.
Gold Brick #240: T. Rex Enclosure. Shoot the black blocks to the left of the dino paddock.
Gold Brick #241: East Dock Route. Dig up the soil patch and fix the car.
Gold Brick #242: East Dock Route. Go forward, dive into the dung pile to find a tracker and use it to find this brick.
Gold Brick #243: East Dock Route. After getting #242, turn around back to the main path and go left. Cut the vines, go through two hatches.
Gold Brick #244: East Dock Route. After getting #243, drop down, head left to a clearing where there are some poles to jump on.
Gold Brick #245: East Dock Route. After getting #244, have Lex break the glass of the house next to Henry Wu.
Gold Brick #246: East Dock Route. Head down the slope, smash the black rock with a Dilophosaurus and build the aerosol can.
Gold Brick #247: East Dock Route. Operate the nearby panel to clear away the spider web then smash the with a Dilophosaurus.
Gold Brick #248: Shoot some bananas off the trees to find a tracker, use it locate a plant and grow it. Use the flower to reach the brick on the hut.
Gold Brick #249: Shoot the blue target on the container to open it. You'll find a character and this piece inside.
Gold Brick #250: Enter the pen area, send a Compy into the pipe to press the switch which opens the box.
Gold Brick #251: Some ways past the guy who has egg problems is a scent for the raptor to track to this brick.
Gold Brick #252: Jump on the narrow footholds over to a ledge where you can parachute to another brick.
Gold Brick #253: Look for a big white destructible debris and smash it. Head into the swamp, kill at least 5 of the small dinos.
Gold Brick #254: Gallimimus Territory. Summon a T. Rex from the dino paddock and roar at 3 orange rocks
Gold Brick #255: Gallimimus Territory. Send T. Rex to pull the lever on that white block. Enter the cave for the brick.
Gold Brick #256: Gallimimus Territory. Find 3 plants and grow them into flowers.
Gold Brick #257: Gallimimus Territory. Summon a Brachiosaurus from the paddock and have it smash 3 of the white glowing squares on the ground.
Gold Brick #258: Go through the hole in the fence, cross the stream then scale up the wall.
Gold Brick #259: Go forward to the end of the path and use the hanholds on the wall to climb up
Gold Brick #260: Stand on the stone walls at the side of the path, and a parachute marker should appear when you're directly across from the ledge with this brick in the distance. Climb the wall at the other side to reach it.
Gold Brick #261: Head on back to find a destructible log north of the dino paddock.
Gold Brick #262: Find a black rock to be smashed by a Dilophosaurus, build the target and shoot it. This brings up several targets that you must hit within the time limit for this piece.
Anything missing from this guide?
ASK A QUESTION for Lego Jurassic World
Comments for Gold Bricks
Add a comment
Please log in above or sign up for free to post commentsTable of ContentsClose
- Jurassic Park Walkthrough
- The Lost World Walkthrough
- Jurassic Park III Walkthrough
- Jurassic World Walkthrough
- Jurassic Park Minikits
- The Lost World MInikits
- Jurassic Park III Minikits
- Jurassic World Minikits
- Collectibles
Guide Updates
Get notified of updates to this guide
Many of our guides get updated with additional information. To get an email when this guide is updated click below.
 Join us on Discord
Click to close
For some reason the lantern you have to destroy with a dinosaur and defeat some hunters in the Stegosaurus Territory isn't showing up on my game which I have for the Nintendo Switch. How do I get that lantern to show up again?
Never mind it showed up after I did the red brick where you have to smash the cracked walls.
Is there a reason The Lost World gold bricks are not included in this list? Please include them I am stuck on the gold brick on the upper left hand corner of the communications center. I did the race but it is still showing a gold brick indicator. It looks like some kind of garage door you have to open.