1: Operation Aurora
Battlefield: Bad Company 2 Walkthrough and Guide
Level 1: Operation Aurora
Story:
In this tutorial level you play as a different squad to B Company, set in 1944. A small group of commandos was sent to retrieve a Japanese scientist with crucial information for the allied war effort. Your character is not Preston Marlowe, but Thomas Wyatt.
Collectibles:
None
Other Collectibles:
None
M-COMs:
None
Walkthrough:
The level begins at dawn, out at sea and in motorised dinghies. This is supposed to be a stealth mission, but as the boats move along they are spotted by a Japanese light. The first boat of the two is gunned down, before the enemy turn their attention to your crew. The game automatically has your character dive underwater, and when the cut scene ends you are back on dry land.
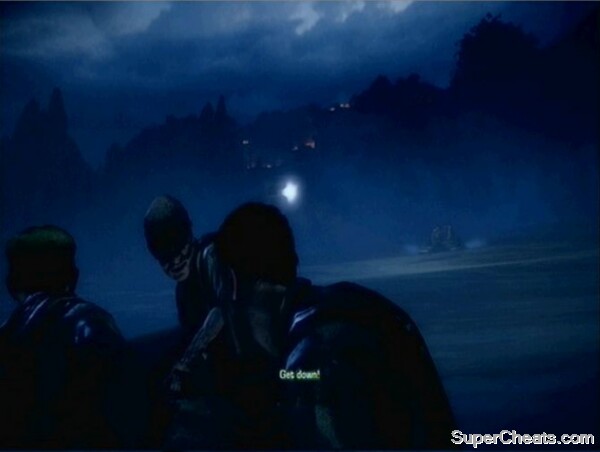 The point team did not fare so well in the night-time raid |
Secure Safe Passage to Rendezvous Point:
Proceed up the path once you gain control of Wyatt. Ahead is a pair of enemy guards. You are appointed the role of taking the left-hand one out stealthily, so use the melee button to knife the soldier.
Reach Trenches:
As you cross the water and head up the hill, an allied soldier throws you a Japanese Type-100 SMG.
TIP: There is no HUD (head-up-display) on this level unlike on every other Bad Company mission. This may seem like a disadvantage, but the positive is that you get infinite ammo, including grenades, once you first pick them up.
Follow McKee:
After you have crossed the thin wooden bridge, you will be ordered into the trenches. Your ally will take out a guard ahead, but at the top of the next set of steps the reverse will occur as he waits for you to clear the trench. You will find around three guards here, so use the steps for cover against them.
TIP: Pick up an additional weapon from one of the downed Japanese. While ammo is infinite, having the range of the Type 5 rifle can be handy later on.
 Help McKee to clear the trenches |
Proceed through trench after trench, taking out the enemy infantry in each room and area. You should pass through three in total, including the first instance where you were required to deal with the enemy. Climb the hill and ladder on the next path, before following a narrow track to come out overlooking a lush field bathed in daylight.
Stay on the path between the fences to catch up with your squad. Make sure you duck down when ordered and remain still to avoid the wrath of the Japanese convoy rolling through (though it is actually a cut-scene, so you can’t physically be spotted). When the air support rips through it, you are given control and can mop up the stragglers.
Locate the Defector:
It is a reassuringly short walk up the path to locate the Japanese scientist. Cross the wooden bridge to trigger a cut-scene.
Your squad does not know the truth behind this mission: that the information the scientist has is in relation to a devastating super-weapon. Our task it simply to get him off the island and back to US soil.
Follow Unit to Airfield:
With the bridge cut, climb even higher to come to a position overlooking a Japanese airfield.
 We need to clear the airfield to get a vehicle |
Capture Enemy Vehicle:
From the top of the hill try to pick off the infantry by the front entrance using your Type 5 rifle. With this done, proceed down the hill. The vehicles are located in the section to the right of the large building destroyed by aircraft fire. You can use the trench at the front of the base for cover while moving up.
TIP: While you cannot tell when you first pick up grenades, you do now have them (in unlimited supply), so use them to your heart’s content!
The collapsed building has stairs leading to the roof, even once it has been destroyed. From here you can gain a good vantage point over the vehicles, and clear the area before moving in.
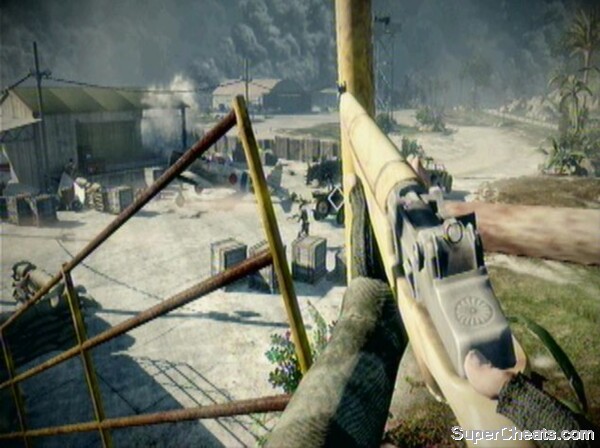 Use this building to flank the vehicular area |
Defend Vehicle:
Once you reach the vehicle, you will mount the gun. It is difficult to fail this section, but you should nonetheless try to take out any RPG-wielding enemies threatening the jeeps. Watch out for those on bridges, and the jeeps which come in front of your vehicle to slow you down. Once you are driven to the target area, you will disembark and must then head around the corner on foot.
Find Subpen Location:
A Japanese enemy will run round the corner, so ensure you have the Type 100 out to mow him down. Around the corner there is also an enemy behind the sandbags, and another two will come into view from up ahead. There is one final enemy near the door you have to pass through to get to the subpen, near the crates.
Breach Subpen Interior:
The door needs to be breached before your squad can proceed. Follow the on-screen instructions to place TNT on the door, before standing back and detonating the charges. You will then find yourself in the pen itself.
 The subpen is crawling with enemies |
Escape to Captured Enemy Sub:
Inside the subpen the whole place is coming down, as the Japanese weapon is being armed. Just before you cross to the other side of the pen, enemies will spill out towards you. Riddle them with bullets and move into the next area. Guards will be in the distance ahead of you. Follow the gangway to the left, shooting the infantry on the walkway above and then those at the end of the path you are on. Across the bridge to the right are more enemies.
Deal with them and pass into the final subpen. Use the path to the left once more, and cross the plank onto the submarine to trigger the final cut-scene and the level’s end.
Fight through the subpen to the end of this prologue level.
The weapon goes off as your squad is fleeing the island. It creates a huge wave that destroys the submarine and everyone on board.
No comments yet. Tell us what you think to be the first.