Bruma Quests
The Elder Scrolls IV: Oblivion Walkthrough and Guide
The Elder Scrolls IV: Oblivion Guide - Side Quests
Bruma Quests
This side quest contains the following sections, just scroll down to read, or use the anchor links in the list below to jump straight to the section you are interested in.
A Brotherhood Betrayed
Two Sides of the Coin
Lifting the Veil
Buying a House in Bruma
A Brotherhood Betrayed
While in Bruma, you may hear talk of a man named Raynil Dralas. If so, you can then speak to almost any NPC wandering the streets of Bruma and select the 'Raynil Dralas' dialogue option to learn more. Whomever you ask, you will be pointed to Bradon Lirrian's House. If the 'Raynil Dralas' dialogue option is not yet available, you can simply visit Bradon Lirrian's House to start the quest
Inside Bradon Lirrian's House, you'll find two Bruma guards, Bradon's wife, and the late Bradon. Speak to the guards first, and then to Erline, Bradon's wife. Bradon was killed by Raynil Dralas, who is a vampire hunter. Erline can't tell you where Raynil is, but a merchant or innkeeper in Bruma can help you. Locate Olav's Tap and Tack in Bruma, head inside, and speak to Olav. Raise his disposition to at least 70 using bribery or the persuasion mini-game to learn that Raynil has a room rented out in the tavern.
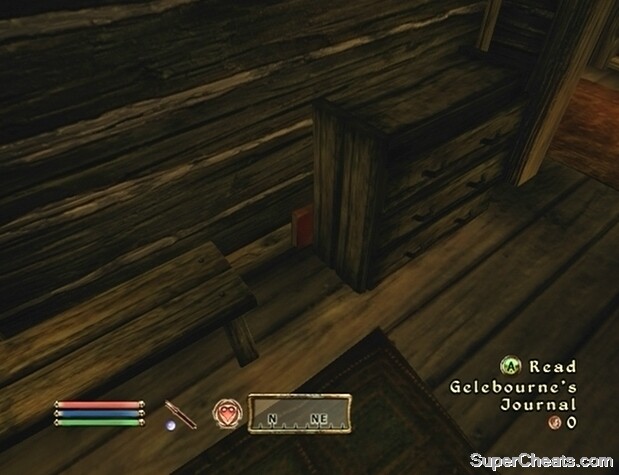 Look for Gelebourne's Journal behind the dresser in Raynil Dralas' room in Olav's Tap and Tack. |
Once you have the room key from Olav, locate Raynil Dralas' room and step inside. Upon entering, look for a book wedged in the corner of the dresser to your right. Read Gelebourne's Journal, and then ask Olav about Gelebourne. For additional information, return to the Bradon Lirrian's House and speak to Erline again. Then, speak with Carius Runellius about Gelebourne. He'll tell you to meet him at Olav's Tap and Tack in one hour.
After speaking to Carius Runellius, wait for him in Olav's Tap and Tack. He should arrive within the hour, and will tell you that Raynil Dralas was seen heading west, coincidentally in the same direction as the cave mentioned in Gelebourne's Journal. Boreal Stone Cave has been marked on your map; you'll have to get there before Raynil can retrieve the artifact and escape. If you do not complete this quest within 24 hours, Raynil Dralas will have escaped, and you won't receive a reward. So get on it!
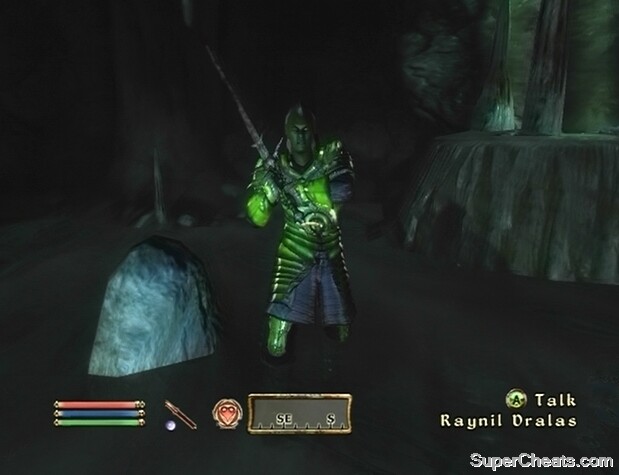 The treasure is in Boreal Stone Cave. Get there before Raynil Dralas makes off with it! |
Travel to Boreal Stone Cave and step inside. Locate Raynil Dralas inside and defeat him. Then, look around for a treasure chest and remove the Mundane Amulet from it. With the Mundane Amulet in your inventory, return to Erline Lirrian and speak to her once more. The Mundane Amulet will turn to the Phylactery of Litheness, which Erline will allow you to keep. This amulet boasts a levelled Fortify Speed enchantment.
Two Sides of the Coin
Arnora Auria is looking to find some money that has been stolen from her. Speak to almost any NPC in Bruma, select the 'Rumours' dialogue option, and you are sure to hear of her problem. With 'Two Sides of the Coin' set as your active quest, follow the arrow on your compass to Arnora's House in Bruma. Speak to Arnora inside, and select the 'Jorundr' dialogue option. If she refuses to tell you anything, raise her disposition to at least 60 using the persuasion mini-game or bribery. Then, select 'Stolen Gold' dialogue option for the details. She wants you to enter the Bruma Castle Dungeons and ask Jorundr about the stolen gold.
After speaking to Arnora, fast travel to Castle Bruma, enter the castle, turn right, and proceed through the door to the Bruma Barracks. Here, turn left and head through the door to the Castle Bruma Dungeon. Find and speak to the Bruma Jailor, who should be sitting at a desk just outside of the cellblock. Select the 'Visit a prisoner' dialogue option and the jailor will unlock door for you.
In the Bruma Castle Dungeon, look for Jorundr behind bars. Unfortunately, he won't tell you anything unless you're in the cell with him. The only way to get in there is to get yourself carted off to jail. There's no need to do anything rash; just something that will get you thrown into the slammer for a negligible amount of time. Simply approach a marked item, such as the tools on the table directly across from Jorundr's cell, and press the LB/L1 button to pick it up. When the Jailor confronts you, select the 'Go to Jail' option.
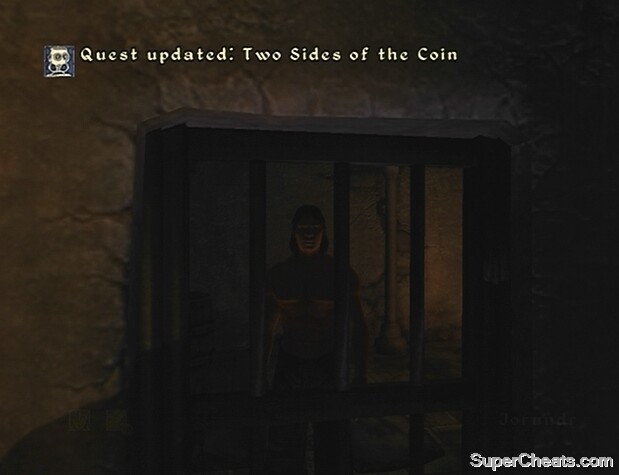 Speak to Jorundr in the Bruma Castle Dungeon. |
Once inside the jail cell, ask Jorundr about the Stolen Gold. Jorundr will tell you a completely different version of the story. He claims that Arnora framed him, and as his final act of revenge, he wants you to kill her. Depending on the kind of character you're playing, you may be against that. He'll tell you where the gold is, provided you bring him the amulet that Arnora wears around her neck as proof of her death. There is a way around this, but how you complete this task is ultimately up to you. Serve your time and when you are out, return to Arnora's House.
Confront Arnora about the stolen gold. She will, naturally, deny Jorundr's tale. She gives you two choices here: you can kill her and bring the true amulet to Jorundr in the Bruma Castle Dungeon, or you can do things her way. If you want to kill her, it doesn't have to be a crime; just tell her that you're going to do it Jorundr's way and she'll attack you. Then, just run outside and the guards should take care of her
If you don't want to get any blood on your hands, choose to do things her way. Arnora will give you a key to the locked chest next to her bed downstairs. Use the key to unlock the chest and remove the amulet. Arnora then wants you to bring the amulet to Jorundr to learn the location of the gold. Once you have collected the gold, Arnora demands that you return to her and give her half of the loot, threatening to tip off the guards to the whole scheme if you don't. If you choose this route, make your way back to the Bruma Castle Dungeons and speak to Jorundr again. After showing him the proof of Arnora's death, he'll tell you that the treasure is buried outside Bruma's north gate.
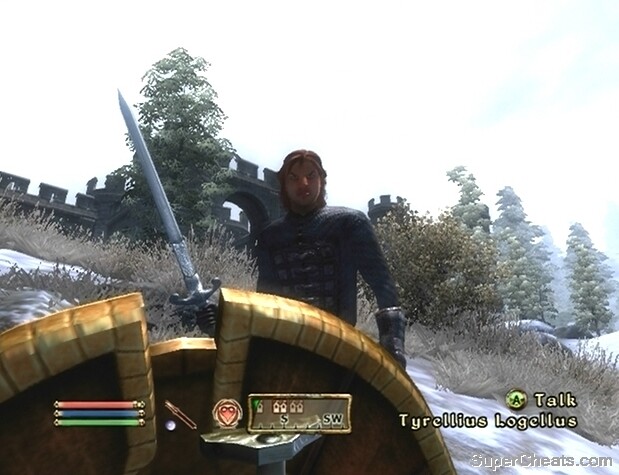 Fight Tyrellius Logellus for the hidden treasure! |
Follow the arrow to the gold outside of the city. Of course, you won't be able to claim the lost loot that easily, as upon reaching the spot where the gold is buried, you will be confronted by one Tyrellius Logellus. Take care of the fool and you are free to claim the gold for yourself. Open the chest to find a couple of books, some gold, some gems, and some jewellery. Not a stash worth killing over, but it's something. Return to Arnora's House in Bruma to find her slain inside. Oh well, more gold for you!
Lifting the Veil
Once your character has acquired some fame by completing quests (10-20), you may be approached by one of the Countess Carvain's servants while in Bruma. The servant informs you that the countess wishes to see you, and tells you between what times she is available. Enter Castle Bruma and see the countess in the throne room between the given times.
The countess has a penchant for Akaviri relics, and asks you to retrieve the Draconian Madstone in exchange for different Akaviri relic. The Draconian Madstone is somewhere in Pale Pass. To aid you in your search, the countess will provide you with a diary, a landmark map, as well as a key to the ruins. There are some tough enemies in Pale Pass, so ensure that you have an adequate supply of health and magicka restoration items before embarking on this quest. You'll also need a silver, enchanted, or Daedric weapon/arrows.
 Use the landmark map to find Pale Pass. |
Your quest begins at Dragonclaw Rock, which is the first landmark on the map. Dragonclaw Rock has been marked on your map, so fast travel to the nearest location available and make your way over there. According to the landmark map, you must head west from Dragonclaw Rock to a statue. So, head west from Dragonclaw Rock to reach The Sentinel statue. From the statue, head north to reach the Serpent's Trail cave.
Upon entering The Serpent's Trail, look around for the remains of the messenger who wrote the diary that Countess Carvain gave you. Clutched in the skeleton's hands is a tablet containing the Akaviri's Orders mentioned in the diary. It's easy enough to find your way out of the cave, but there are some tough monsters in here, so be careful. Look to the local area map if you are having trouble finding your way.
Proceed through the Serpent's Trail exit to enter Pale Pass. The entrance to the ruins can be found by descending the hill. Of course, you will encounter some resistance along the way, either Trolls or Ogres depending on your character's level. When you can no longer progress north, start heading west. You should come to a frozen pond if you are at the right point. Look for a Frozen Barrel near some rocks on the pond; open it to find a Crumpled Note and a Rusty Key. These items are of no importance to this quest, but it wouldn't hurt to take them.
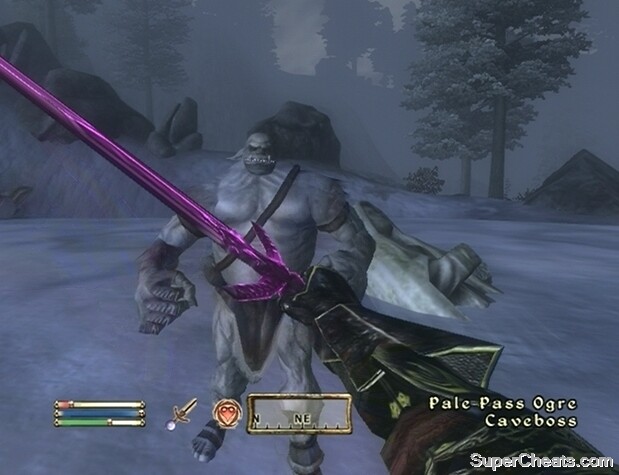 There are plenty of Ogres in Pale Pass. |
You should be able to see the entrance to a fort as you continue heading west. You'll encounter a final band of Ogres before you can enter the ruins. Be careful, as Ogres in packs can be quite deadly. If you have a bow, there are some boulders around that you can hop onto where the Ogres cannot reach you. Don't even try to run past them, as they will follow you into the ruins.
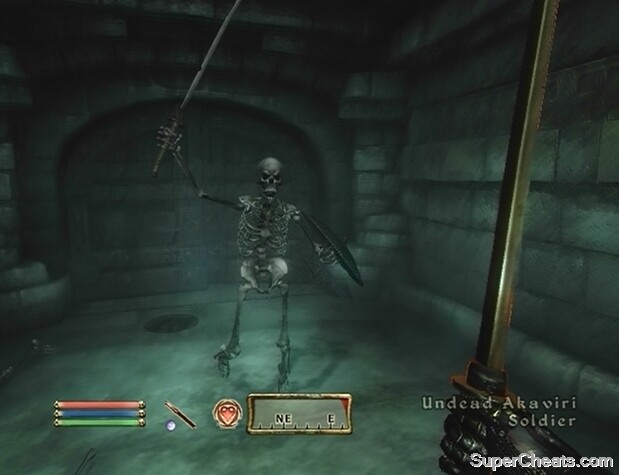
Inside the ruined fort is the entrance to the 'Mouth of the Serpent.' Inside are plenty of undead Akaviri Warriors, so consider saving your game before heading inside. The halls are littered with traps; they're mostly touch pads on the floors, so watch your step. Provided 'Lifting the Veil' is set as your active quest, follow the arrow on your compass while watching for traps on the wall, ceiling, and floor. At the end of this area is a door to the 'Eyes of the Serpent.' Follow the arrow on your compass to the door to the 'Fangs of the Serpent.'
The Fangs of the Serpent is full of traps and undead Akaviri as well. Be especially careful here, as some of the pillars are equipped with arrow launching traps. Activate the Lever to lower the bridge and cross to the other side. You'll encounter more Akaviri soldiers across the bridge, so fallback if need be. Then, proceed through the door to the 'Venom of the Serpent.'
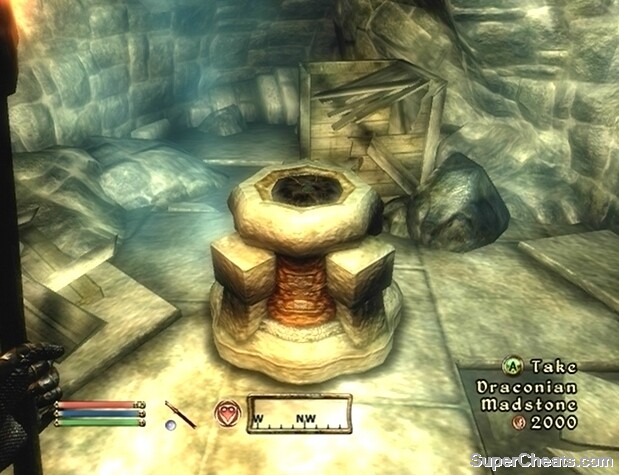
 Fight your way to the Akaviri artifact. |
In the Venom of the Serpent, you'll encounter Mishaxi, an undead Akaviri soldier. Tell Mishaxi the orders, and he'll allow you to step through the doors. If you want to fight him instead, tell him that you're there for the Madstone. It's best not to fight him though, as he is quite tough. The Draconian Madstone is sitting on a pedestal behind where the commander was originally standing. Collect the Draconian Madstone, use lockpicks to open the treasure chests in the area if you are so inclined, and then head through the door here to the 'Scales of the Serpent.'
Once you're in the Scales of the Serpent area, follow the arrow on your compass to a door that leads back to the Mouth of the Serpent. From there, you can return to Pale Pass. Once in Pale Pass, you can fast travel directly to Castle Bruma.
 Deliver the orders to Mishaxi to uncover the Draconian Madstone. |
Present the Draconian Madstone to Countess Carvain in the Castle Bruma throne room while she is there. In return, Carvain will give you the Ring of the Vipereye relic. Though not as useful as the Draconian Madstone, the Ring of the Vipereye boasts levelled Magic Resistance and Fortify Agility enchantments. If you are so inclined, you can sneak into the Castle Bruma throne room at night, unlock the display case there, and take the Draconian Madstone back for yourself.
Buying a House in Bruma
Speak to the Countess of Bruma in the Castle Bruma Great Hall and inquire about buying a house in town. If the Countess won't talk to you about the house, either persuade or bribe her to raise her disposition to at least 60. She wants 10,000 gold for the house. When you purchase the house, she'll give you the key. With 'Buying a House in Bruma' set as your active quest, follow the arrow on your compass and reach your new abode. If you wish to purchase some furnishings for your new home, visit Novaroma in Bruma and speak to Suurootan. You can purchase some furnishing from him at a reasonable price.
how do u beat the persuasion mini-game?