Marshal Johnson's Missions
Red Dead Redemption Walkthrough and Guide
Marshal Johnson's Missions
(New Austin Walkthrough)
You can first accept a mission from Marshal Johnson in Armadillo after completing 'Obstacles in Our Path' in Bonnie MacFarlane's mission line. Bonnie's second mission has you accompanying her to Armadillo, so you might as well complete that one first.
When you're ready to travel to Armadillo, meet Marshal Johnson at the Sherriff's office in town to accept your first mission from him.
Political Realities in Armadillo
Walk with Johnson to the saloon at the other end of town. After the cutscene, press up on the D-Pad to whistle for your horse. Hop on your horse when it comes and start after the red blip on the Mini Map.
Walton and his gang have fled to their hideout -- a small cabin outside of Armadillo. A cutscene will ensue when you reach the place, at which point Marston and Johnson will dismount their horses. After the cutscene, press the RB/R1 button to move out from cover and then sprint to the marker in front of the wagon further up. Press RB/R1 to take cover behind the wagon. Take aim with LT/L2 and blast the outlaw behind the sandbags in front of you.
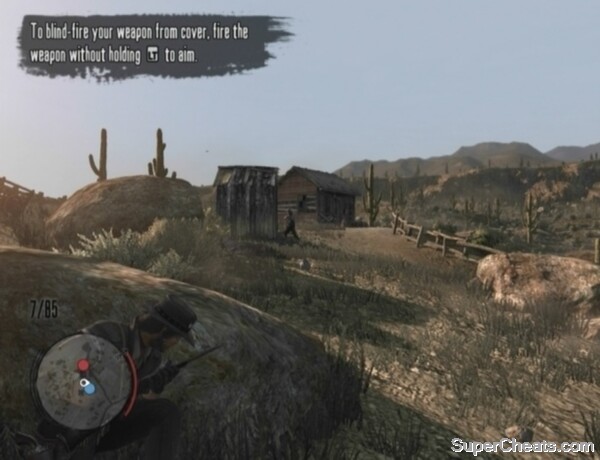 Walton is holed up in Pleasance House. |
With the first outlaw down, move out from cover and sprint to the marker by the crate further up the hill. Kill the outlaw behind the rock when he pops out from cover, then move up and take cover behind the rock. Gun down the outlaw behind the outhouse up ahead and then the one along the side of the cabin when he peeks his head out from around the corner.
Once you've killed the first batch of outlaws, take cover behind the outhouse and kill the last member of Walton's gang behind the cabin. Walton is inside. Move around to the front door and be ready to cap him when he emerges. Use Dead Eye to slow him if necessary. Shoot Walton in the legs once to capture him, which will earn you 200 Honor and allow you to claim his bounty ($20). Shoot him dead and you'll earn -200 Honor.
Honor is influenced by the good deeds you do, the crimes you commit and the way you handle the choices you are faced with, such as whether you capture or kill a bounty target. Honor affects how NPCs interact with you. A player with high Honor will earn store discounts in most towns and receive more money for completing jobs and bounties. Bonuses bestowed upon a player with low Honor include being able to bribe witnesses for less and discounts when buying from shopkeepers in Thieves' Landing.
 Shoot Walton dead or once in the legs to capture him. |
When the mission is complete, loot the corpses of your fallen enemies for ammo and money by standing over them and pressing the Y/Triangle button. Be sure to open the lockbox in Pleasance House as well.
You can fast travel back to Armadillo or MacFarlane's Ranch if you set up camp. To set up camp, press the Back/Select button to open your Satchel, then press RB/R1 to select the Kit section of the inventory and use the Basic Campsite item. When the campsite is set, move down to the 'Travel to Destination' option and use the Left Stick to select one of the locations you've previously visited.
Capturing Walton
Justice in Pike's Basin
One of Marshal Johnson's deputies has spotted the cattle-rustling Bollard Gang in Pike's Basin. You must accompany the Marshal there and clear them out.
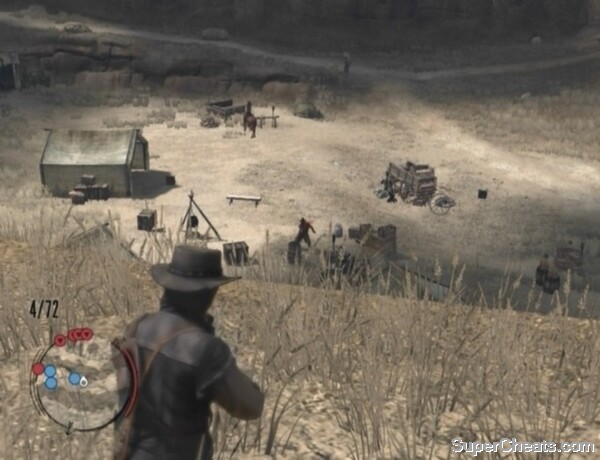
Hop on your horse and start following Johnson toward Pike's Basin. When you reach the place, move forward while keeping an eye on the Mini Map. When the path curves to the left, you should notice several red blips appear on the map. Immediately take cover behind the boulder to your left (approach the boulder and press RB/R1 to enter cover) and start picking off the first few outlaws with your Repeater Carbine. Four outlaws are hiding behind the boulders up ahead and a fifth is perched on the large rock formation. The rifles in Red Dead Redemption boast considerable range, so you should be able to take all of these guys out from your current position.
When the first batch of outlaws has been dealt with, you can either take the left path to assist the two deputies or the right path to assist Johnson. It doesn't matter which path you take, as both lead to the same place. If only for the sake of following this walkthrough, go with Johnson.
 Fight your way to the Bollard Gang's hideout. |
Take cover behind the boulder a few steps up the ridge and blast the two gang members when they pop out from cover further up. Take the time to loot one of these fallen enemies by approaching one of their corpses and pressing the Y/Triangle button when prompted. Do this to discover the Bollard Twins outfit. You can't don this outfit until you've collected all of the scraps needed to craft it. You can view a list of the items needed to craft any of the outfits you've discovered by interacting with the wardrobe in one of your safe houses. Refer to the 'Outfits' section of this guide for a complete listing of outfits and where to find everything needed to craft them.
Continue forward, taking cover behind one of the boulders along the ridge to protect yourself from enemy gunfire, and you will soon come to a small camp. Kill the three enemies at the camp, then move in, collect the fallen enemies' Repeater Ammo and open the two containers to find some cash.
Regroup with Johnson and press on. Johnson will call out a couple of snipers; they're both on the ridge across the bridge. These guys are deadly accurate, so sprint to one of the boulders further up and take out both of them with your Repeater Carbine.
Cross the first bridge and take cover behind the boulders between the two bridges. There are two outlaws across the second bridge, so kill them both from behind cover before sprinting across. Wait to regroup with Johnson and the deputies once across the second bridge. Crouch (click the Left Stick) and follow Johnson toward the Bollard Gang's main encampment.
 Fire down at the outlaws from the ridge. |
Each of the gang members below is marked on the Mini Map by a red blip. Kill as many of the outlaws as you can from the ridge before moving down to clear the rest out.
Wipe out all of the Bollard Gang members marked on the Mini Map to complete the mission. Be sure to collect all of the fallen enemies' ammo, loot each corpse and open the container in each of the three tents to earn some cash.
Spare the Rod, Spoil the Bandit
Get on your horse and go with Johnson and his deputies to search for a group of bandits. Follow Johnson and you will soon come to a campsite, which will be marked on the Mini Map with a yellow blip. Approach the camp to trigger a cutscene, during which Marston will pick up a Winchester Repeater.
After the cutscene, get back on your horse and continue following Johnson. You'll come to a second campsite before heading to Ridgewood Farm. When you reach Ridgewood Farm, search the shed and outhouse, which will both be marked on the Mini Map by a yellow blip. You'll have to dismount your horse to search the outhouse. With that, join Johnson at the barn and shoot the four boards on the door to trigger another cutscene.
You must fight your way into the house and rescue the two hostages on the second floor. Start by switching back to your Winchester Repeater after the cutscene and sprint toward the house. There is an outlaw posted on the outer walkway on the second floor of the house, so take him out as you approach. Once he's down, sprint to the left side of the house and take cover by the logs stacked there. Blast the outlaws from behind cover as they step onto the porch.
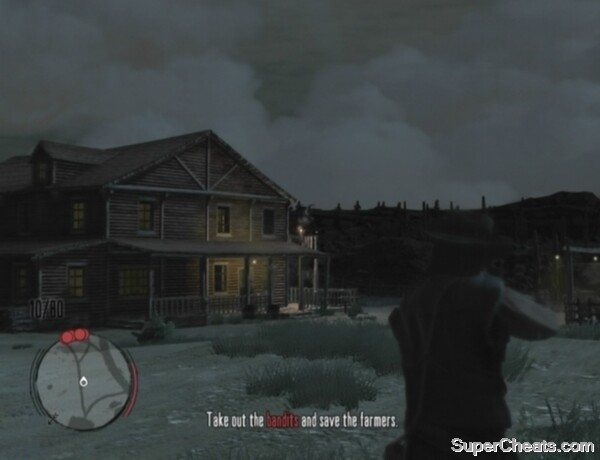 Rescue the farmers being held hostage inside the house. |
Move out from cover and enter the house when there are only four blips left on the Mini Map. The two red blips with black arrows on them denote enemies that are upstairs. Both of these enemies have a hostage, but leave them be for now and focus on taking down the two enemies in the kitchen. One of the enemies will take cover by the doorway into the kitchen and occasionally peek his head out; headshot him when you can and then enter the kitchen. Charge the Revolver-wielding outlaw in the kitchen and perform an execution kill by pressing RT/R2 while close to him.
When the downstairs is clear, head upstairs and take cover by the first door on your right. Peek into the room and blast the outlaw when he turns around. The hostage is on her knees by the window at the back of the room, so be careful not to shoot her.
The second hostage is through the closed door two doors down the walkway. Be careful here, as the hostage-taker will execute his hostage if you don't kill him quickly enough. You'll fail the mission if a hostage is killed, so take it slow. Hold LT/L2 to free aim and move into the door to push it open. As soon as the door is open and you see the outlaw and hostage, click the Right Stick to activate Dead Eye and then shoot the hostage-taker in the head.
Once you've rescued both hostages, exit the house and join Johnson and the deputies by the shed.
Rescuing the hostages
Mount your horse after the cutscene and start following Johnson. You'll trigger another cutscene when you reach Mercer Station. You'll face two waves of bandits here, each first arriving on horseback. Remain behind cover and try to kill as many bandits as you can while they're riding in. Shoot the remaining bandits as they pop out from cover to fire. Release the LT/L2 button if you're taking too much damage and stay down until your health is restored.
Kill all of the bandits in the onslaught to complete the mission.
Hanging Bonnie MacFarlane
Complete 'The Burning' in Bonnie's mission line to unlock this mission. Williamson's men have captured Bonnie and want to trade her for Norman Deek, the man you took prisoner at the end your previous mission with Johnson.
The trade will take place in Tumbleweed, which is quite a ways from Armadillo, so get on your horse and start following Johnson. Tumbleweed is across the bridge you'll come to soon after entering Gaptooth Ridge.
 Move Norman Deek into town to make the trade. |
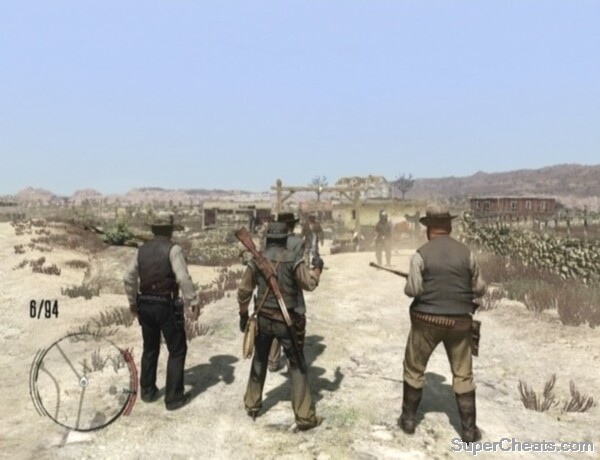
When you regain control over Marston in Tumbleweed, walk behind Deek to move him into town. The deal goes bad, as these things so often do, and the outlaws in the town open fire. Kill one of the three outlaws standing in front of you and then back up and take cover behind the boulder to your left. Equip your Winchester Repeater and start picking off enemies as they scramble for cover. Take down the enemy posted on top of the church to your right first.
Once you've killed the first batch of outlaws, move to one of the boulders further up and take cover to protect yourself from enemy gunfire. Take out as many enemies from behind this cover as you can before moving up to a boulder closer to town.
Move from cover to cover to get closer to the blue blip on the Mini Map, which denotes Bonnie's location. When you're about halfway to Bonnie a cutscene will trigger, showing Bonnie with a noose around her neck and a man kicking a stool out from under her. You must cut Bonnie free before she suffocates.
If you have Dead Eye Level 2 (unlocked by completing 'You Shall Not Give False Testimony, Except for Profit' in Nigel West Dickens' mission line), you can free Bonnie by activating Dead Eye, moving the cursor over the rope she is hanging from to tag it and then pressing RT/R2 to shoot it. You can shoot the rope without Dead Eye Level 2, but it will be more difficult to do so.
You can free Bonnie just as well without using Dead Eye. When you regain control over Marston, ignore the remaining enemies and sprint to Bonnie. Don't just make a beeline toward her, but rather run in a wide arc to the right to avoid the outlaws in the middle of town. Marston will automatically free Bonnie when you reach her.
Take cover in the house south of Bonnie and help your allies kill the remaining outlaws. When the town is clear, approach Bonnie to cut her hands free and complete the mission.
Rescuing Bonnie from the outlaws
The Assault on Fort Mercer
To unlock this mission, you must complete 'The Sport of Kings, and Liars' in Nigel West Dickens' mission line, 'Let the Dead Bury Their Dead' in Seth Briars' mission line, and 'On Shaky's Ground' in Irish's mission line.
Be sure to purchase a couple of things of Medicine before setting out on this one. You can buy Medicine at the Doctor's office in Armadillo. Meet Marshal Johnson and the others at the 'M' marker outside of Fort Mercer when you're ready to get started.
In the first stage of the assault, Nigel will drive his wagon into the fort and put on a show to distract the outlaws inside. When Nigel gives the cue, Marston will then surprise the outlaws by opening up the back of the wagon to reveal himself and the Gatling gun. You'll retake control over Marston at this point, putting you in control of the very powerful Gatling gun.
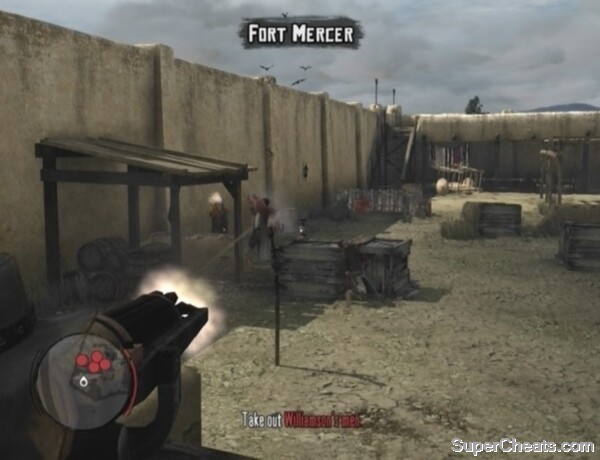 Use the Gatling gun to decimate Williamson's army. |
The Gatling gun has infinite ammo and doesn't need reloading, allowing you to easily decimate Bill Williamson's army. Take advantage of the various TNT crates scattered about the area; shoot a crate when there are enemies near it and you'll likely kill them. Each red blip on the Mini Map denotes an outlaw, so look to the Mini Map to determine where enemies are coming from. Kill as many of the outlaws as you can while they're scrambling for cover. It's easiest to kill these enemies as they are entering the area, so turn to face incoming enemies when you notice red blips appear on the Mini Map or spot enemies moving along the fort wall to get to the stairs.
Though the Gatling gun is very powerful, using it does leave you vulnerable because you are unable to move around while doing so. As such, if you're taking a lot of damage and are close to death, use Medicine to instantly restore your health. To use Medicine, open your satchel (by pressing the Back/Select button) and then select the Medicine in the Consumables section by pressing the A/X button.
Once you've cleared all of the enemies in the courtyard, follow Johnson and the others up the steps at the other end of the yard to reach the fort walls. Equip your Winchester Repeater and take out any outlaws marked on the Mini Map. There are plenty of crates and barrels scattered along the wall, so enter cover if need be.
When you've made it to the other end of the wall and have killed all of the enemies on the Mini Map, regroup with Johnson and the others, who will be marked on the Mini Map by a blue blip. After the cutscene, you'll once again be in control of the Gatling gun, which has been mounted on the fort wall to fend off the approaching enemy reinforcements.
 Make use of TNT crates near enemies. |
Most of the enemy reinforcements will come in on foot, but there will be some on horseback and a couple on wagons. There are several crates of TNT scattered about the area, so take advantage of this when enemies are near them. Both of the enemy wagons is equipped with a Gatling gun is carrying a TNT crate, so just keep spraying these wagons with bullets until they explode. Restore your health with Medicine if you're taking a lot of damage and are close to death.
Defend Fort Mercer against the enemy reinforcements to complete the mission.
How to win 5 finger mini games
Love this game, the missions are kinda missed together so that the only sad part.
I Love this game!!! takes you back to a time when a Man was a real Man!!. wish they had a second one made for xbox 360 and i dont mean the undead one, i didnt care for that particular game myself.
Dickens not Dickson
There's no proper list of missions that is in a logical order,they're all mixed up. The M marker for Fort mercer won't appear.I'm sick of this stupid game.I've done the race for Dickson.