Tactical Plan
Overlord 2 Walkthrough and Guide
Overlord 2 Guide - Walkthrough
Tactical Plan
Each Mistress offers a different Minion mount, which become available at various points during this quest. With Kelda set as your First Mistress, she will provide Wolves for your Brown Minions, while Juno provides Spiders for your Green Minions, and Fay provides Salamanders for your Red Minions.
Your choice won't have too much of an impact on the quest, but Kelda's Wolves or Fay's Salamanders are the better of the choices due to their utility in battle. Wolves are needed to reach the Dark Crystal in the Empire Hills area, but even if you don't choose Kelda to start with, you can always return to the Netherworld and change your First Mistress mid-quest. You can find your Mistresses in the tower at the northeast end of the Private Quarters. For the sake of following this walkthrough, consider choosing Fay's Salamanders to start with.
Also, if you have any free Spell Catalysts kicking around in the Magic Room of the Private Quarters, upgrade the Target spell as much as possible, as doing so will make the final battle much less tedious.
Task: Take the first hill
Use the Minion Gates at the starting point to create a horde consisting of Browns, Reds, and Blues. If you chose Kelda as your First Mistress and thus have access to Wolves, most of your Horde should consist of Browns. If you chose Fay as your First Mistress and thus have access to Salamanders, call forth more Reds than you normally would (at least 15). If you chose Juno as your First Mistress, you may want to consider returning to the Netherworld for a swap, because the Spiders she provides don't seem to be the least bit useful.
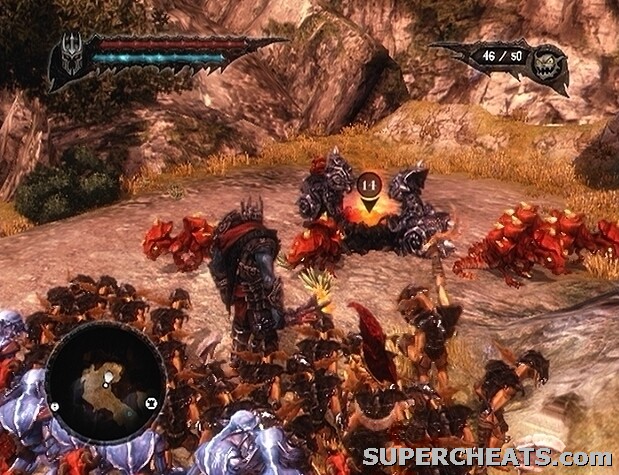 The Minion mounts available during this quest depend on who you have set as your First Mistress back in the Netherworld. |
You'll find a Minion mount gate along the path east of the Netherworld Gate. Summon some mounts, have your Minions of the corresponding colour hop on, and continue down the path. When you reach the pit with the working slave, kill the Legionnaires there, and then sweep your Browns into the tent at the top of the slope at the other end. There are some archers positioned along the side of the pit, so take them out as well.
The first hill is just beyond the slave dig site. There are some archers on the hill equipped with fire arrows, so be especially careful. Throughout this quest, try to avoid having your Minions stand in tall grass, as archers can set fire to the grass and roast them.
If you chose Fay's Salamanders, use the Right Stick to roll them below the archers on the hill and with any luck, they'll soon be taken care. You can disrupt the legion formation by sweeping your Browns in, but keep your mounted Reds on the sidelines to spit fire at the soldiers. If you have Kelda's Wolves, you can sweep them into the legion formation to hopefully create a gap, and then sweep those Wolves over to the archers to tear them up before they can cause more damage.
Task: Shoot boulders to repel the attacking waves
Once your Minions have set the Tower Heart in place, a Netherworld Catapult will appear. Use the Catapult to prevent the legions approaching from the north from reaching the hill. If one of the legions manages to cross the bridge and reach the hill, you will have to fight them up close. Be sure to destroy the archer towers to the north and east. Continue to launch boulders and crush the approaching troops until the task clear message appears onscreen.
 Use the Netherworld Catapult to destroy the archer towers to the north and east. |
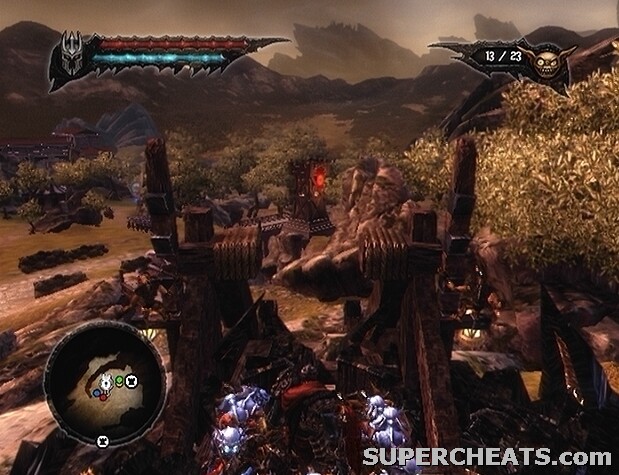
Task: Get a Catapult onto the second hill
There is another Minion mount gate by the bridge beyond the hill, so use it to summon more mounts if you lost any while taking the first hill. There's a Spell Catalyst in the northeast corner of this field guarded by a Gargantuan, so be sure to collect it on your way to the second hill. Individual soldiers will continuously spawn from the tent near the Spell Catalyst, so sweep your Minions in to destroy it.
Cross the bridge below the eastern archer tower. There are bombers on the hill in the middle of this area; the ramp up onto this hill is on the other side, so quickly make your way around the hill, up the ramp, and onto the hill to attack the bombers. Keep an eye out for thrown bombs while on the hill, and sweep your Minions away to avoid losing them.
Proceed up the steps beyond the Minion Gates. There's a legion formation blocking the way out of this area. Set all of your Minions on a Guard Flag, select your Blue Minions, and tap the B/Circle button to call one Blue Minion to your side. Stand on the platform to the right of the legion formation, and lock onto one of the bombs in the pile behind the formation. While locked-on to the bomb, press the RT/R2 button to send your Blue Minion through the formation to pick it up. Blues have the ability to Blink through enemy units, so he shouldn't be attacked. When the Blue Minion picks up the bomb, use the Right Stick to drop it behind the formation. Repeat if necessary.
 Send a Blue Minion through the legion formation to pick up a bomb, and use the Right Stick to drop it behind the soldiers. |
Fight your way to the second hill and send your Minions into the tent there to stop the soldiers from spawning. A Netherworld Catapult will appear on the hill once the Tower Heart has been set in place.
Task: Flatten the opposition
Send some Minions in to power the Catapult, then make your way up onto the highlighted steering platform and take control. First, use the Catapult to crush the archers behind the rock barriers. The Empire will then send three war machines toward the hill. Each siege tower requires two or three hits to destroy. Just don't charge each launch for too long, because even if the boulder lands a bit in front of the target, it will most likely roll and still do damage.
Once the three siege towers have been levelled, before leaving the Catapult, turn toward the grassy field to the north, fully-charge the Catapult, and release to kill the archers along the wall there. These archers are equipped with flaming arrows, and can set fire to the grass and roast your Minions if you aren't careful. It is best to take them out with the Catapult to avoid this loss.
The Dark Crystal nearby requires Wolves to reach. If you don't have Kelda set as your First Mistress, use the Waypoint Gate by the second Catapult to return to the Netherworld Tower. Once in the Netherworld, set Kelda as your First Mistress; you can find her in the tower in the northeast corner of the Private Quarters with the other Mistresses.
Use the Minion mount gate in the grassy field to summon some Wolves. Destroy the barrier to the east; be extremely careful here, as there are bombers along the walls. Set all but your mounted Browns (press the RB/R1 button and tap Y/Triangle twice) on a Guard Flag and sweep them to the legion formation by the rock wall. When the bombers throw bombs at your Minions, immediately call them back. With any luck, the bombs will go off and wipe out the soldiers.
With the formation out of the way, sweep your mounted Browns to the rock barrier at the top of the steps and wait for the bombers to throw some bombs nearby before calling them back. When the rock barrier has been demolished, kill the bombers along the wall, and then send your mounted Browns across the gap to attack the bombers there. The Dark Crystal is by the rocks on the platform across the gap; send one of your mounted Browns over to collect it.
 Use Kelda's Wolves to reach the Dark Crystal on the platform across the gap. |
Collect the Health Upgrade along the wall as well.
Task: Get a Catapult onto the third hill
Smash the barrier at the east end of the area and start south toward the third hill. There's a rock barrier by the fort in the southwest corner of the field; you'll need to tempt the Catapult stationed in the fort to launch an explosive projectile at the barrier to blow it up.
It is best to designate just one of your Minions as bait to avoid putting yourself and the rest of your horde in danger. While standing at the front door of the fort, set all of your Minions on a Guard Flag, lock onto the flag, and press the B/Circle button to call one back to your side. Then, sweep that Minion around the corner to the rock barrier and set him on a Guard Flag. When you hear the Catapult launch and the projectile explode, call your Minions off of the Guard Flag, have five of them pick up the Tower Heart, and head down the steps beyond the ruined barrier to reach the back door of the fort.
Use one of your Minions to carry one of the bombs at the bottom of the steps up to the door to blow it open. Once in the fort, kill the soldiers around the Catapult to complete the task.
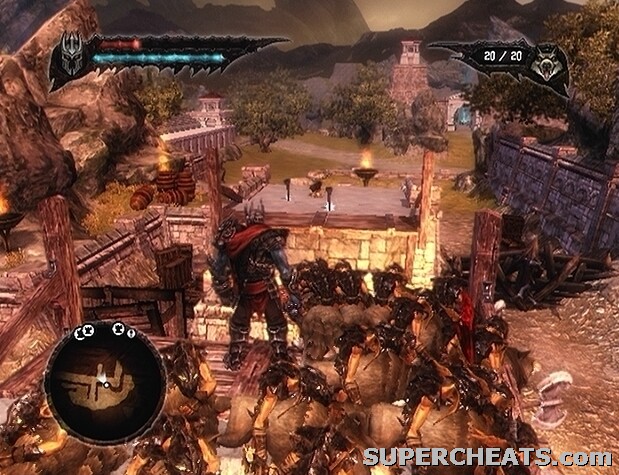
Task: Use the Tower Heart to breach the city wall
Send 10 of your Minions into the Netherworld Catapult to power it, walk up to the steering platform, and take control. Launch the Tower Heart at the Empire City gate to blast it open.
 Use the Netherworld Catapult to launch the Tower Heart at the city wall. |
Task: Deal with the last of the defenders
Use the Catapult to launch explosive projectiles at the legions marching out of the ruined gate, as well as the archer towers along the walls. If any of the troops reach the platform, you'll have to fight them off at close range, so try to kill them before they reach the fort.
I cant take the cataclysts in tactical plan i have try every thing
My blues won't pick up the bombs behind the soldiers help plz?
I can send them there but they wont pick it up
You have to have the mistress who's mounts you want selected as your head mistress in order to get her mounts.
omg plz help me i chooze fay for mounts cause personally salamanders are indeed the usefullest but i cant summon em :S
plz help me what i do wrong?
could it be because my tower is not dressed in fulle fay or not?
Hi i think your walkthroughs are really really helpful i used them on several occasions especially the gnome quest that was really good so yeah carry on doing walkthroughs and doing what you do best =P bye!