08: Looking for Lois
Operation Flashpoint: Dragon Rising Walkthrough and Guide
Operation Flashpoint: Dragon Rising Guide - Walkthrough
Mission Eight: Looking for Lois
Summary:
This is a beast of a level whereby we, as Saber Two, have to extract a USMC team taken prisoner by the PLA. We have to locate and then break the POWs out of a convoy as they are being moved away from the front line in this conflict. From there we need to get to the extraction point safely.
Walkthrough:
Primary Objective 1: Rendezvous with POWs:
First off, set your team to Fire on My Lead. Next, move towards the RV point. Once you get within about 70 metres of it, someone in your squad should have spotted the two snipers, holding position right on the RV point. At about 40 metres you should be able to see them yourself. They are facing the other way, so you can get this close without being spotted. Ensure you are crouched and, once you have a clear shot, pick off whichever sniper is easiest. You could use a grenade from your rifle's launcher, as this will clear out both enemies, but it also blows up the ammo crate within. If you choose the explosive option, flank round so you can fire it through the door. If not, take out the first sniper, and your team will then go weapons free and take out the other.
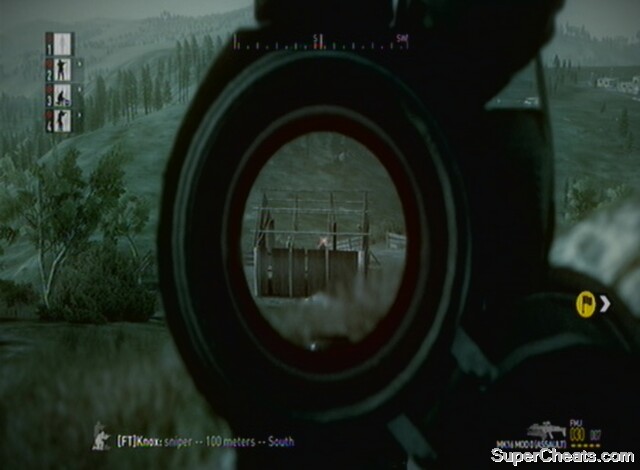 Take out both snipers |
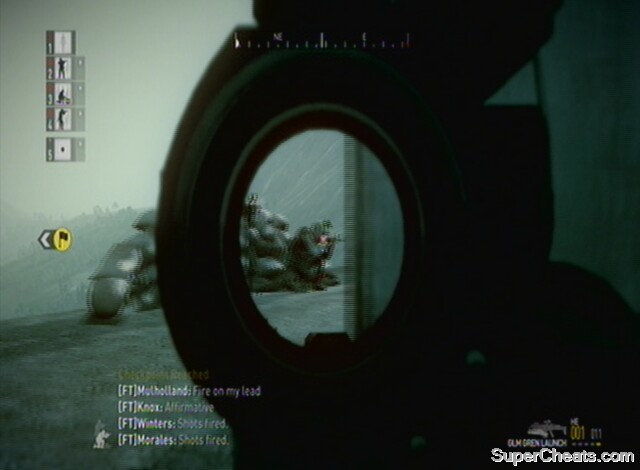
Scavenge the QBZ95 Marksman from one of the snipers, and then get even more ammo for it from the ammo crate inside the hut, if you didn't destroy it. This will be more than enough ammo for the rest of the mission. From here, sprint to the next RV point. Ignore the activity at the base to the south-west, as we won't be going in that direction. Continue on to the RV point as well. This is where the POWs are. They have armed themselves, ever resourceful as the USMC are, so get into a flanking position and go and help your allies out. The PLA are pretty low to the ground, using the ruins for cover, so make sure you don't walk on them as you are searching. Move in and take them out, using your squad to assault them.
Help out the POWs and integrate them into your squad
Primary Objective 2: Extract POWs
Secondary Objective 1: Remain undetected until the end of the valley
As before, with the helicopter crew, the POWs are now your fifth team member. Set them to follow you. Also, put your team to Return Fire Only so they don't draw unnecessary attention. This is a difficult period of the game, where we are basically running away from the PLA as fast as we can. Unfortunately, they will be dropping in Spec Ops teams via helicopter to chase you down. Once you pass through the next RV point, you will see a helicopter landing. Curve away from it to the west, while still heading for the next RV point. They can't sprint any more than you, so as long as you get a bit of a head-start and don't stop for too long at once, you can outrun them. Just be aware when fighting enemies ahead, that you may have to deal with some behind too. You could engage them as soon as they land (or try to shoot them down), but more teams are en route, and time is of the essence. Also, there is a secondary objective for remaining undetected, which you may well want to get. You should be able to make it the long distance to the next RV marker without having to fire a shot. Once there though, proceed onwards with caution.
Ahead is an emplacement staffed by a pair of enemy rifleman (one may be out of sight). Once close enough, pick the first off with a headshot, and the other will come into range. Do the same to him. If you managed to remain undetected throughout this valley up to this point, you will complete a secondary objective. This makes everything easier, as you now have a good head start on the PLA teams.
Towards the next RV marker, about 100 metres out, you'll see a farmhouse and get a checkpoint activated. There are two guards out of sight to the northern end, and, if you managed to remain undetected, the will be unaware of you sneaking up on them and so are facing out onto the valley. Head to the left (west) of the farmhouse. To the right around the corner of the building are the enemy, so ready your weapon (a grenade from your under-rifle launcher is good here) and take them both out on sight.
 Deal with these guards, and prepare to be hit from both sides by PLA squad |
By this stage the PLA Spec-Ops team are probably pretty close to you. It is worth defending this location until you clear the immediate area. Set half your squad to defend the rear of the building (keep the POWs safe, but they can look after themselves to some degree) and the others to mount the gun emplacement heading north and defend that end. An enemy squad is inbound from that direction too. Use the map to keep an eye on both sides of your position. Once both sides are clear, sprint to the next RV marker. You can make it all the way there without seeing any PLA, so do this to activate a checkpoint. Remember to make sure your entire squad are following you, including the POWs!
The end of the level is near now, but it's no walk in the park. Head up the hill towards the next RV marker, and you'll come in sight of the base. Unfortunately, rather than using the empty ruins that we just passed for extraction, HQ have decided to use an enemy base. So we need to clear it, keep the POWs alive, and then extract. Once at the top of the hill, survey the scene and check your map. You have two real options here. You can either assault the base with your entire squad, including the POWs for their extra firepower, but will almost certainly lose some of them as a result, or, if you want the achievement for rescuing every one of the POWs, you are advised to put them in the woods somewhere safe, and head into the base supported by your squad members alone. This is what I recommend for this section. Note that there is a video for the move to the base, dealing with the PLA and securing the area for extraction below.
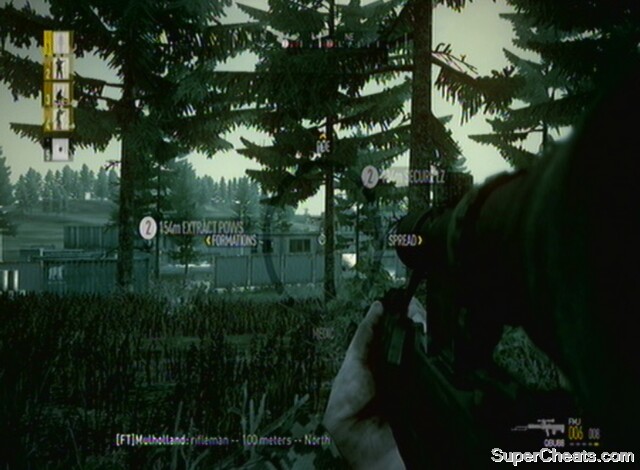 Move up to the base stealthily |
Secondary Objective 2: Clear the landing zone before further reinforcements arrive:
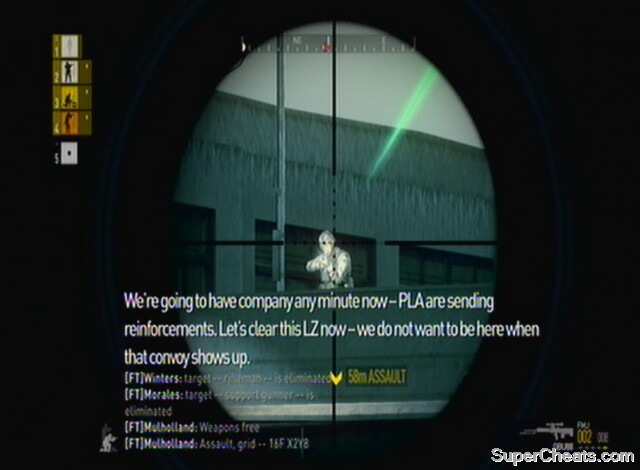
Ensure your entire team is set to Return Fire Only, or Fire On My Lead, as we're going for a stealthy approach here. Gather everyone near the RV point. Stick to the trees and you can comfortably get within around 100 metres of it without being spotted. Leave the POWs here, in the dip in terrain so out of sight. In the example video below I had them come in a couple of minutes later to the holding position, just in case it was too hot around the base. Move forward so you are within range of the PLA you can see in the base, and set your team (that is your usual three squad members, not the POWs) to weapons free. Now all hell will break loose. Use your map to direct your squad into the base as you pick off anyone you can see from range. Time is important here, as enemy reinforcements will arrive if you take too long. You don't need to rush, necessarily, just don't dawdle.
Keep a particular eye out in the upper windows of buildings, as there are enemy snipers in the base. Once near the centre of the depot, order your squad to assault the main building. The AI are far better at assaulting buildings than human players, though you may lose a couple of your team in this encounter. Cover your team's backs from enemy riflemen as they assault the building, and once the text 'LZ Secured' appears at the bottom of the screen, feel free to order the POWs to 'Move Fast' to the extraction point. The helicopter will now arrive, and you can order everyone left surviving on board.
Attack and secure the base, and extract the POWs
Achievement/Trophy: Heroic Rescue (Successfully extract the hostages) Bronze/20G
Achievement: Perfect Rescue (Successfully extract all the hostages – note that you also get the Heroic Rescue achievement for this) Silver/30G
Extras:
This level again, has no vehicles in (except helicopters that you can't get a hold of). The only section where you really have free reign is in the choice whether to remain undetected in the valley or not. You can feel free to shoot down the Spec-Ops helicopters as they come in, and hold up at the farmhouse to have a stand-off with the PLA. Once you get to the base at the end, you can try to snipe the inhabitants from range, but it will take you longer to get there after the alarm is raised, meaning there is a greater chance of reinforcements coming in.
 Pick off the snipers before they do the same to you! |
You can have some fun with the reinforcements though. Try laying mines and setting an ambush for them.
"This level again, has no vehicles in (except helicopters that you can't get a hold of)."
There are actually 2 APCs in Skoje Village.
Why is it that when I clear out the LZ, the POWs dont go into the helicopter. This has happened everytime at the end. Everyone else in my team is in the helicopter and the POWs either stay still or start to roam around. I have failed this mission everytime because of this.
The route suggested in this guide is very risky. There are too many variable spawn points for enemies in the valley. There is an alternative and safer route, through the mountains. First off, take the sniper rifle from the first set of guards you encounter. Once you meet up with POW's, backtrack up the mountain to where you started the mission. Procced to a small house east of the insertion point. Sometimes a PLA spec ops squad will spawn at the top of the ridge and fire down at you. Deal with them accordingly, keeping the POW's behind the house. Head north and make a b-line for the extraction area. Once you reach the final summit overlooking the port, take out your rifle and pick enemies off from a distance. You can tell your medic and machinegunner to flank the port, taking the POW's with them, or keep everyone with you. Move in with your FT and POW's to finish off any survivors (some will be inside, so you HL grenades for your launcher may come in handy). Move methodically and precisely, with the POW's and one of your squad with you (medic), and your other two mates at a good distance ahead to blaze the trail and scout. You will complete the mission, and achieve the secondary objective as long as you take the back-route. Hope this helps - best of luck. blindfire 111 - Xbox 360
If you go over the mountain range there will be 2 PLA and a Jeep that you can use to drive you to the White Fang Complex. This will help you avoid the PLA as well as get there faster.