Save Our Boat
Monster Hunter Tri Walkthrough and Guide
Save Our Boat
Hunting Quest: Hunt a Royal Ludroth
Unlock: Complete 'Playing with Fire'
Reward: 2000z
Contract: 200z
Time: 50 min.
Area: Flooded Forest
Subquest A: Deliver 1 Wyvern Tear
Reward: 800z
Subquest B: Slay 5 Ludroth
Reward: 600z
As its name suggests, the Royal Ludroth shares much in common with the smaller Ludroth you've encountered in previous quests. The two monsters have similar move sets and both can fight underwater and on land, however the Royal Ludroth is much stronger and faster than the Ludroth, and has several powerful new moves.
This beast is tough at this stage of the game, so be sure to prepare well before departing. Health items are a must and at least one trap would come in handy. To produce a Mega Potion, first combine a Herb and a Blue Mushroom to make a Potion and then combine the Potion with Honey to make the Mega Potion. You can make a basic Pitfall Trap by combining a Spider Web with Ivy to make a Net and then combining the Net with a Trap Tool (buyable at the market) to make the trap. You can make a Shock Trap by combining a Thunderbug with a Trap Tool.
If you happen to have any Waterblock Seeds in your Item Box, bring those along too.
The Royal Ludroth is in Area 4 to start. If this is your first time attempting this quest, he will remain in Area 4 until you enter the area and watch the short video sequence. If you have attempted this quest before, it is best to head directly to Area 2 and wait there for the Royal Ludroth to appear, as there are only Felyne to worry about in Area 2 and things can get hectic in Area 4. Felyne become quite aggressive when one of their own takes damage. Angered Felyne target hunters almost exclusively, so steer clear of any you see carrying a barrel bomb.
 Royal Ludroth is the larger, male variant of the Ludroth. |
Completing Subquest B requires killing five Ludroth. There are Ludroth in Area 1, 4 and 8. Kill the two Ludroth in Area 1 at the start, as it will take some time for your target to make his way to Area 2. The remaining three Ludroth can be dealt with while you're facing the Royal Ludroth in Area 4 or 8.
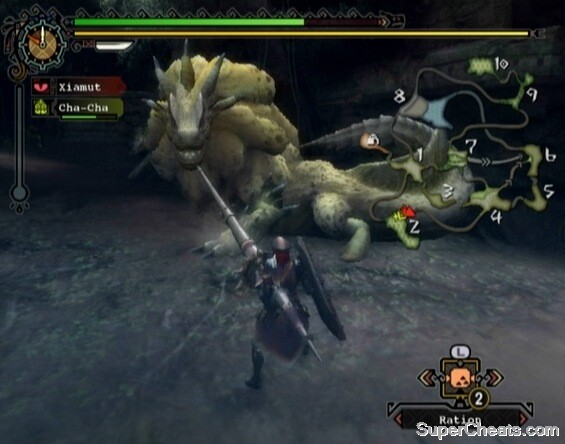
When the Royal Ludroth enters Area 2, dash over to him and begin attacking his spongy mane. The Royal Ludroth won't attack straight away when he first spots you, so take the opportunity to get some easy hits in. Step or roll to the side after he roars to avoid his claw swipe.
The areas to concentrate your attacks on are his head, mane, torso and tail. Start by focusing your attacks on his tail. The Royal Ludroth's tail can be cut off if you damage it enough (unless you're using a Hammer, of course). Cutting off a monster's tail has several advantages. Most importantly, shortening a monster's tail will lessen the effectiveness of attacks in which they use their tail, such as the standard tail whip. Secondly, you can carve one item from a cut tail. Carving a monster's tail is the only way to obtain certain materials; just be sure the monster has left the area before you get to carving! Lastly, in some cases cutting the monster's tail is required to complete a subquest.
Once you've removed the Royal Ludroth's tail, focus your attacks on his mane. You can wound his mane if you attack it enough. The Royal Ludroth's mane will appear tattered once wounded and he leave a glittering spot on the ground. Gather at this spot to find an item. The item you find will most likely be a Dash Extract, but it could be the Wyvern Tear you need to deliver to complete Subquest B. If you find a Wyvern Tear, be sure to deposit it in the Delivery Box at Base Camp before finishing the Royal Ludroth. As well, you can break the crest on the Royal Ludroth's head to gain additional loot at the reward screen.
The Royal Ludroth has a couple of powerful attacks that can be difficult to anticipate. Perhaps the most irritating is his roll. When he lifts his head and one of his front legs and shakes his mane, he will then roll to the side once. He lifts his tail when he rolls, so this attack will most likely miss you if you're at his backend. You are very vulnerable to this move while attacking the Royal Ludroth's mane from the side. If you have a weapon that can block, avoiding taking damage from this attack is simple; just be ready to block when attacking him from the side. If you're using a weapon that cannot block, be ready to roll or step toward his tail when you see him begin to lift his head.
 Aim your attacks at the Royal Ludroth's spongy mane. |
One move similar to the roll is a long-range attack in which the Royal Ludroth throws himself toward you and rolls twice. Again, this is an easy attack to avoid if you're wielding a weapon that can block. Be ready to block when the Royal Ludroth takes a step to the side and positions himself horizontally to you. Roll or step to the side if your weapon cannot block to avoid taking damage.
Another of the Royal Ludroth's attacks is a close-range body slam. The Royal Ludroth stands on his hind legs for a moment and falls back down on his stomach. This attack is easy to avoid with a roll to the side or a block. It's best to attack from the side to avoid this close-range attack as well as his claw swipe. The Royal Ludroth also has a long-range pounce similar to the body slam. This move, too, is easy to anticipate. When he lowers his head, he will then pounce forward, so block, roll or step to the side to avoid being hit.
Royal Ludroth also has a tail whip move. This attack becomes significantly less effective once you've managed to cut his tail. This attack has considerable range and deals quite a bit of damage. When he wraps his head to one side and his tail to the other, he will then whip his tail back around to his other side. Blocking this attack can be tricky depending on your positioning, as his tail curves when he whips it, allowing him to hit your hunter in the back. The Royal Ludroth can also whip you with his tail when you're standing directly behind him. He will lift his tail, look over his shoulder and then swing his tail twice from side to side. Block, roll or step toward his torso to avoid taking damage.
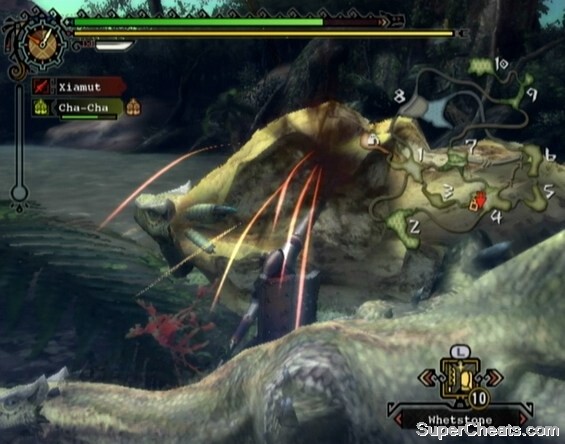
The Royal Ludroth also has a couple of projectile attack in his arsenal. These projectiles inflict Severe Waterblight, an annoying status ailment that slows your hunter's stamina recovery rate. Consuming a Waterblock Seed will cure this status ailment, although the effect doesn't last long, so just tough it out if you don't have the cure.
 Cut Royal Ludroth's tail to reduce the effectiveness of his tail whip attack. |
Avoiding these projectiles is easy. When the Royal Ludroth stands on his hind legs and remains there (as distinct from his body slam attack), he will either spit out a single watery projectile in front of him, or three separate projectiles at different spots several feet in front of him. These projectiles may leave a water trap where they land; steer clear of this residue, as your hunter will suffer from Severe Waterblight if you touch one of these traps. If you're close enough to the Royal Ludroth, his attacks won't be able to reach you, and you can run around and use this opportunity attack his tail. If you're far enough in front of him to be hit by one of the projectiles, block the attack or roll to the side to avoid it.
The Royal Ludroth has an extended projectile attack as well. During this attack, he charges straight ahead, spitting water bombs to his left and right as he goes by. When he reaches the other end of the area, he may turn and charge in a different direction. The best way to avoid this attack is to sheath your weapon and just dash around the area to keep your distance, as his movement during this attack is unpredictable.
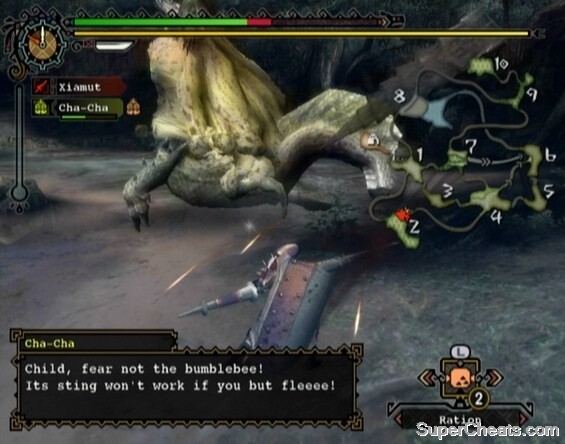
When Royal Ludroth is ready to leave Area 2, he will most likely go for Area 4. There are three Ludroth in Area 4, so things can get a bit hectic here. Try your best to ignore them, although if you have a strong enough weapon, you could likely kill one in just a few hits.
When the Royal Ludroth's stamina is low, as indicated by his deflated mane and drooling mouth, he will dive into the water at the north end of Area 4. Underwater, he has a few attacks at his disposal. These attacks are, for the most part, easy to anticipate and subsequently avoid or block. When he opens his mouth and extends his neck, he is about to propel himself forward. Block with your weapon or swim to the side to avoid taking damage. The Royal Ludroth can also spit projectiles underwater; when he reels his head to the side, block or dash to dodge the incoming projectile. While facing forward, Royal Ludroth may swing his tail upward. This attack is very easy to avoid if you've removed his tail.
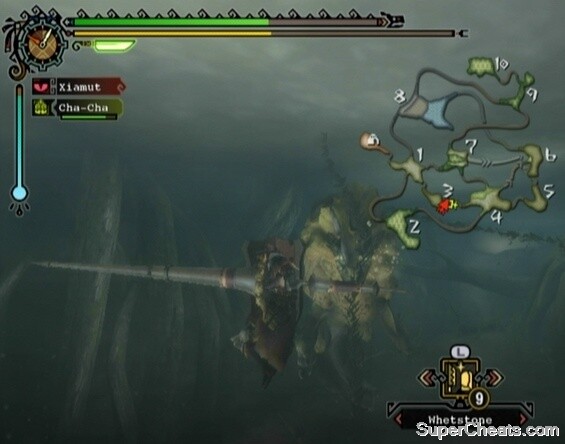 When Royal Ludroth's stamina is low, you'll have to face him underwater. |
Avoid remaining in front of Royal Ludroth when facing him underwater. You can avoid most of his attacks underwater by just keeping to his side. Focus on attacking his mane just as you were on land. Be careful, however, as you can take damage when Royal Ludroth swims forward if you're too close.
When close to death, Royal Ludroth will retreat to Area 8 to rest. If you are in Area 3, 5, or 6, he may use an underwater tunnel inaccessible to hunters to jump straight to Area 8. When this happens, swim through to Area 1. If you found a Wyvern Tear after breaking the Royal Ludroth's mane, take the time now to stop by Base Camp and deposit the Wyvern Tear in the Delivery Box to complete Subquest B.
Once in Area 8, drop down from the ledge to the area below. The Royal Ludroth will most likely be sleeping at the north end of this patch of land. Use this opportunity to get some easy hits in. After waking, the Royal Ludroth will most likely dive into the water in Area 8, so follow him in and finish him off. There are some Ludroth in this area as well, but they are easy enough to avoid.
When Royal Ludroth is dead, you can carve his corpse three times.
Hunting the Royal Ludroth
More Monster Hunter Tri Stuff
i used the bowgun use flamings and crag poison works to i like peirce tho good for breaking his manei also used jaggi armor
How do you kill the Royal Lundroth?? Ive tried over and over again and cant kill it. im playing offline.
This guild saved my butt when i tried that damn "save our boat" quest. Thanks man.
Throw sonic bomb underwater and you can get the wyren tear.
it took me twice, but after bringing a bunch of potions, it wasn't so hard after all. it's because i use a hammer, so blocking/dodging is harder and he hits me faster
I've checked a dozen help sites and watched a dozen videos and tried the quest six times and still can't get it.... The "trapping a trickster" quests went haywire when a RATHIAN APPEARED!!! Believe you me I was confused and ultimately unhappy when it killed my prey.. But this is worse! I'm hoping it won't take many more tries... Thd wiimote and nunchuck seem to have fused to my hands.... But the one thing this guide had that the others didn't was the part about cutting the tail off (surprisingly).... So maybe I can do it this time...
now we r playin w/water
its harder than it looks
not really, on my first try i broke everything possible on him, but when I went to use my potions, then realized I forgot to grab them. i had rugged great jaggi sword, jaggi helm, rhenoplos chest, and bone legs and boots.