- September 20
Dead Rising Walkthrough and Guide
Dead Rising Guide - Scoops
September 20th Scoops
Lovers
The Hatchet Man
The Coward
Restaurant Man
Above The Law
Mark of the Sniper
The Woman Who Didn't Make It
Antique Lover
Lovers
This scoop can conflict with the second case if you take too much time to defeat Carlito. If you are trying to complete all of the scoops as well as the cases, a good time to attempt this one is right after the Medicine Run case mission. This is very tough to do, even more so if you wish to save Heather and Pamela Tompkins as well. The strategy below is written with the assumption that you are attempting to complete this scoop after having defeated Steven.
You're in the North Plaza now. The North Plaza is connected to Wonderland Plaza; look to the mall map to orient yourself if need be. Enter Wonderland Plaza, and visit the book store where Tanya and Ross can be found. Talk to both of them. When Ross asks for a gun, DO NOT give it to him! He'll just use it to kill himself, and Tonya will then refuse to follow you. When he asks for the gun, just start talking to Tonya and eventually she should agree to go with you, but you'll have to carry Ross, as he is severely injured.
 Look for Tonya and Ross inside of the “Run Like the Wind” shoe store in Wonderland Plaza. |
Assuming you have defeated Adam the Clown, pick up Ross and make your way to the ladies room at the north end of the plaza. Once there, take shortcut to Paradise Plaza. You'll have to equip Tonya with a weapon, since there will surely be droves of zombies in your path. If you still have a Katana from your encounter with Steven, hand it over to Tonya.
By the time you reach Paradise Plaza, two women named Pamela Tompkins and Heather Tompkins may have spawned there. Saving Ross, Tonya, Pamela and Heather is ridiculously tough, in part due to terrible AI. If Pamela and Heather have not spawned in Paradise Plaza by the time you get there with Ross and Tonya, count yourself lucky, as they will likely spawn on your next trip through the plaza when you have more time to spare.
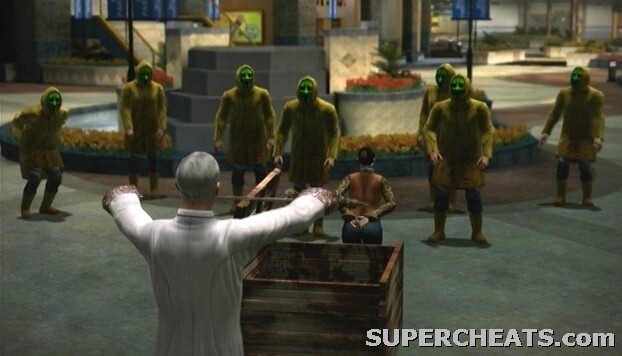
If Pamela and Heather have spawned in the plaza and you want to attempt to rescue all four survivors, you may have a difficult time of it. When you first reach Paradise Plaza via the Wonderland Plaza shortcut, tell Ross and Tonya to wait in the restroom. Pamela is likely in the middle of a pack of zombies, so the only chance you really have to rescue her is by throwing down a Queen. Heather should be in the Child's Play store on the lower level, while Pamela is outside surrounded by a pack of zombies.
 This is going to be tough... |
If you managed to save both of the women, lead them to the restroom where the other survivors are waiting. Take the stairs to the right of the ladies' room up and follow it around to pass a large group of zombies on the lower level of the plaza. Put down Ross for a moment and clear the zombies on the stairs that lead back to ground floor.
Lead all four survivors back to the Security Room to earn a massive amount of PP. Then, head into the main room to end the second case.
The Hatchet Man
You should receive a call from Otis concerning a strange man in a hardware store at around 8:00AM. You will probably receive this call while searching for the medicine for Brad. Ignore the scoop at this point; leave it alone until you reach case 4.
Once you have advanced to the fourth case, you'll have a few hours to kill until the next case begins. At this point, you should have enough time to finish The Hatchet Man scoop, as well as The Restaurant Man scoop if complete them at the same time. The Hatchet Man takes place in Crislip's Home Saloon, which is located in the North Plaza. Before leaving Paradise Plaza, be sure to grab the Katana on the awning outside of the Colombian Roastmasters restaurant on the upper level of the plaza. Take some Orange Juice with you as well.
The quickest way to the North Plaza is through Leisure Park. Have The Hatchet Man scoop selected and follow the arrow to the North Plaza entrance. Upon entering the North Plaza, turn right to spot the entrance to Crislip's Home Saloon.
Since you're in the North Plaza, stop by the Huntin' Shack, which isn't too far from Crislip's, and take a Shotgun from the rack behind the counter. Even if you didn't kill Cletus on the first day, he should no longer be there at this point. If Cletus is there, however, you'll have to do without a Shotgun, which means you may have a tougher time with psychopath battle connected to this scoop.
When you're ready to get started, step into the hardware store to encounter Cliff.
PSYCHOPATH: Cliff Hudson
If you followed the instructions above, you should have a Katana and a Shotgun going into this fight. Cliff is deadly with his machete, and can knock off a couple of blocks of health per strike. For this reason, you'll have to be especially careful when facing him.
 Crazy and wielding a machete. Never a good thing. |
The best time to weaken Cliff is at the start of the battle, right after the cutscene. With Katana in hand, turn around to spot Cliff, run toward him, and slash him once. Never slash Cliff twice in a row, as he will just block the second attack and deal some damage to you. So, if your swipe connects, immediately backtrack or jump away to avoid his retaliation. Cliff is adept at close-ranged combat, so you don't want to be standing in one place for too long. After his retaliatory strike misses, run back in, slash him again, and move back out. Repeat this until he flees.
Cliff will likely remain attacking you in this fashion long enough for you to drain at least half of his health bar. He will eventually flee. Cliff uses trap doors to quickly and deceptively move through the store, which can be a problem. If you have a Shotgun, chase after Cliff as he makes his way to one of the trap doors and blast him. Cliff should cease running and turn back to fight you if a shot connects. Don't bother taking the time to aim with the Right Trigger, just point Frank in Cliff's direction and fire. As Cliff nears, switch back to your Katana and repeat the strategy described above.
In the event that Cliff does manage to jump through one of the trap doors, you will have to go on the defensive. It's nearly impossible to know where he will pop up, as there are trap doors all over the store. At this point, you can climb up onto one of the shelves to get a good overview of the store in anticipation of Cliff's appearance. The shelves by aisle one seem to offer the best view, so climb up the low stack of boxes against the shelf, then jump to grab hold of the top of the shelf and climb up.
 Cliff uses trap doors to quickly move around the store. |
While atop one of the shelves, scan the store in an effort to spot Cliff. If you remain on the floor, Cliff will likely take to one of the shelves and lob pipe bombs down toward you. These pipe bombs are quite damaging, so for this reason it is integral that you prevent him from climbing onto one of the shelves in the store. Atop a shelf is the first place Cliff will usually go upon emerging from trap doors. However, if you are standing on one of the shelves as well, he won't remain there for long.
If at any point you run low on health, wait until Cliff takes to one of the trap doors before consuming a food item.
Repeat the strategy described above until Cliff falls.
Cliff leaves you with the Empty Store Key, which is used to unlock the store outside of Crislip's. Grab the machete before leaving Crislip's, and then use the key to open up the empty store just outside to find three survivors. You'll probably want to grab the Survival Book on the floor here, as it increases the effectiveness of food items by 100%.
If you want to attempt it, you can take these survivors across Leisure Park, but you'll have to make it past the convicts. It is fairly easy to make it from the North Plaza entrance to the Paradise Plaza entrance while avoiding the convicts by hugging the wall along the northwest end of the park, but you can use the Wonderland Plaza shortcut instead if you wish.
 Look for Barbara, Rich, and Josh in the empty store next to Crislip's after defeating Cliff. |
If you have yet to complete The Restaurant Man scoop, consider picking up the survivor in Jill's Sandwiches on your way through Paradise Plaza. You will need to give him any type of food item before he'll follow. If you don't have a food item in your inventory at the moment, you can grab something from the Colombian Roastmasters restaurant on the upper level of the plaza. Just be sure to command the survivors with you to wait in the restaurant until you return.
Once you're ready, lead the survivors back to the Security Room to rescue them.
If you happen to encounter the True Eye cult in Paradise Plaza, be sure to save the woman who has been captured by them. You'll have to kill all of the cultists around the plaza to save her. The cultists are quite tough, but if you have a Sledgehammer, tap and hold the X button while near a group of them. If you have a Shotgun, that works quite nicely as well. If you lack either weapon, use the Double Lariat attack instead (provided you've mastered it) by pressing up on the D-pad to drop your current weapon, and then clicking the Left Thumbstick and tapping the X button.
Be careful when facing the cultists, however, as if one manages to knock Frank out, he will be taken to their lair. At this point, it's quite likely that the survivors traveling with you will be lost. Also, if you're short on time, you could fail the current case. To avoid this, if spot one of the cult members slowly reaching into his pocket, dash away, because he will soon throw some dust into the air that can cause Frank to pass out.
 The True Eye cult first appear in Paradise Plaza around 2:00PM on the second day. |
If you don't want to risk it, it may be best to just leave the cult be and continue to the Security Room with the survivors already in your party.
The Coward
This scoop takes place in the Al Fresca Plaza. You should receive a call about the man in the hardware store there at around 9:00AM. The man is cowering behind the front desk in the McHardy's Hardware store. Hop over the desk and speak to him. At first, he refuses to follow. Press up on the D-pad to put away your current weapon, and then proceed punch him a few times. Eventually, the man will agree to follow Frank.
This scoop can be tough to fit in due to the cases and other scoops that run parallel with it. If this is your first playthrough, you may have to leave this scoop alone. Otherwise, you may be able to fit it in by heading to Al Fresca Plaza right after the third case ends, provided there's enough time left in The Hatchet Man scoop. Take the man through the Wonderland Plaza shortcut to both save time, and avoid the convicts in Leisure Park.
Restaurant Man
At around 11:00AM, Otis should call about a man in a restaurant in the Paradise Plaza. The survivor has barricaded himself in the Jill's Sandwiches restaurant. You have to bring him a food item and give it to him before he will agree to follow. Grab something from the Colombian Roastmasters restaurant on the upper level of the plaza if your inventory is currently empty. As Ronald consumes the food, take out your camera and get ready to take a picture of him when the PP icon appears above his head.
Since Ronald is so close to the Security Room, just pick him up the next time you're in Paradise Plaza and are headed for the Security Room.
 Snap a picture of Ronald after he consumes some food to earn a large amount of points. |
Above The Law
You should get a transmission about this scoop at around 3:00PM. On your way through Paradise Plaza, grab the Katana on the awning outside of the Colombian Roastmasters restaurant on the upper level. Grab some Orange Juice from the fridge while you're at it. If you're not going through Paradise Plaza, you can also get a Katana from Ripper's Blades, which is just outside of Seon's Food & Stuff in the North Plaza.
If you're starting in Paradise Plaza, you'll want to head through Leisure Park, and then through the Food Court to get to Wonderland Plaza. The arrow associated with this scoop may be pointing toward the Entrance Plaza, but take the Leisure Park route instead, since it's guaranteed to be much safer at this point in time.
If you haven't been to Wonderland Plaza in awhile, you will likely encounter two survivors hanging from the rabbit statue at the north end of the Plaza. A mess of zombies lies below the dangling survivors. You'll have to clear away most of the zombies here to save them; this can be accomplished easily if you happen to have a Queen in your inventory. If you don't have anything to use, try the Double Lariat attack (provided you are a high enough level to have it mastered), which is executed by pressing up on the D-pad, then clicking the Left Thumbstick and tapping the X button.
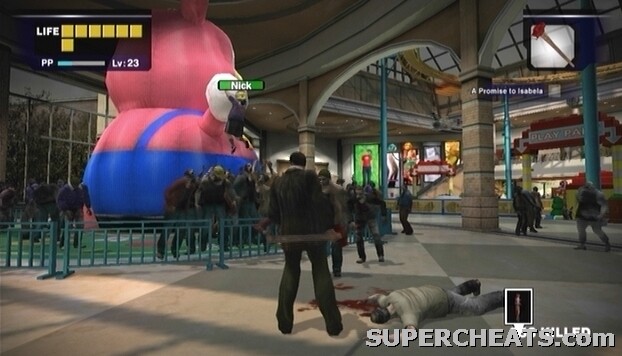 Rescue Sally and Nick before they become zombie chow. |
When most of the zombies surrounding Nick and Sally are gone, you can take a picture of each of them to receive 10,000 points apiece. Just stand behind them, switch to your camera, then zoom in and take the picture.
Afterwards, pick up a Hunk of Meat from the ground, hold RT, aim at one of the dangling survivors and press the X button to throw the meat to knock the survivor to the ground. Repeat with the other survivor, and then speak to both of them to have them join your party. Do not give either survivor a weapon at this point.
The Lovely Fashion House store is along the eastern walkway in Wonderland Plaza. Step inside here to trigger a cutscene.
PSYCHOPATH: Jo Slade
This is likely the easiest psychopath battle of Dead Rising. Have a Katana in your inventory (and optionally a Sledgehammer as well) and you're all set. You'll want to avoid using guns here, as melee weapons are much more effective.
Jo Slade, a large, female police officer, is holding four women captive in the Lovely Fashion House along the upper walkway on the east side of Wonderland Plaza. If you rescued Nick and Sally before going into this fight, as soon as you gain control over Frank after the cutscene, command them to stand in a corner so they remain out of danger. If they stay in the corner and do not do anything, Jo should not attack them. Make sure that you have not giving either of them a weapon, otherwise they may attempt to help by shooting Jo, which will turn her attention to them instead of you.
Jo is very slow when her attention is focused elsewhere. When she isn't chasing after Frank, she'll walk around the store and randomly kick and taser her captives. Jo's attacks are quite easy to avoid, but you'll take quite a bit of damage if one connects.
If Jo manages taser Frank, he will become incapacitated for about five seconds. While this state, Jo will walk around the store and harm the women. She doesn't do very much damage, however. Once you are able to move again, her attention will quickly shift back to you. Jo also has a simple bludgeon attack as well. Her bludgeon is quite slowly executed, so you can usually hit her with a melee weapon to stagger her, interrupting the animation and preventing her from dealing any damage.
 A zap from Jo's taser will set Frank convulsing on the floor for several seconds. |
Though Jo is quite fast for her size, she can easily be avoided by running around the tables in the store. Avoid jumping up onto a table, as doing so causes Jo to take out her Handgun and fire several shots off.
The strategy to use here is simple: run around the store with Katana in hand, slash Jo once or twice, and then sprint away again to dodge her attack. In most cases, you won't want to hit Jo more than twice in a row, as that is usually enough time for her attack animation to fully complete. If you are tasered, once Frank is back on his feet, immediately run at Jo, slash her a couple of times while she is preoccupied, and then dash away.
Another way to win this fight is by running out of the store while Jo is in pursuit. Once you're outside, Jo will stop chasing after you, and turn her attention to one of her captives. At this point, run back into the store and hit her over the head with a Sledgehammer while her back is turned. Repeat as necessary.
Once Jo is dead, be sure to snap a photo of her corpse if you are interested in unlocking the achievements associated with taking pictures of psychopaths.
Jo drops a Handcuff Key, as well as her Stun Gun. Use the Handcuff Key to unlock each of the four girls' handcuffs. Once everyone is free, lead them to the ladies' room in Wonderland Plaza. If you didn't rescue Nick and Sally before fighting Jo, take the time to save them now if they have spawned. They'll be dangling from the giant rabbit statue at the north end of the plaza. Take the shortcut to Paradise Plaza, and then proceed to lead the survivors to the Security Room.
Mark of the Sniper
There are three different scoops that can all be completed in the Entrance Plaza at this time. These scoops are "Mark of the Sniper," "The Woman Who Didn't Make it" and "Antique Lover." You should receive a call from Otis about these scoops at around 4:00PM. If you haven't completed “Above the Law” yet, complete that scoop one first. Afterwards, if Otis had yet to inform you of one of the aforementioned scoops by 4:00PM, he should call in with it now.
According to Otis, a group of snipers has taken control of the Entrance Plaza. Before you enter the Entrance Plaza, make sure you have a Sledgehammer in your inventory. You can find a Sledgehammer on top of the shelves in the warehouse, from McHardy's Hardware in Al Fresca Plaza, or from Crislip's Home Saloon in the North Plaza.
PSYCHOPATH: Roger, Jack, and Thomas Hall
The Halls aren't very tough, but defeating them may take awhile, as they'll try to keep their distance from you for the majority of the fight. The Sniper Rifle that each Hall wields deals a pitiful amount of damage, and serve solely to stop Frank in his tracks more than anything.
 The Halls are armed with sniper rifles in the Entrance Plaza. |
When you gain control over Frank after the cutscene, turn around and head up the escalator to reach the walkway. Duck into the Shootingstar Sporting Goods store to the right. Take a Hockey Stick or two from the rack at the back of the store and then wait by the entrance until the Halls approach.
The Hall family is much more efficient as a group, so you'll need to split them up. More than likely, one of the Halls will run into the store after you. Each Hall will run if you get too close to him, but fortunately Frank can run faster. The best way to inflict enough damage to quickly deal with the Halls is by using the Sledgehammer. First, chase after one of the Halls to separate him from the others. Otherwise, if the other members of the family are too close by, they will likely shoot Frank, causing him to flinch and stop moving.
When you near the Hall you're chasing after, continue running until you are a few strides in front of him. Then, with Sledgehammer in hand, press and hold the X button to swing the weapon to the side, hopefully stunning your target. If you managed to halt the target, turn Frank towards him and immediately tap the X button to hit him with the Sledgehammer's primary attack. If the hit connects, it should knock off a large chunk of the target's health bar. Repeat this strategy until all three have fallen.
 Using a Hockey Stick to slap pucks at the Halls deals a fair amount of damage. |
As soon as you kill one of the Halls, take a second to snap a picture of his corpse. If you wait too long, the body will disappear. Each one member of the family counts toward the Psycho Collector achievement.
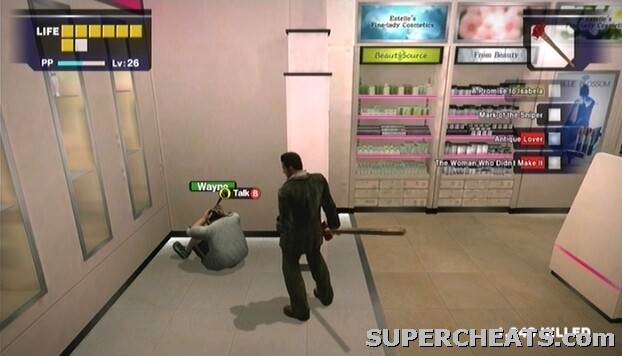
Once the Hall family has been dealt with, there are several survivors in the plaza that can be rescued. Wayne can be found in the cosmetics store at the top of the stairs. Jolie, the survivor from The Woman Who Didn't Make It scoop, can be found in the Gramma's Kids store on the ground floor of the plaza. Talk to her, then start to leave and she will follow you.
 Look for Wayne in the cosmetics store along the crossway across from the escalator. |
Lead Jolie up to the Ladies' Space clothing store along the walkway and gather her friend Rachel. Snap a picture of the two women when they hug to earn some points. Lastly, grab Floyd from the antique store along the walkway. After a short conversation, he'll agree to go with you. With all four survivors in tow, lead them through the Entrance Plaza, through Paradise Plaza, through the warehouse, and finally, to the Security Room.
The Woman Who Didn't Make It
Otis should call about a woman in a children's toy store in the Entrance Plaza at around 4:00PM. Save this woman after killing the psychopaths associated with the "Mark of the Sniper" scoop which also takes place in the Entrance Plaza.
Jolie can be found in the Gramma's Kids toy store on the lower level of the plaza. She believes her friend, Rachel, has been killed by zombies. She last saw Rachel in the Ladies' Space clothes store, which is also located in the Entrance Plaza. Attempt to leave the store and Jolie will join the group.
 Take a picture of the two girls when they embrace to earn a substantial amount of points. |
You'll have to lead Jolie up to the Ladies' Space store, which is located on the second floor of the plaza. If you travel there without Jolie, Rachel, who is hiding inside, will not listen to Frank. When the two reunite, take out your camera and be ready to snap a picture of them when they embrace. Speak to one of the girls afterwards to have Rachel join the group.
Antique Lover
You should receive a call from Otis about an unusually calm man in an antique store on the second floor of the Entrance Plaza at around 4:00PM. Save this man after killing the psychopaths associated with the "Mark of the Sniper" scoop, which also takes place in the Entrance Plaza.
 Look for Floyd in the corner of Ned's Knicknackery, which is located along the upper walkway of the Entrance Plaza. |
Floyd can be found in Ned's Knicknackery, which is located on the second floor of the plaza. After a rather long conversation, Floyd will eventually agree to go with you. Floyd can be carried, though he can walk just fine, so doing so isn't necessary.
Dead Rising Xbox 360 Index
No comments yet. Tell us what you think to be the first.